Messages
A Message contains all the configuration required to send, receive, and process a request.
Messages are central to the functionality of Unifi. A Message brings together the disparate parts necessary for the configuration required in order to send, receive and process a request.
Automated Creation of Trigger Business Rule
Unifi will automatically create a Trigger (Business Rule) for the Process being integrated (if one doesn't already exist) when you run 'Build' either on the Integration or Message once your Create Message is configured.
For step-by-step instructions on how to configure Messages (and other Integration components) see the Integration Guides section of the documentation.
Message Fields
Details
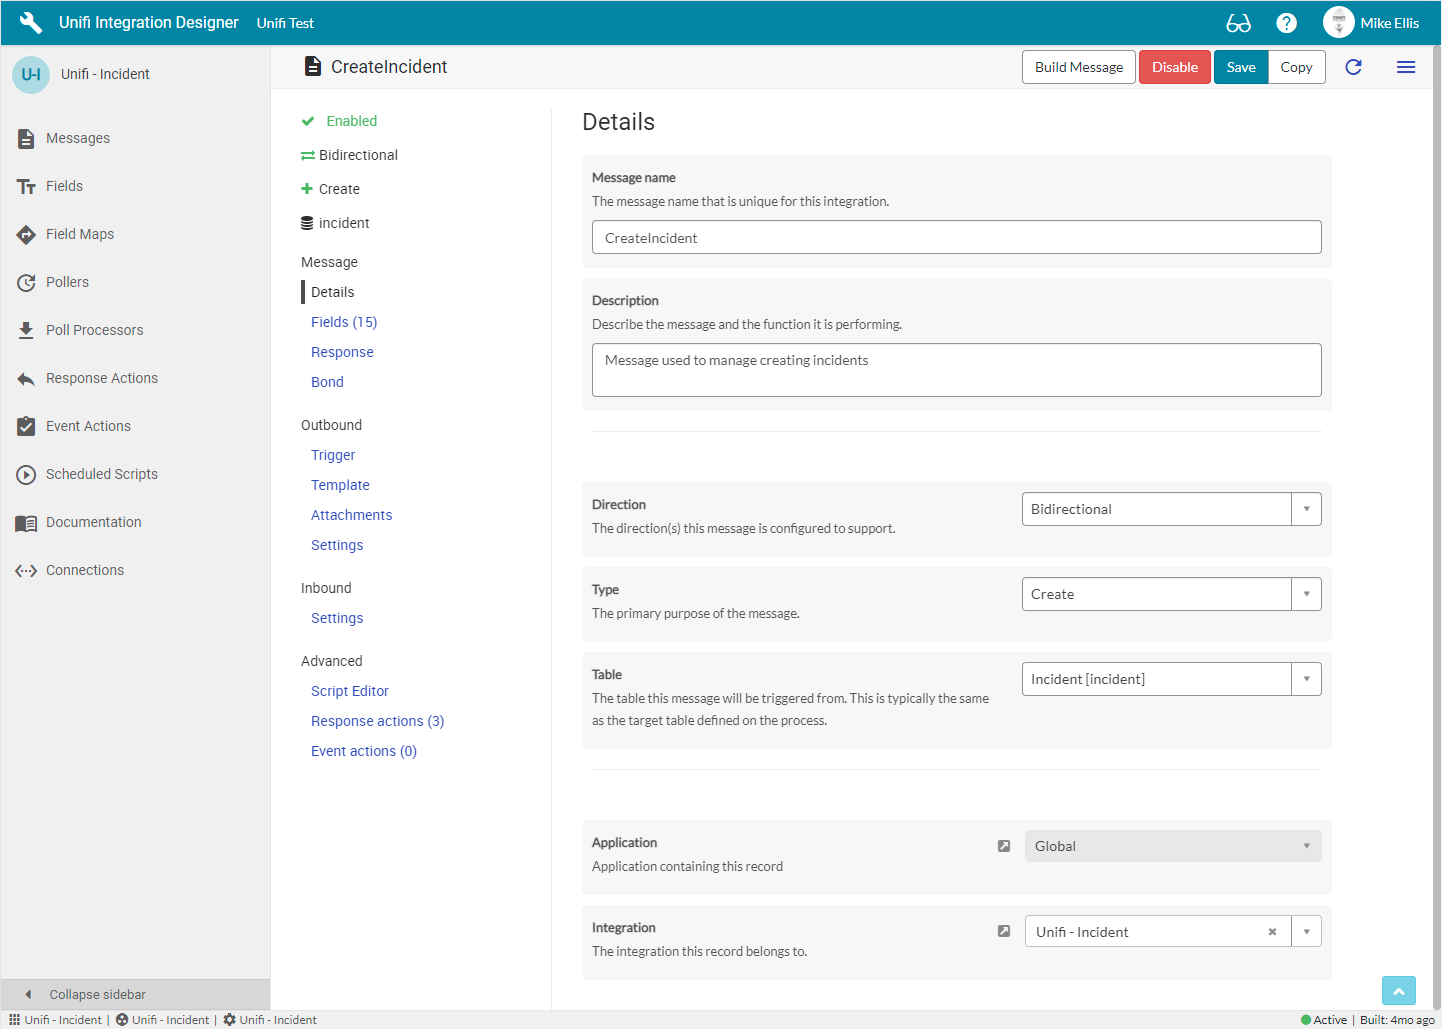
The Details fields to be configured for the Message record are as follows:
Message name
String
The message name that is unique for this integration.
Description
String
The description for this message and the requirement it is meeting.
Direction*
Choice
The direction(s) this message is configured to support.
Type
Choice
The primary purpose of the message.
Table
Table name
The table this message will be triggered from. This is typically the same as the target table defined on the process.
Application
Reference
The application containing this record.
Integration
Reference
The integration this record belongs to.
*Direction choices: Inbound, Outbound, or Bidirectional.
The 'Disable' button will set the Active flag to 'false'.
Fields
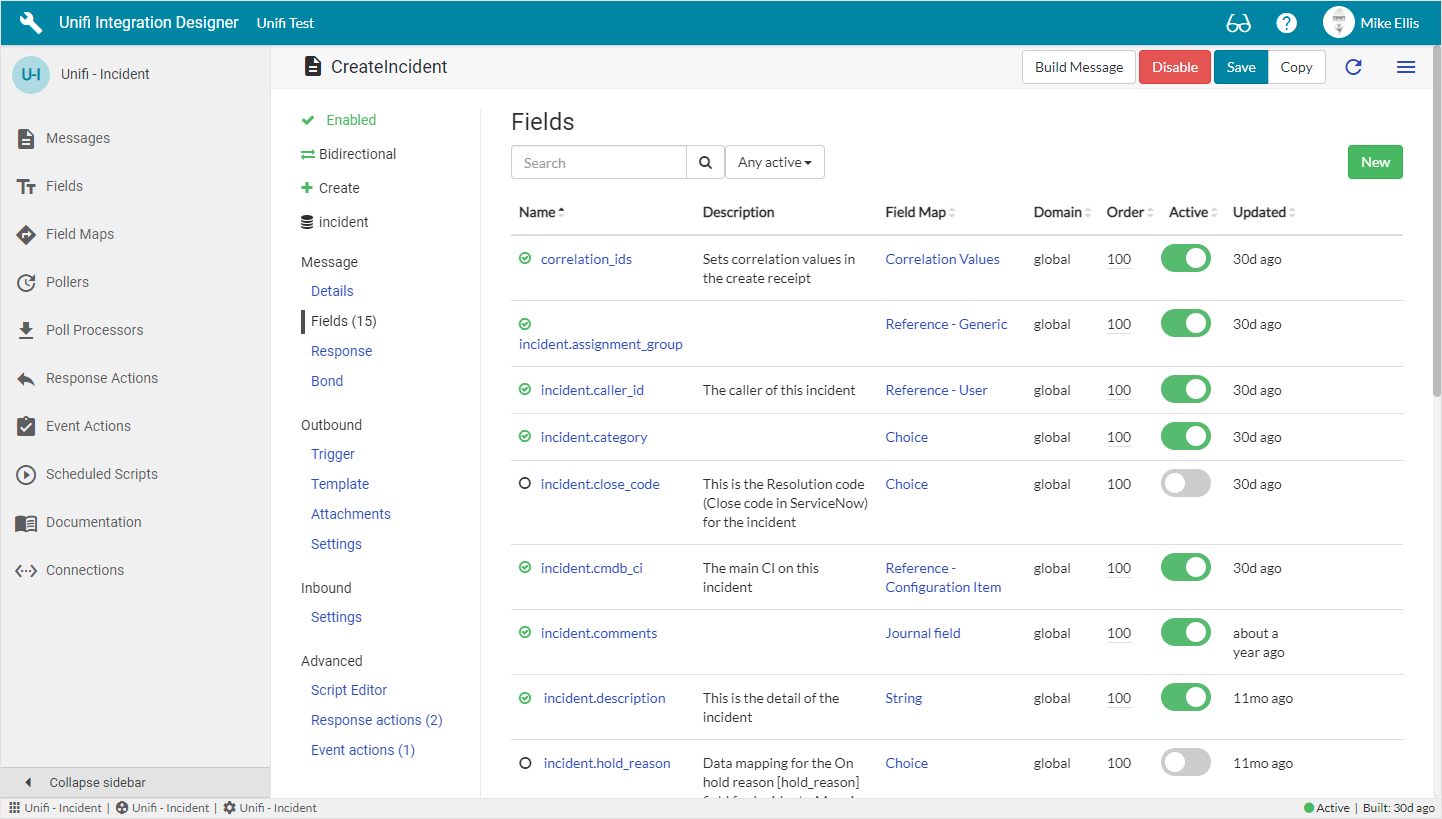
From here you can configure the relevant Field records for the Message. A list of the available and active Fields is displayed*. For more information about Field records click here.
*The Fields displayed in this list are automatically filtered based on the table referenced on the Message (so you will only see relevant Fields).
Response
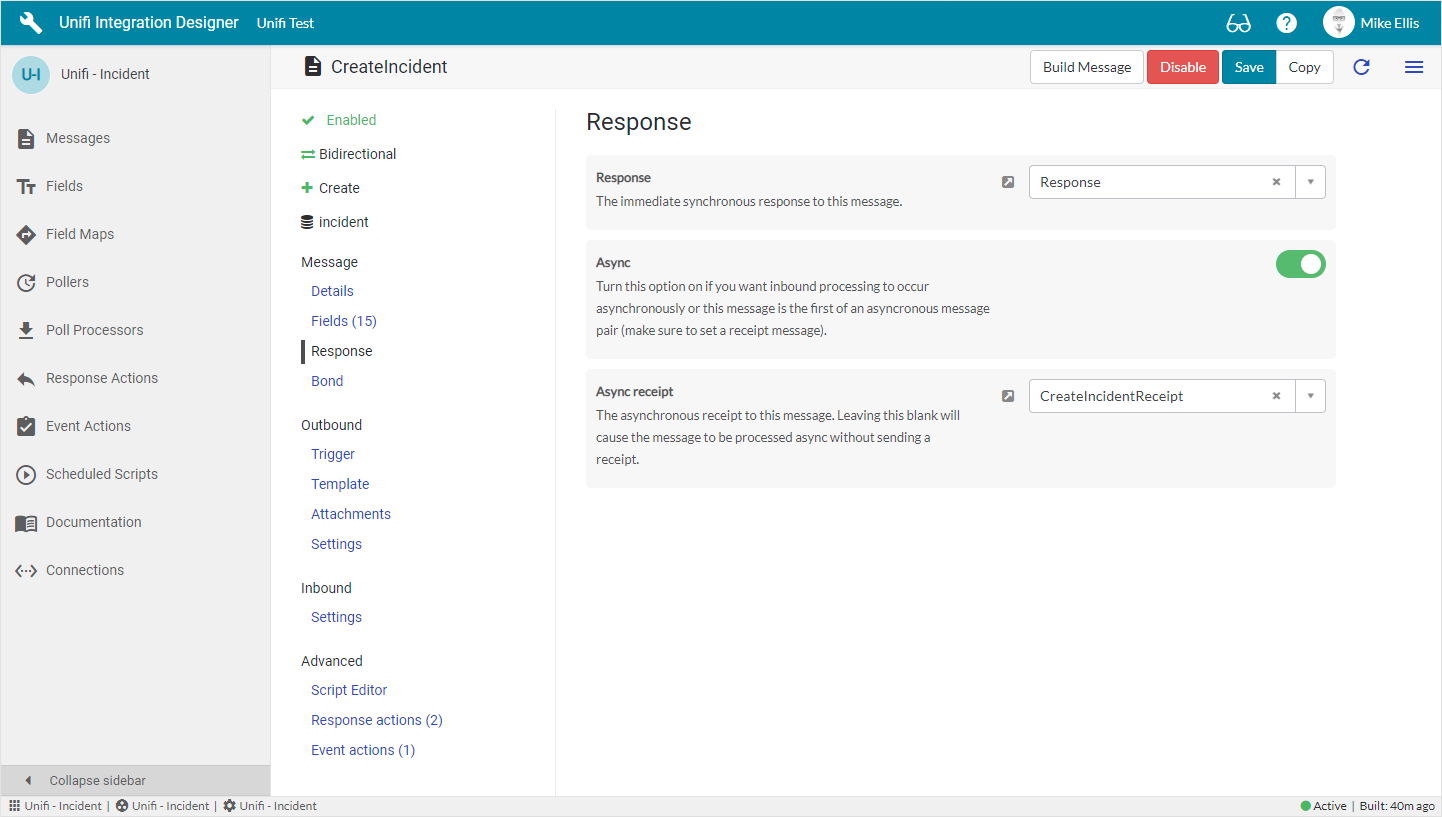
The Response fields to be configured for the Message record are as follows:
Response
Reference
The immediate synchronous response to this message.
Async
Boolean
Turn this option on if you want inbound processing to occur asynchronously or this message is the first of an asynchronous message pair (make sure to set a receipt message).
Async receipt
Reference
The asynchronous receipt to this message. Leaving this blank will cause the message to be processed asynchronously without sending a receipt.
Bond
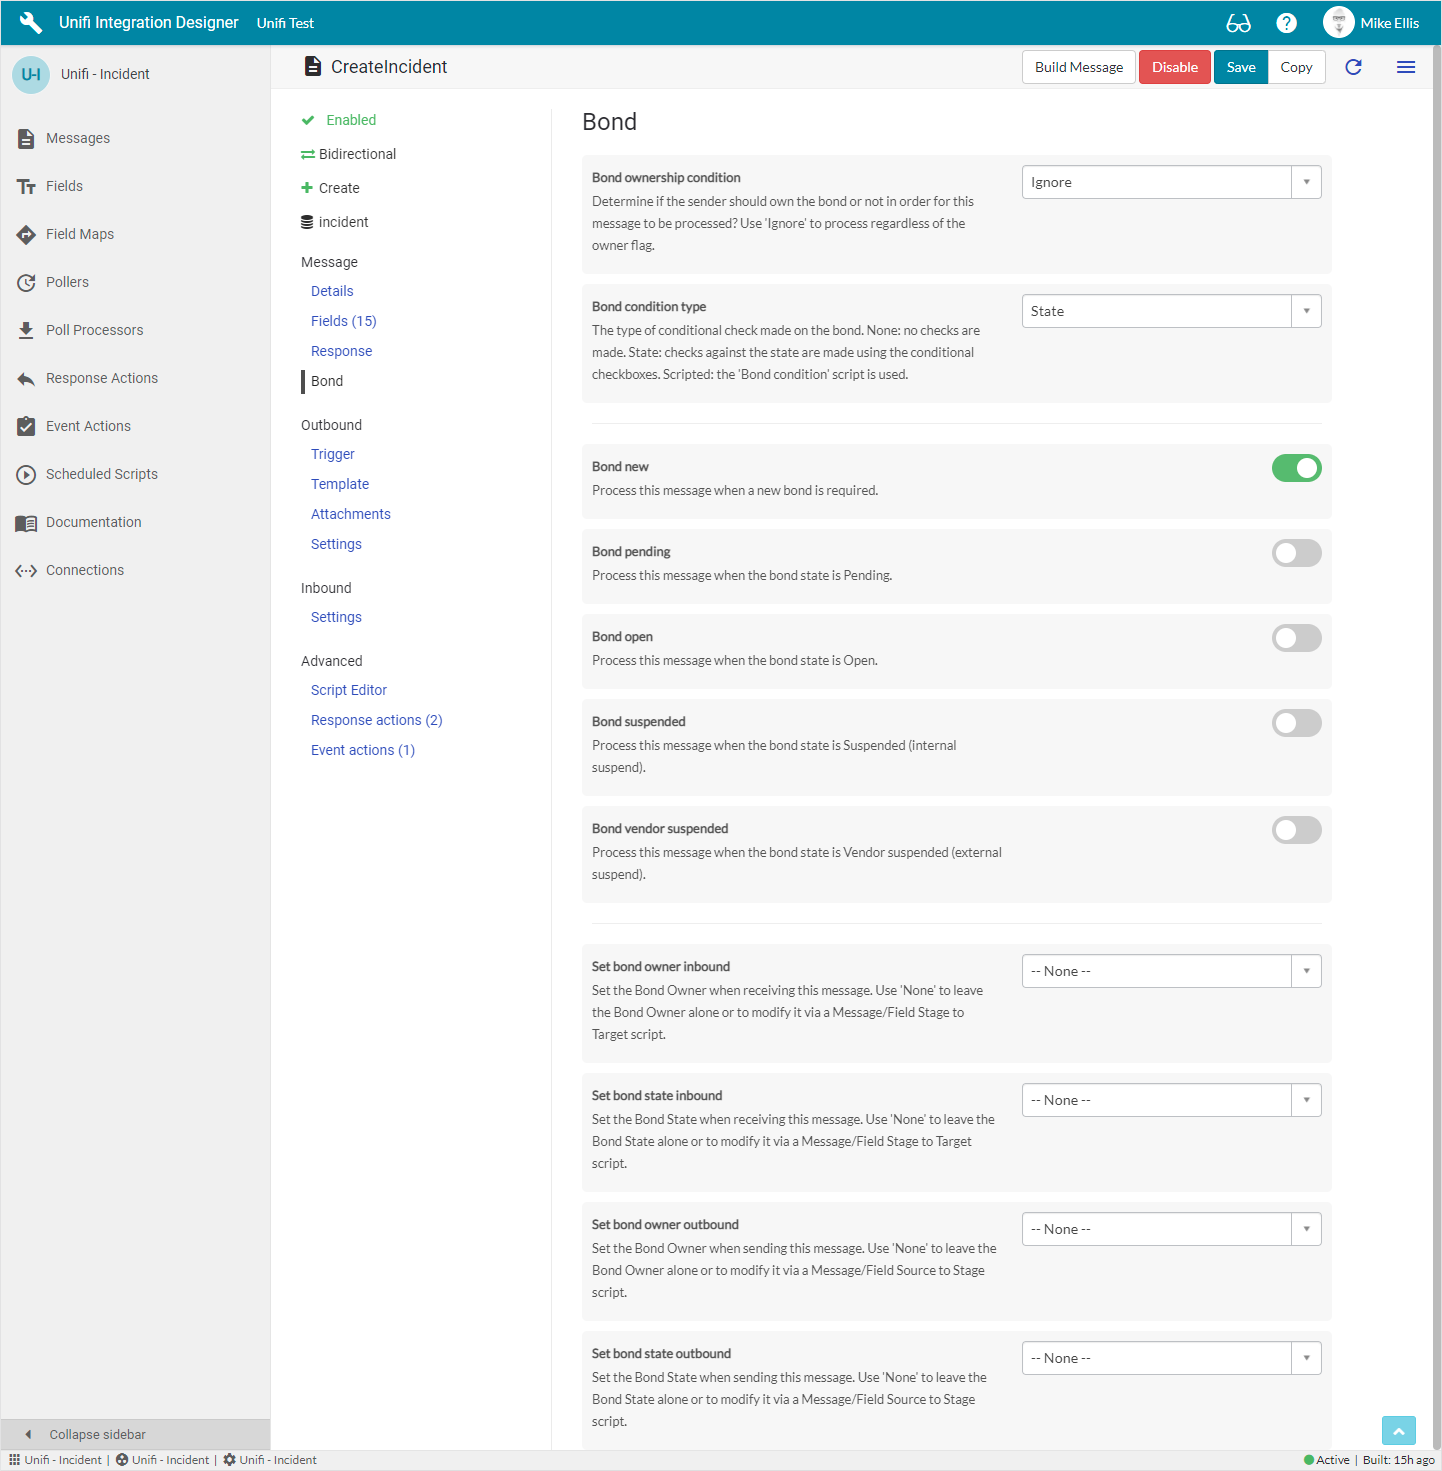
The Bond fields to be configured for the Message record are as follows:
Bond ownership condition*
String
Determine if the sender should own the bond or not in order for this message to be processed? Use ‘Ignore’ to process regardless of the owner flag.
Bond condition type
String
The type of conditional check made on the bond. None: no checks are made. State: checks against the state are made using the conditional checkboxes. Scripted: the ‘Bond condition script' is used.
Bond condition script
Script plain
The script used to make advanced contidional checks on the bond. Visible if Bond condition type is 'Scripted'.
Bond new
Boolean
Process this message when a new bond is required.
Bond pending
Boolean
Process this message when the bond state is Pending.
Bond open
Boolean
Process this message when the bond state is Open.
Bond suspended
Boolean
Process this message when the bond state is Suspended (internal suspend).
Bond vendor suspended
Boolean
Process this message when the bond state is Vendor suspended (external suspend).
Set bond owner* inbound
String
Set the Bond Owner when receiving this message. Use 'None' to leave the Bond Owner alone or to modify it via a Message/Field Stage to Target script.
Set bond state* inbound
String
Set the Bond State when receiving this message. Use 'None' to leave the Bond State alone or to modify it via a Message/Field Stage to Target script.
Set bond owner* outbound
String
Set the Bond Owner when sending this message. Use 'None' to leave the Bond Owner alone or to modify it via a Message/Field Source to Stage script.
Set bond state* outbound
String
Set the Bond State when sending this message. Use 'None' to leave the Bond State alone or to modify it via a Message/Field Source to Stage script.
*Bond ownership condition choices: Ignore, Must own, Must not own.
*Set bond owner choices: None, Internal, External.
'External' sets the bond.owner flag to true. 'Internal' sets it to false.
These settings will take precedence over any which are scripted in the Message Scripts.
*Set bo_nd state choices:_ None, Pending, Open Suspended, Vendor Suspended, Closed.
These settings will take precedence over any which are scripted in the Message Scripts.
Outbound Fields
Trigger
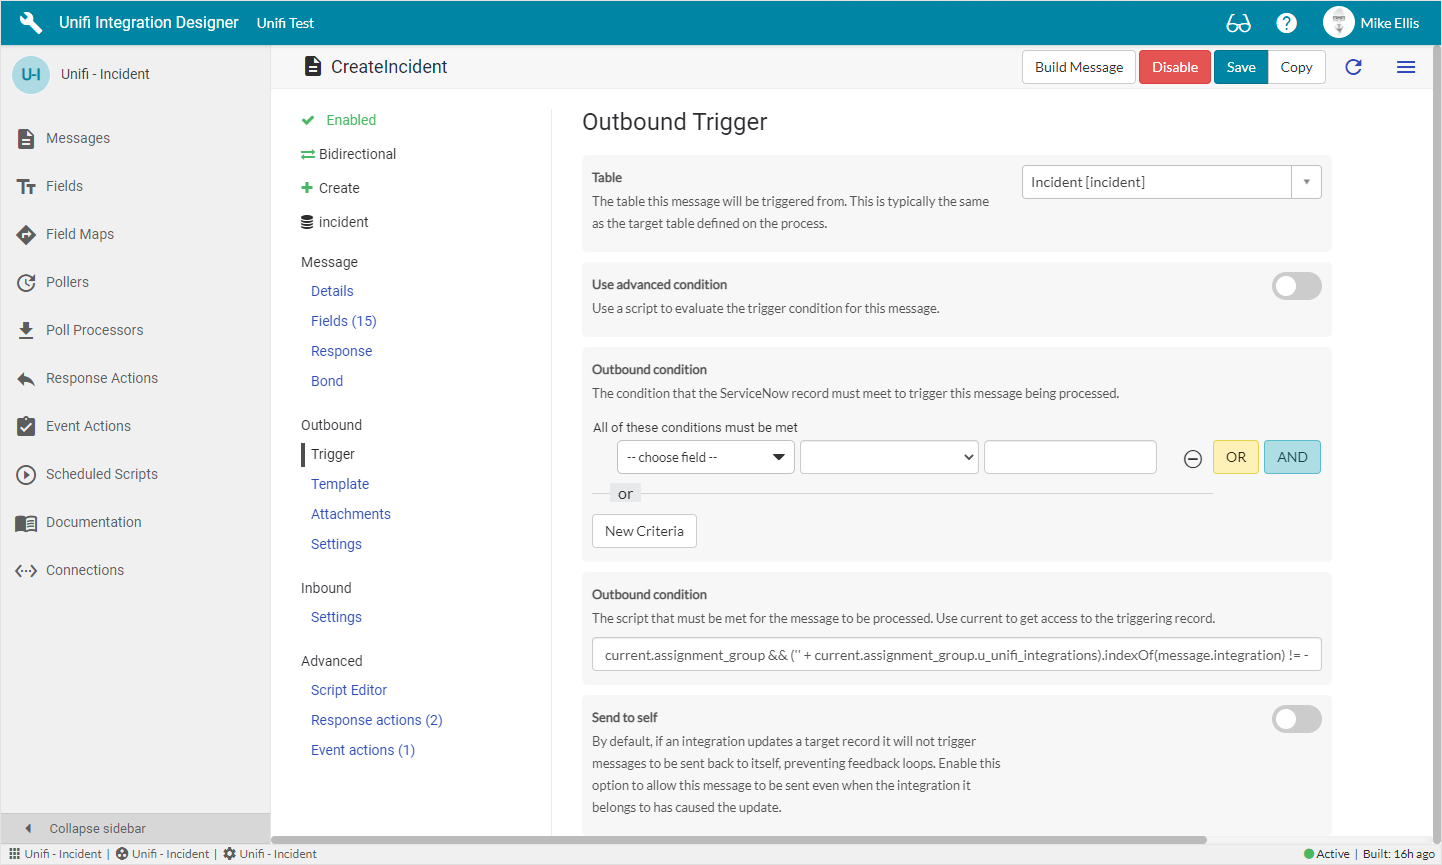
The Outbound Trigger fields to be configured for the Message record are as follows:
Table
Table name
The table this message will be triggered from. This is typically the same as the target table defined on the process.
Use advanced condition
Boolean
Use a script to evaluate the trigger condition for this message.
Advanced condition*
Script plain
The script that must be met for the message to be processed. Use current to get access to the triggering record.
Outbound condition
String
The script that must be met for the message to be processed. Use current to get access to the triggering record.
Outbound condition
Conditions
The condition that the ServiceNow record must meet to trigger this message being processed.
Send to self*
Boolean
Enable this option to allow this message to be sent even when the integration it belongs to has caused the update.
*Advanced condition:
This field is made visible when the 'Use advanced condition' field is set to true.
*Send to self:
By default, if an integration updates a target record it will not trigger messages to be sent back to itself, preventing feedback loops.
Template
The Template fields to be configured for the Message record are as follows:
XML Template
String
The template to be compiled when sending a message for an integration that is configured to use XML. Also handy for storing an example message which can be used as a reference on inbound messages.
CDATA
It is possible to use CDATA within an XML message, but because of the way ServiceNow handles XML it can be a little bit tricky. When ServiceNow see’s the CDATA tag, it actually processes it and the tag ends up being removed in the final. We need to use a little trick allow us to actually get the CDATA in the final result.
Attachments
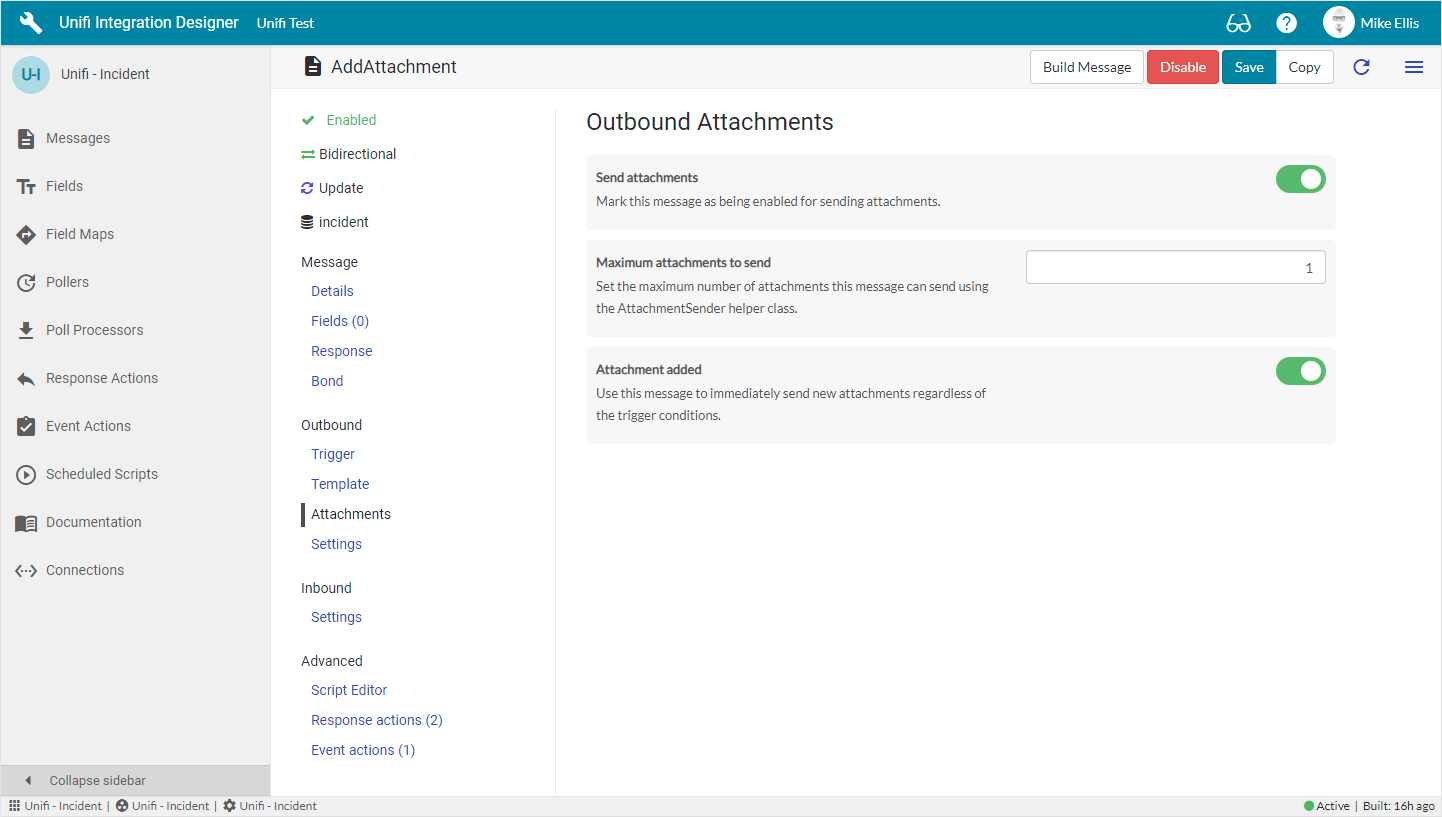
The Outbound Attachments fields to be configured for the Message record are as follows:
Send attachments
Boolean
Mark this message as being enabled for sending attachments.
Maximum attachments to send
Integer
Set the maximum number of attachments this message can send using the AttachmentSender helper class.
Attachment added*
Boolean
Use this message to immediately send new attachments regardless of the trigger conditions.
*Attachment added:
This field is made visible when the 'Send attachments' field is set to true.
Settings
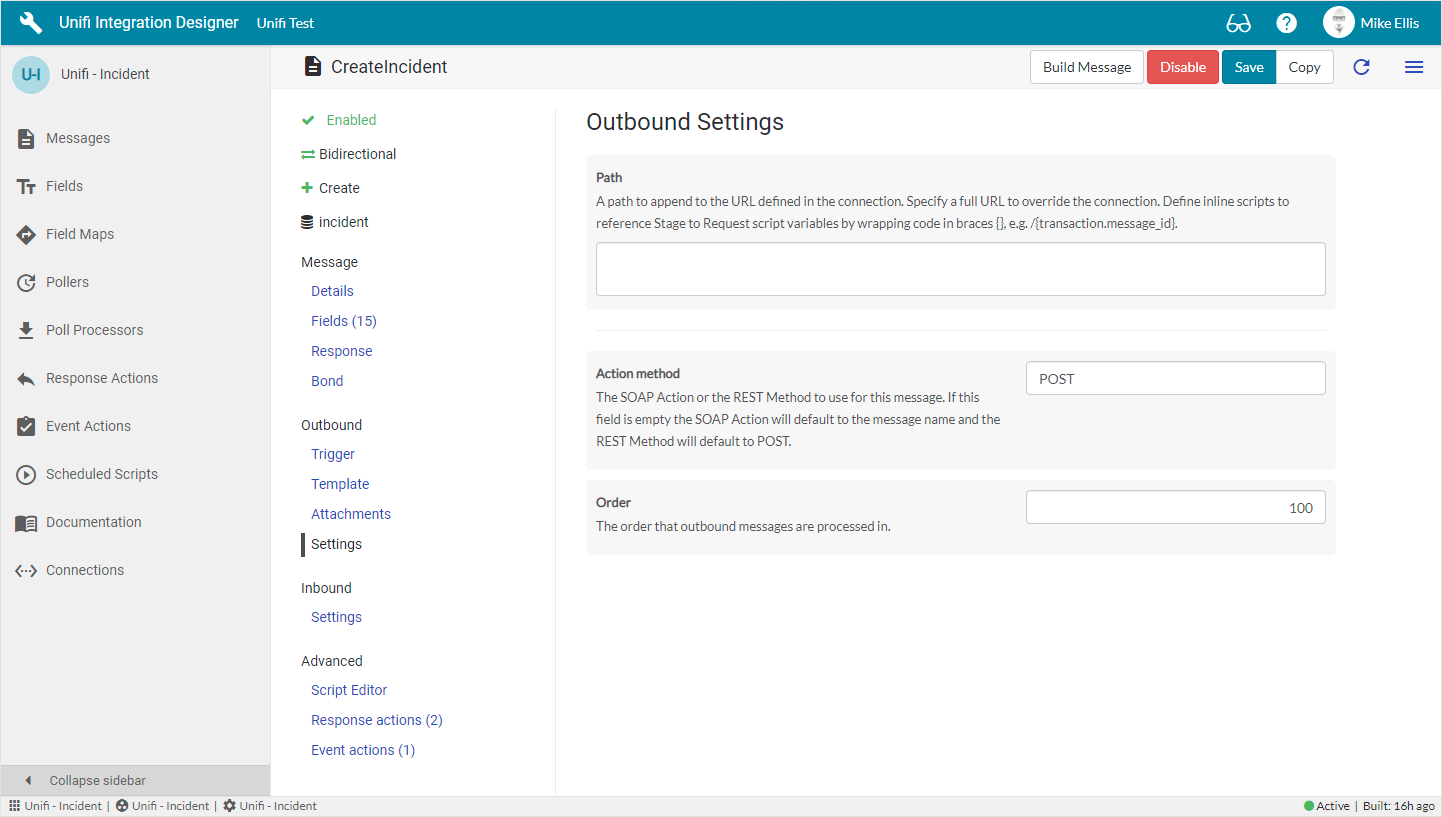
The Outbound Settings fields to be configured for the Message record are as follows:
Path
URL
A path to append to the URL defined in the connection. Specify a full URL to override the connection. Define inline scripts to reference Stage to Request script variables by wrapping code in braces {}, e.g. /{transaction.message_id}.
Action method
String
The SOAP Action or the REST Method to use for this message. If this field is empty the SOAP Action will default to the message name and the REST Method will default to POST.
Order
Integer
The order that outbound messages are processed in.
Inbound Fields
Settings
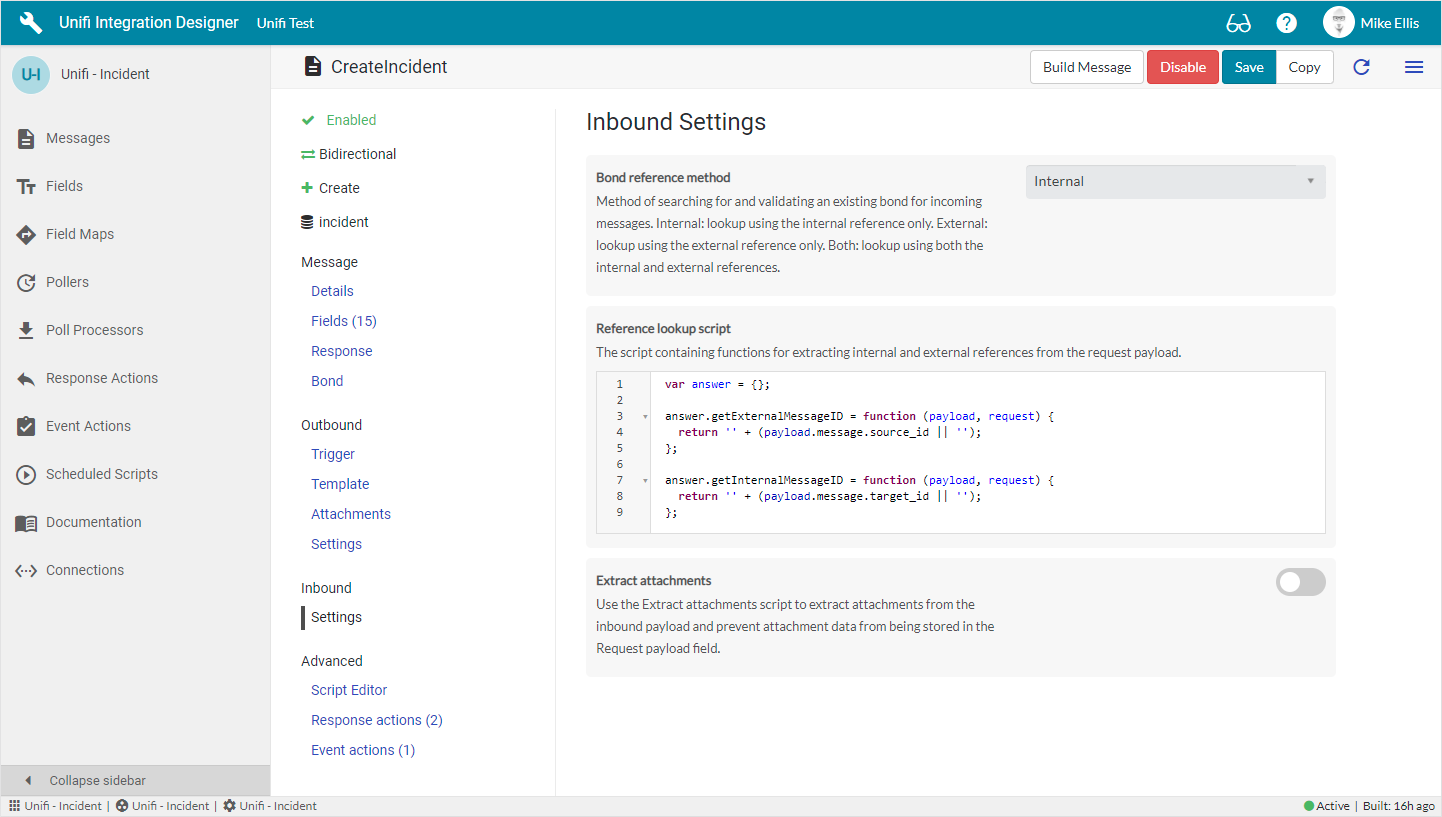
The Inbound Settings fields to be configured for the Message record are as follows:
Bond reference method
String
Method of searching for and validating an existing bond for incoming messages. Internal: lookup using the internal reference only. External: lookup using the external reference only. Both: lookup using both the internal and external references.
Reference lookup script
Script plain
The script containing functions for extracting internal and external references from the request payload.
Extract attachments
Boolean
Use the Extract attachments script to extract attachments from the inbound payload and prevent attachment data from being stored in the Request payload field.
Extract attachments script*
Script plain
The script used to extract attachment data from a request payload. Used to prevent writing attachment data to the request payload field (full payload can be attached using integration ‘Attach payloads’ option).
*Extract attachments script
This field is made visible when the Extract attachments box is checked. The script must always return a string and if an object is used it needs to be JSON encoded (i.e. JSON.stringify()). The following is an example:
Advanced
Script Editor
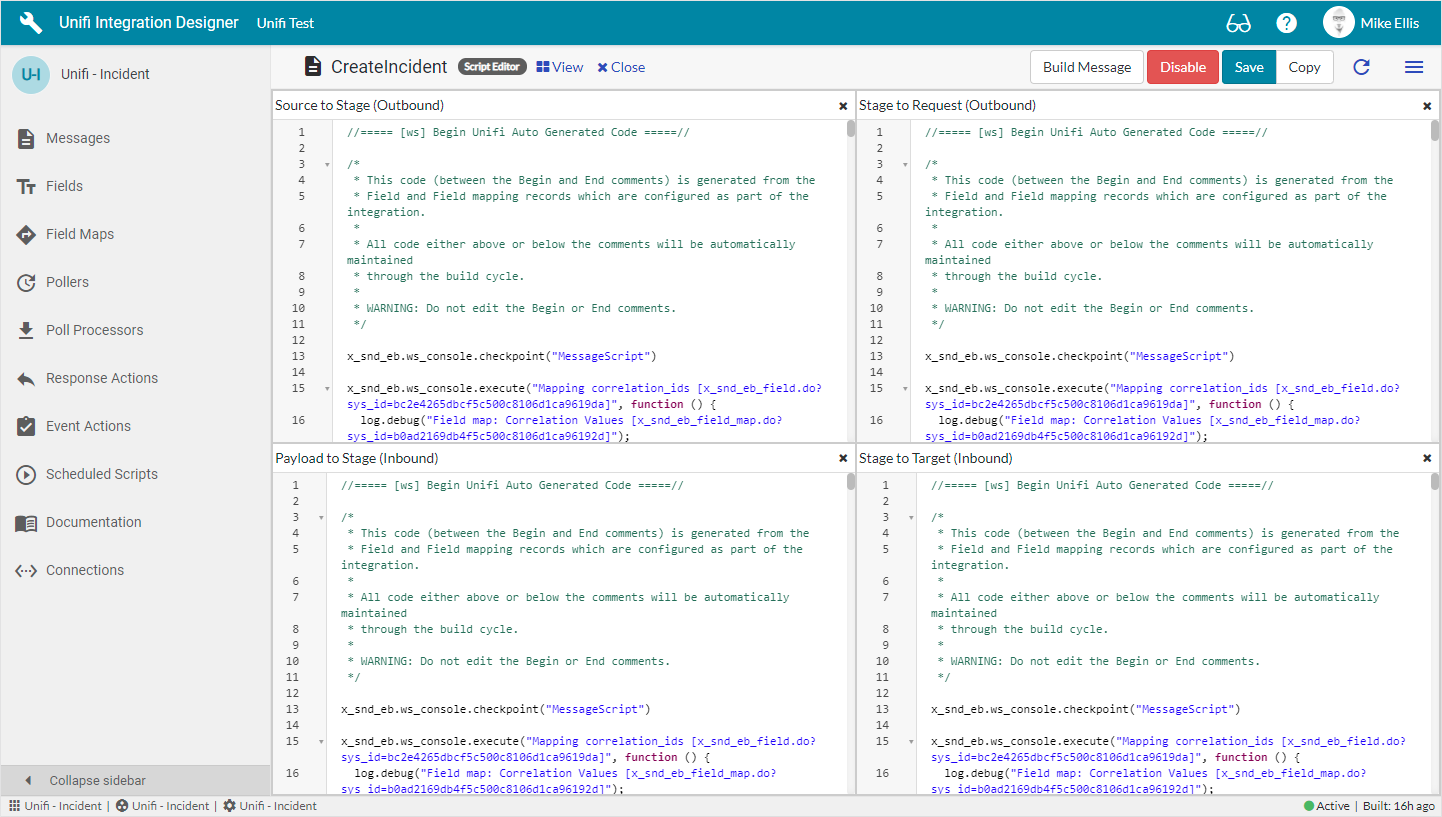
From here you can view each of the Message Scripts for the Message (Source to Stage, Stage to Request, Payload to Stage, Stage to Target). The auto-generated code displayed is configured using Fields & Field Maps. For more information on Message Scripts click here.
You MUST NOT edit the code between the Begin & End Comments, or the comments themselves.
If you wish to manually script any code, that must be done outside of those comments.
Response Actions
From here you can view a list of the relevant Response Actions on the Integration. You can also configure a New Response Action from the list. For more information about Response Actions click here.
Event Actions
From here you can view a list of the relevant Event Actions on the Integration. You can also configure a New Event Action from the list. For more information about Event Actions click here.
The ServiceNow Administrator [admin] role is required to access Response/Event Actions.
Last updated
Was this helpful?
