Test CreateIncident
Follow these steps to test the CreateIncident Message.
Because we have configured Unifi to connect to itself, we don't need to wait until we've connected to the external system before we test. We can test both sending and receiving Messages in the one instance. It goes without saying that these tests should be repeated once we have connected to the external instance.
To test, we will create an incident in our instance and then follow the data as it flows through the Unifi transport stack and on to the newly created ticket (whether that be in our instance, or in the external system we are integrating with).
Assignment Group
We have data-driven the trigger for our Create Message so that it fires when a ticket is assigned to an assignment group which has the integration referenced on it. In order to test then, we’ll need to add our integration to the Unifi Integrations field on the assignment group that triggers our incidents. We will create a new assignment group as an example.
In native ServiceNow, navigate to User Administration > Groups. Click New.
The Group fields to be configured are as follows:
Name
Descriptive name, e.g. DBAs, Network, etc.
<Your Name>
Type
Types of this group.
'itil', 'eBonding'
Unifi Integrations*
Glide List referencing the Integration [x_snd_eb_integration] table.
<Your Integration>
*Unifi Integrations: This field may need to be created/added to the Group [sys_user_group] record.
Your Group record should look like this:

Submit the record.
Create an Incident
In native ServiceNow, navigate to Incident > Create New.
The Incident fields to configure are as follows:
Caller*
Person who reported or is affected by this incident.
<Your Caller>
State*
The Incident lifecycle state.
'New' - Default (Automatically populated)
Assignment group
The group which triggers the Integration.
<Your Group>
Short description*
A brief description of the incident.
<Your Short description>
*Note: We have chosen these fields as these were the ones we mapped when creating our Field records for the CreateIncident Message. Your choices may differ depending on which Field records you created.
Your Incident form should look like this:
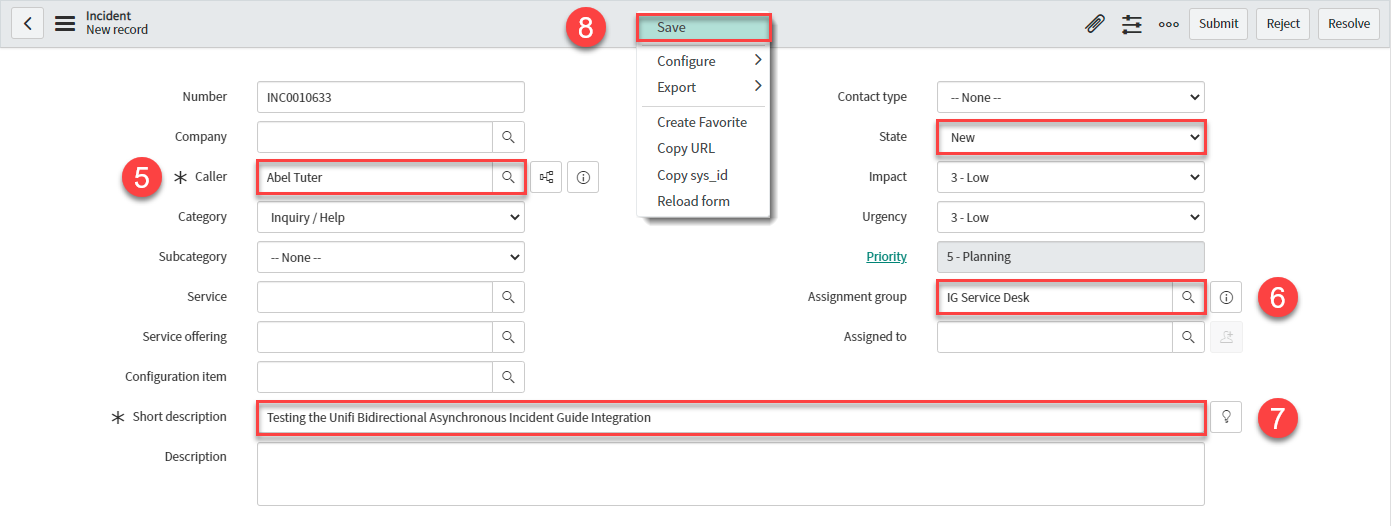
Right-click & Save.
Note the values entered (including State), so that you can check them against the mapped fields on the corresponding record in the instance being integrated to.
You should see an Info Message, confirming the CreateIncident Message is being sent to your Integration:

When you scroll down to the 'Unifi Integrations' related list (you may have to configure the related lists to add it to your Incident form), notice:

A Bond has been created. The External reference is populated & the State has changed to 'Open'. Click the Bond Number link to open the Bond record.
Note: You may need to refresh the list by clicking the Bonds breadcrumb to view the changes.
View the Bond
Your Bond record should look like this:
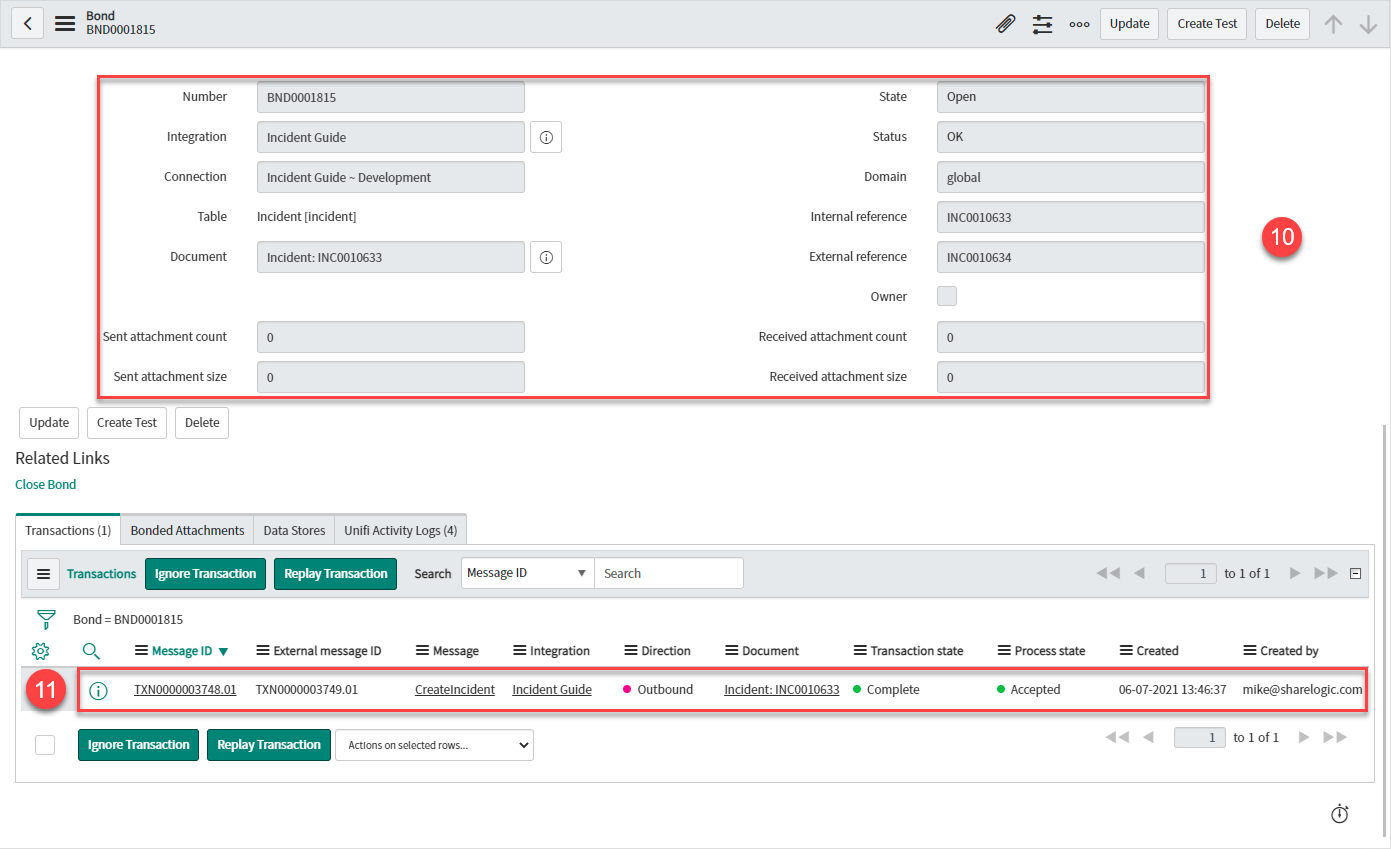
Bond details:
Integration: < Your Integration >
Connection: < Your Connection >
Table: 'Incident [incident]'
Document: < Your Incident >
State: 'Open' (Message exchange is available)
Status: 'OK' (All transactions have completed)
Internal reference: < ServiceNow ticket reference > (Same as 'Document')
External reference: < External system's ticket reference >
Transaction:
Message ID: Internal system's unique Transaction identifier
External Message ID: External system's unique Transaction identifier
Message: 'Createincident'
Direction: 'Outbound'
Transaction state: 'Complete' (The data has been successfully transported)
Process state: 'Accepted' (The transaction was accepted as within the scope of the business logic that's in place)
You are able to view the logs in the 'Unifi Activity Logs' related list.
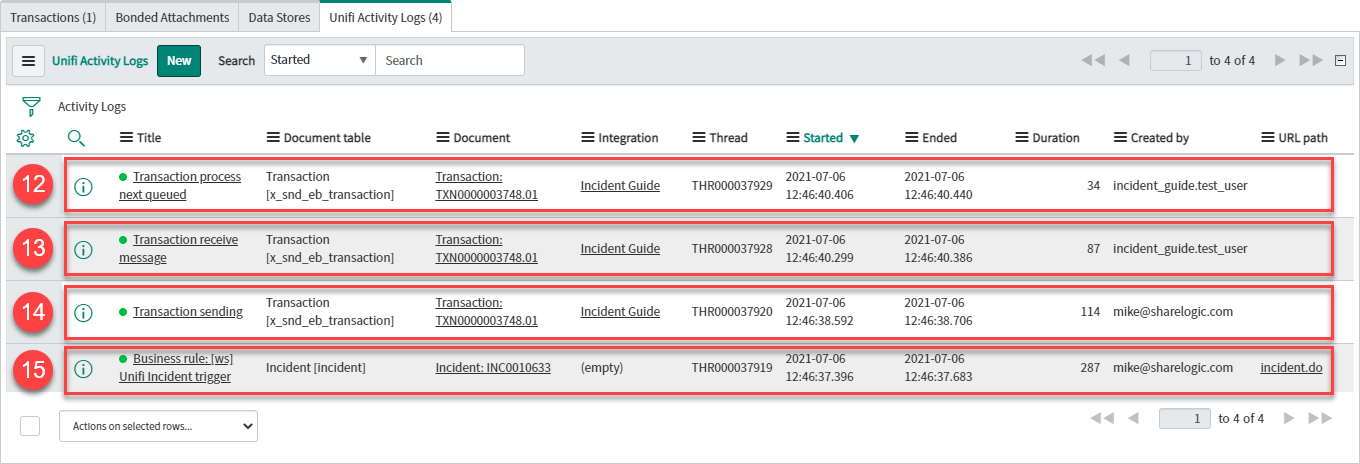
Transaction process next queued: Logs from checking whether there are any other transactions queued and processing those.
Transaction receive message: Logs from processing the inbound asynchronous receipt.
Transaction sending: Logs from taking the Stage data, building the Request record & sending the Request to the integrated system.
Business rule: < Your Trigger >: Logs from the Business Rule that triggered Unifi.
View the Transaction
Click through to the Transaction record from the related list on the Bond.
Your Transaction record should look like this:
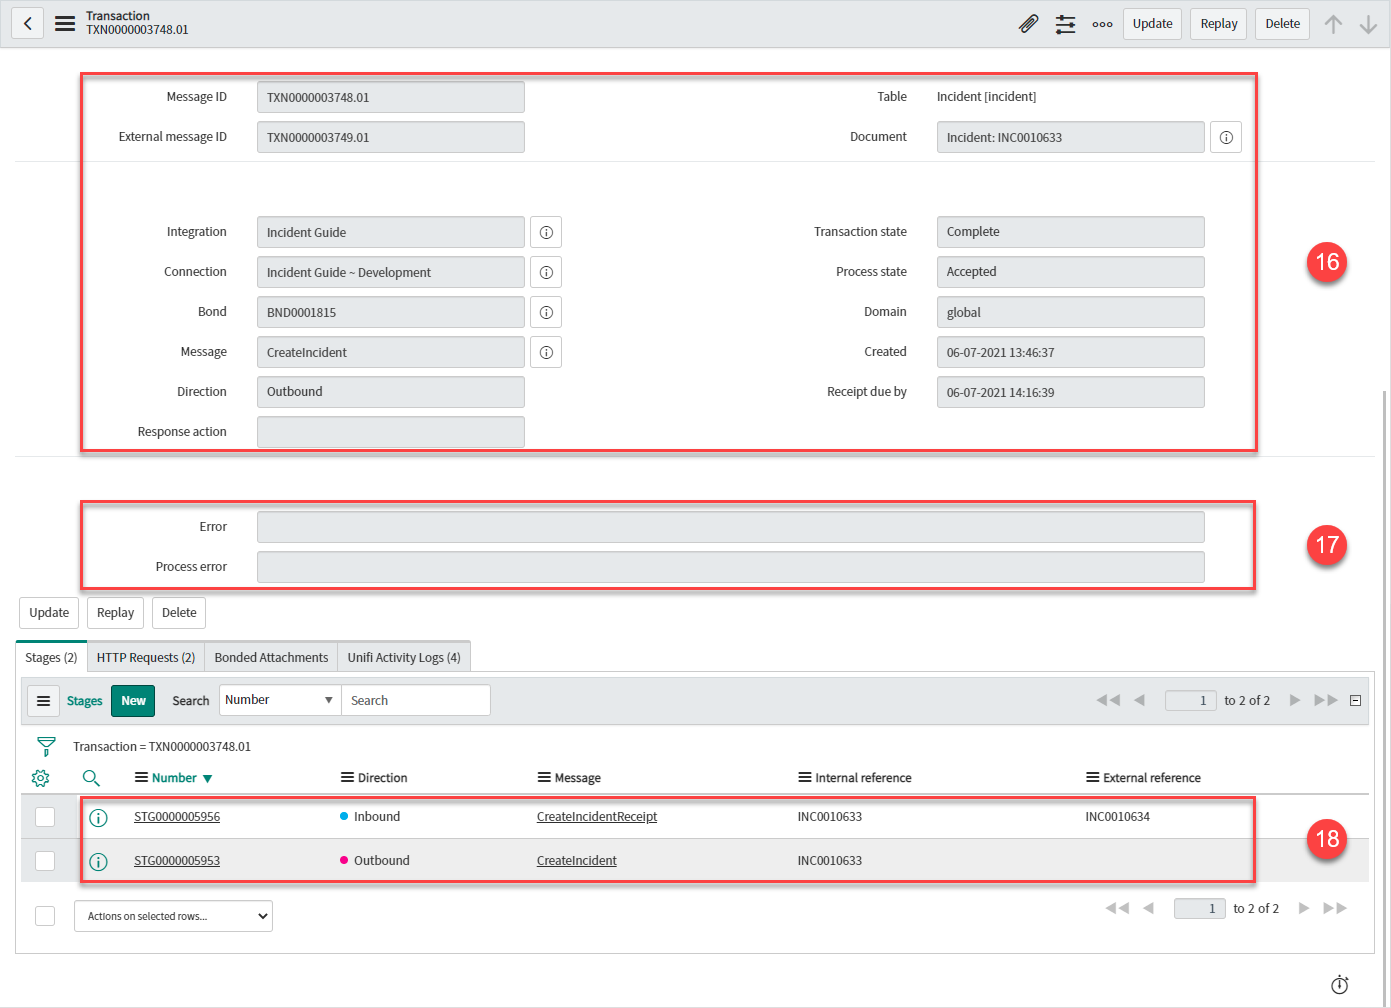
Transaction details:
Table: 'Incident [incident]'
Document: < Your Incident >
Integration: < Your Integration >
Connection: < Your Connection >
Bond: < Your Bond >
Message: 'CreateIncident'
Direction: 'Outbound'
Transaction state: 'Complete' (The data has been successfully transported)
Process state: 'Accepted' (The transaction was accepted as within the scope of the business logic that's in place)
Errors:
Error: (If there was a transactional error the Transaction state would show as 'Error' and the details would be captured here).
Process error: (If there was a process error the Process state would show as 'Rejected' and the details would be captured here)
Stages:
Direction: 'Outbound' & 'Inbound'
Message: 'CreateIncident' & 'CreateIncidentReceipt'
Internal reference: < ServiceNow ticket reference > (Same as 'Document')
External reference: < External system's ticket reference >
View the Stage
Click through to the Outbound Stage record from the related list on the Transaction. (If you wish, you could also do the same for the Inbound Stage record.)
Check the values in the fields match what you expect.
Your Stage record should look like this:
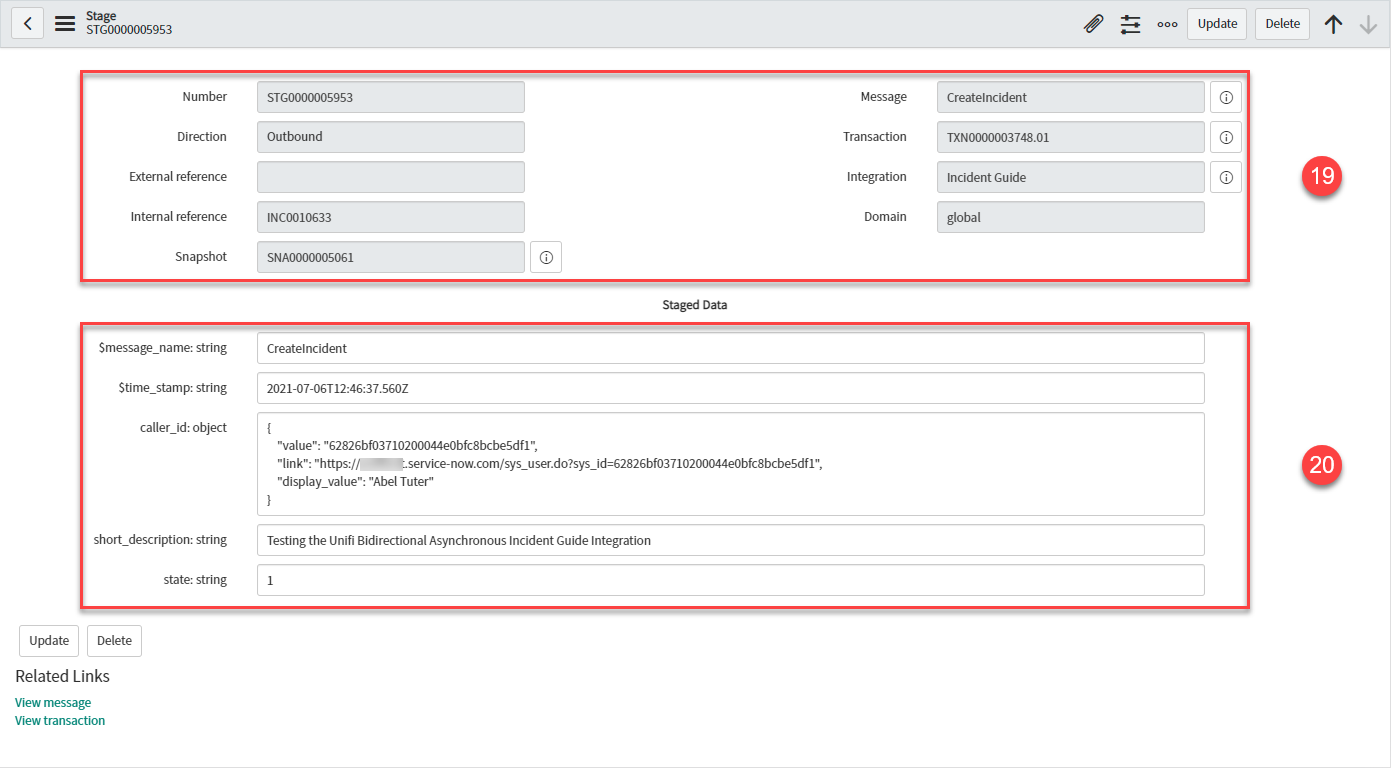
Stage details:
Direction: 'Outbound'
Internal reference: < ServiceNow ticket reference >
Snapshot: < Snapshot record reference >
Message: 'CreateIncident'
Transaction: < Your Transaction >
Integration: < Your Integration >
Mapped Staged Data fields (yours may differ depending on which Field records you created):
caller_id: < Your caller.id >
short_description: < Your Short description >
state: '1'
View the HTTP Request
Click through to the outbound HTTP Request record from the related list on the Transaction. (If you wish, you could also do the same for the Inbound HTTP Request.)
This is where you will find details of the data that was transported between the systems being integrated. (These records are extremely useful for developing and debugging integrations because of the immediate availability and contextual relevance to the integration you are developing.)
Your HTTP Request record should look like this:
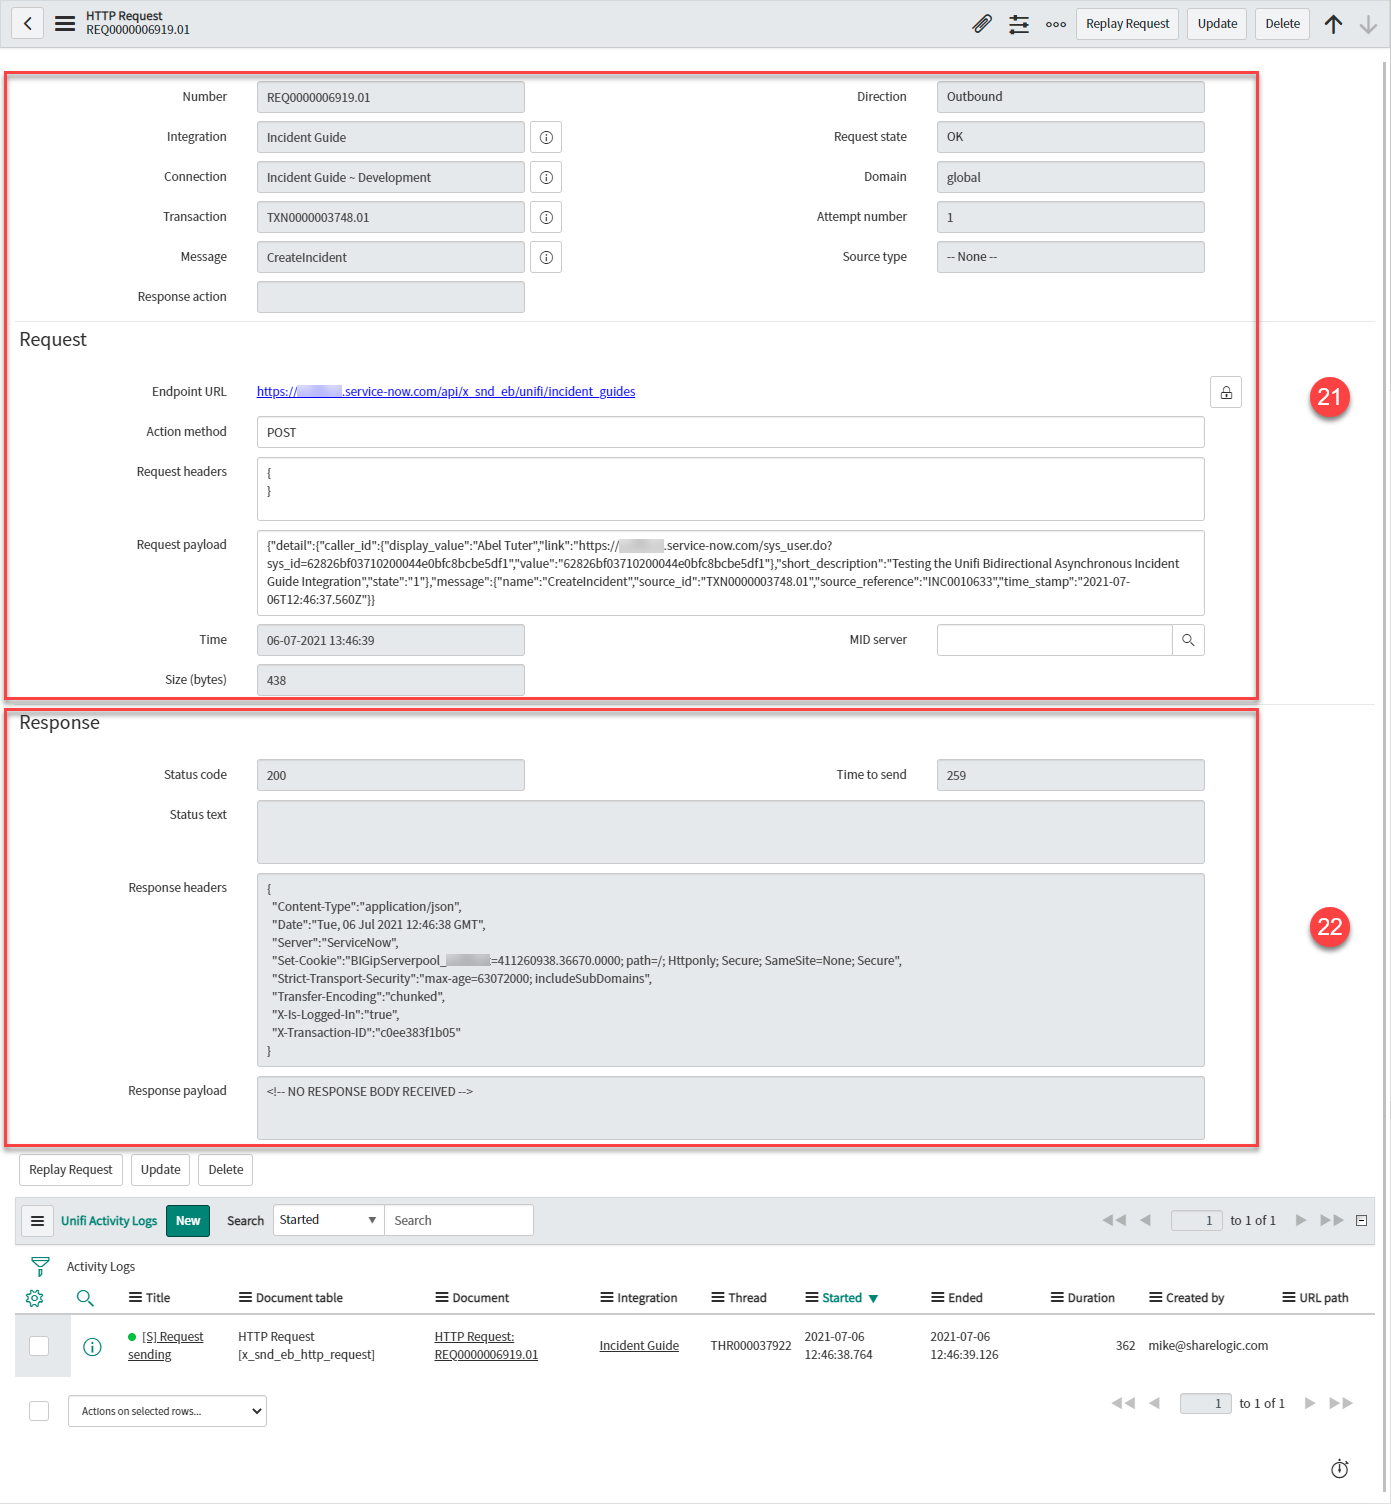
HTTP Request details:
Integration: < Your Integration >
Connection: < Your Connection >
Transaction: < Your Transaction >
Message: 'CreateIncident'
Direction: 'Outbound'
Request state: 'OK' (There are no errors with the HTTP Request.)
Attempt number: < Number of HTTP Request attempts > (Failed requests are retried up to the maximum attempts number as configured on the Integration.)
Endpoint URL: < The external system’s access URL >
Action Method: 'POST'
Request headers: < The header of the request being sent >
Request payload: < The payload of the request being sent >
Response details:
Status code: '200'
Response headers: < The header of the response being received >
Response payload: < The payload of the response being received >
Compare with the External System's Incident
Navigate to the corresponding Incident in the external system.
Check the values in the fields match those you noted when you saved the Incident in the internal system.
Your external system's Incident record should look like this (depending on the system you're integrating with, your record may look different; the important matter is that the values match):
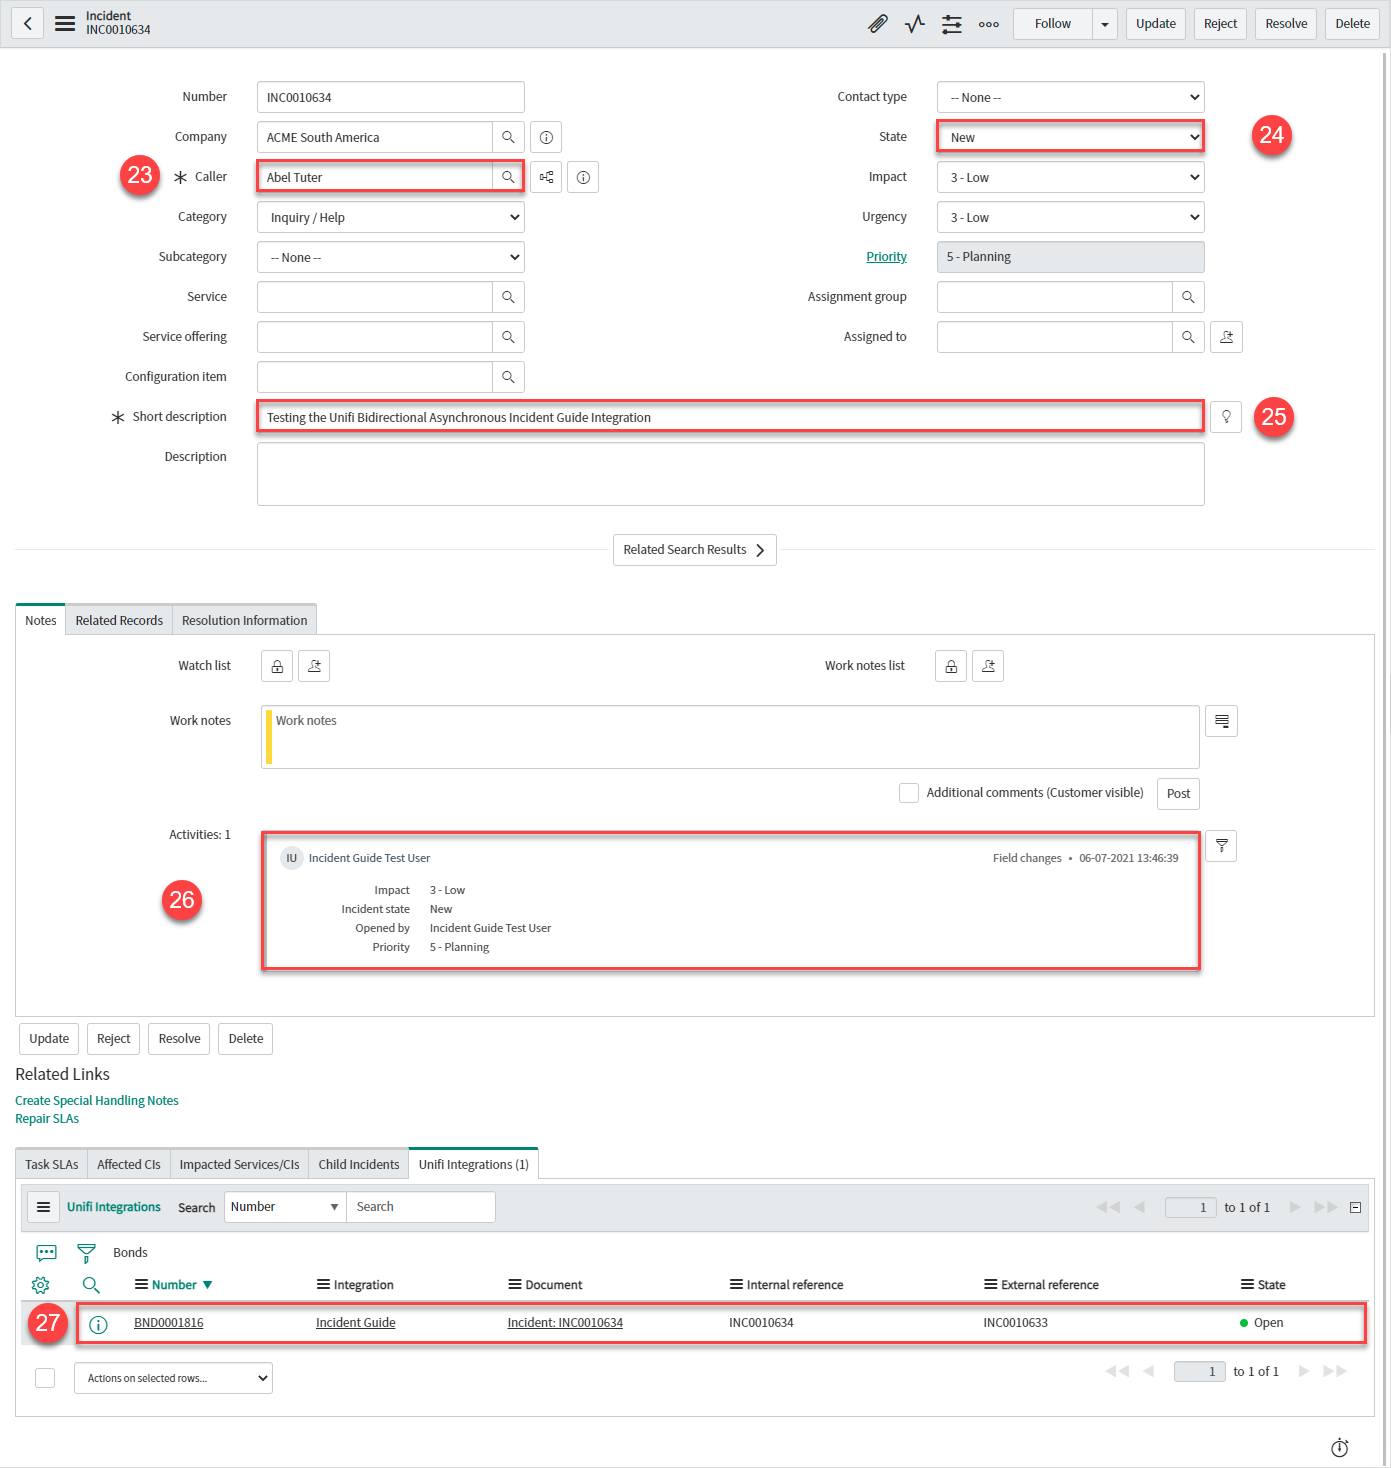
Caller: < Your Caller >
State: < Your State >
Short description: < Your Short description >
Activities: < Note showing activity on the Incident > (Opened by < your.external.system.user > configured in the Connection)
Bond: Note that a bond exists in the external system in an 'Open' state and the 'Internal reference' & 'External reference' are reversed
If completing this test after having integrated with the external system (as opposed to connecting to your own instance), it would be good to test the CreateIncident Message in both directions.
We are now ready to move to the Update Scenario.
Was this helpful?
