Message
The AddAttachment Message will be used to process inbound and outbound attachments.
In Unifi Integration Designer, click on the 'Messages' icon & then New to begin configuring the AddAttachment Message.
New Message Modal
The fields to be configured for the AddAttachment New Message modal are as follows:
Message name
The message name that is unique for this integration.
'AddAttachment'
Type
The primary purpose of the message.
'Update'
Direction
The direction(s) this message is configured to support.
'Bidirectional'
Description
Describe the message and the function it is performing.
<Your description>
Your AddAttachment New Message modal should look like this:
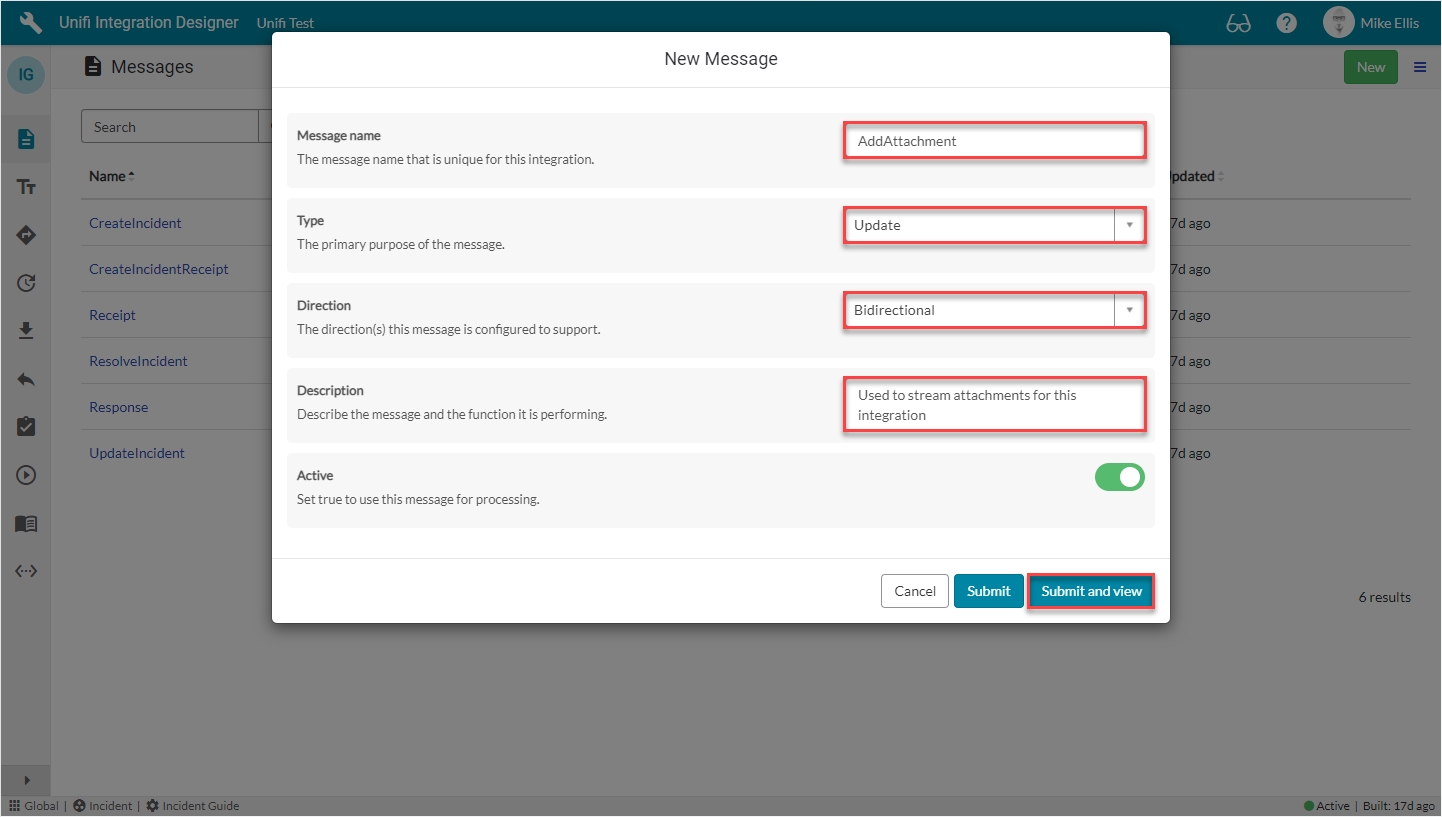
Submit and view to further configure the Message.
Response Fields
Navigate to Message > Response.
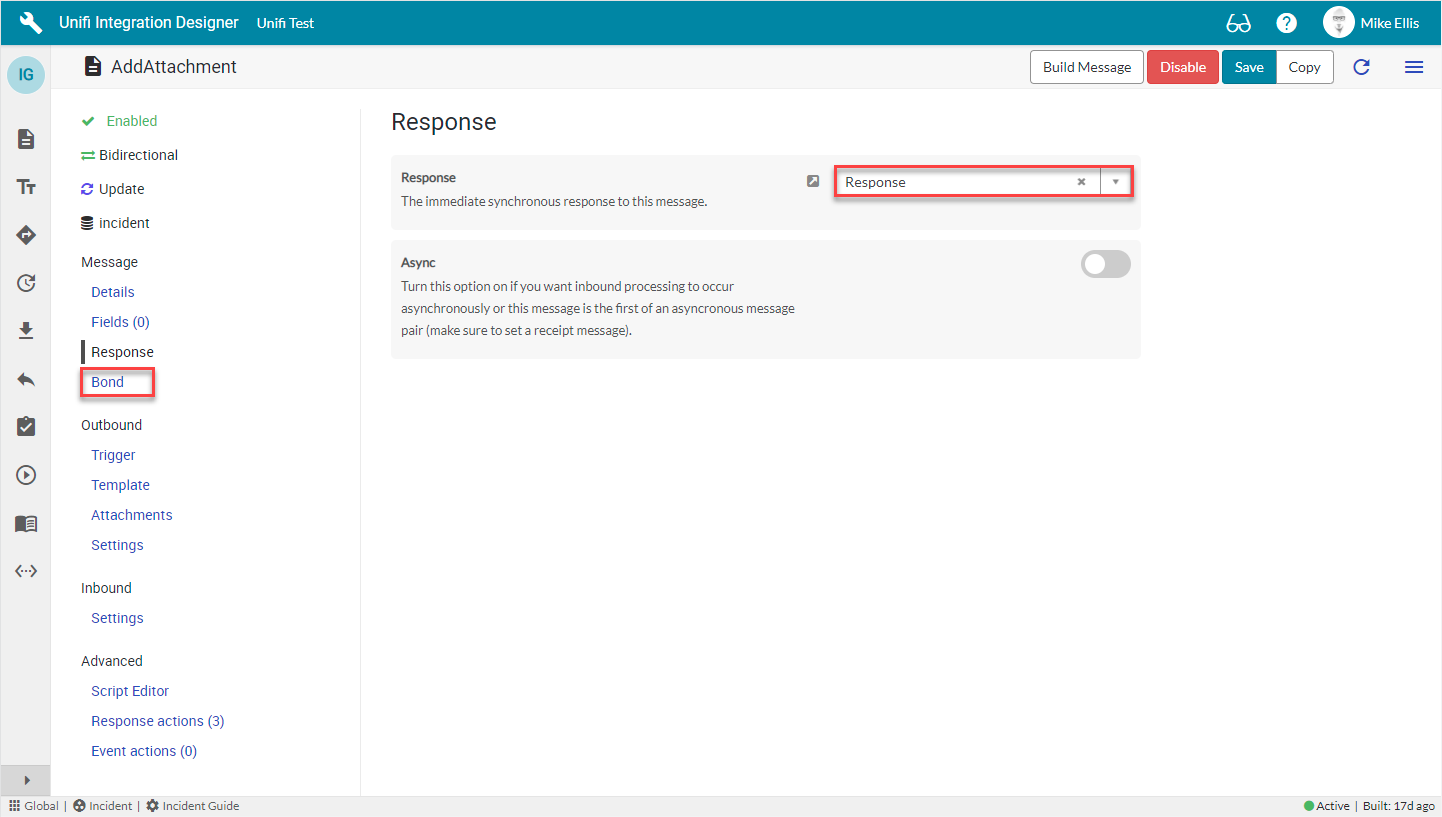
The Response fields to be configured are as follows:
Response
The immediate synchronous response to this message.
lookup: 'Response'
Your Response form should look like this:
Navigate to Message > Bond.
Bond Fields
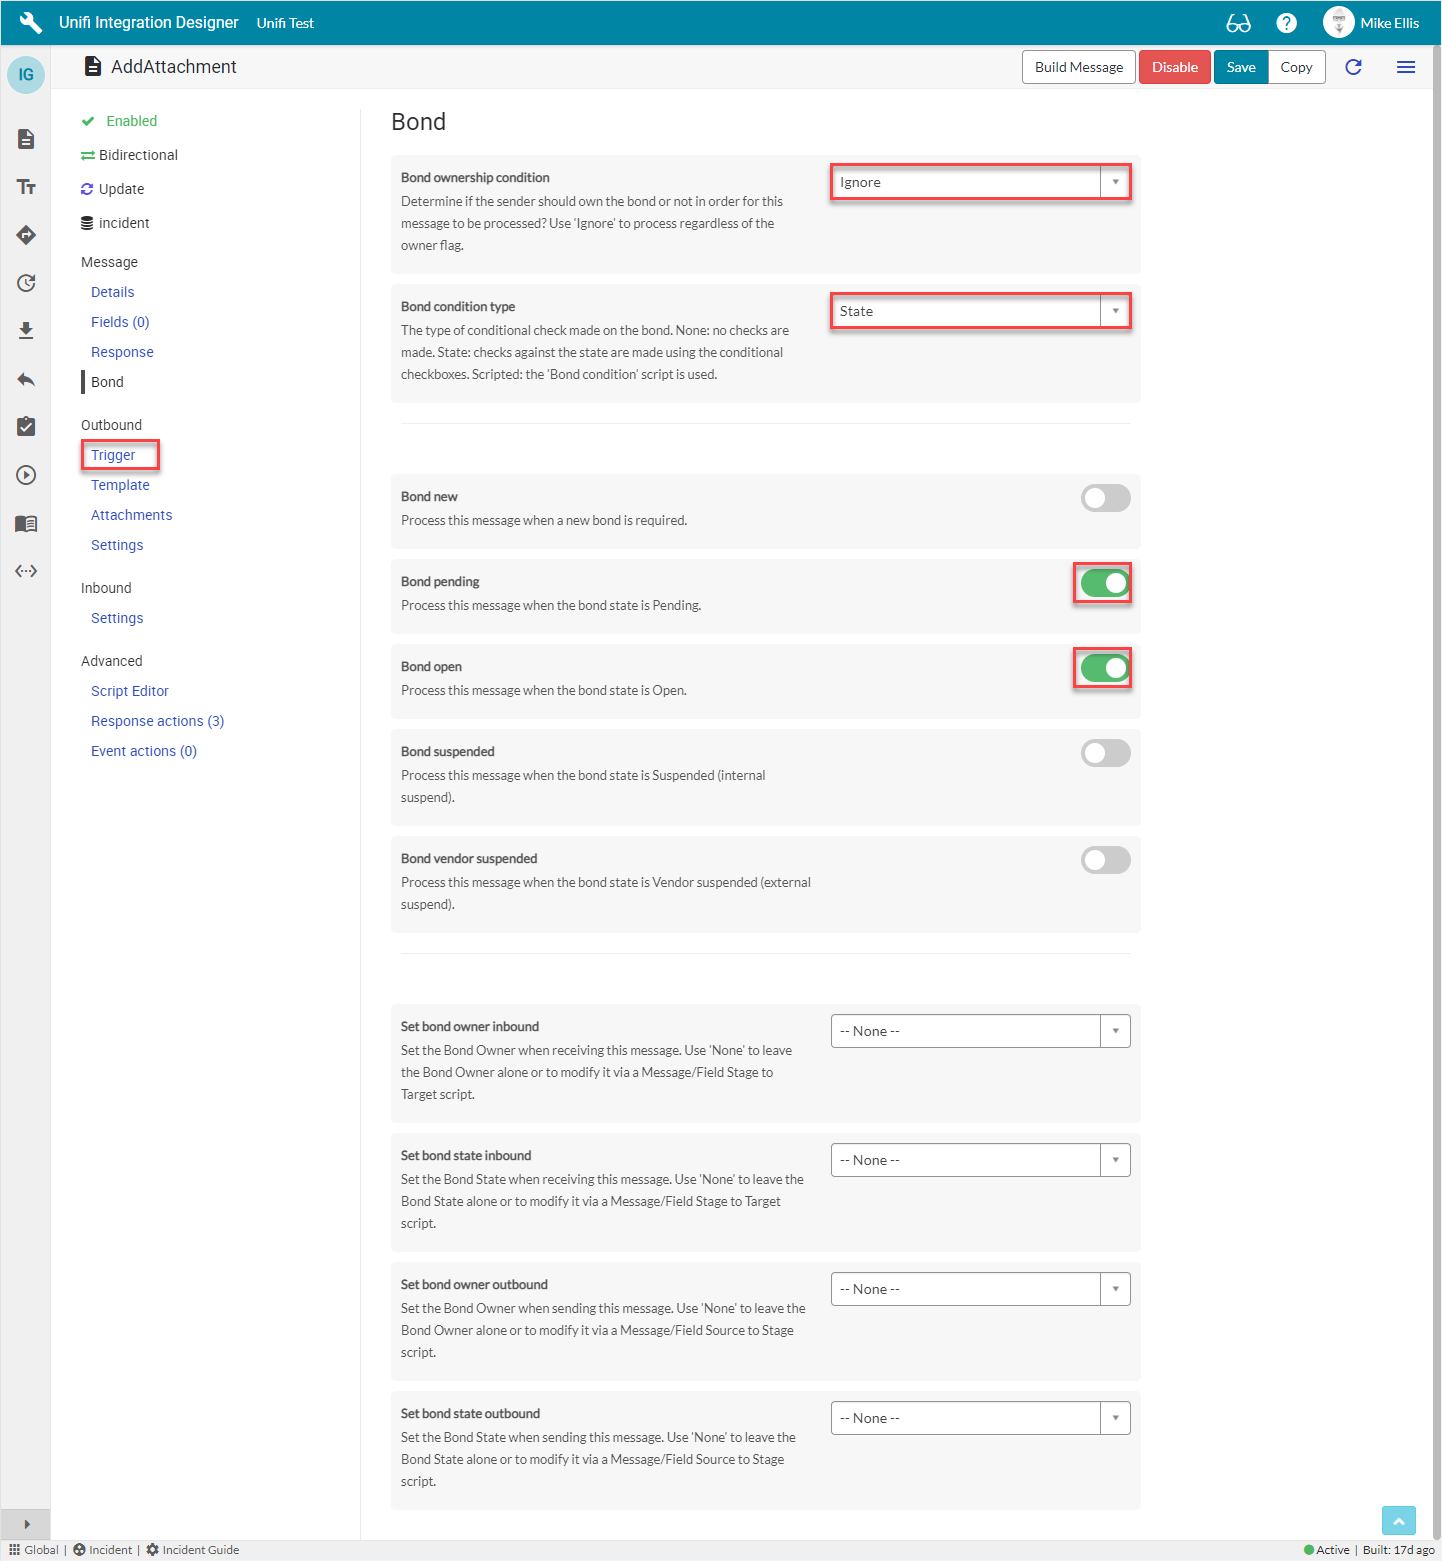
The Bond fields to be configured are as follows:
Bond ownership **** condition*
Determine if the sender should own the bond or not in order for this message to be processed? Use 'Ignore' to process regardless of the owner flag. (Choices: Ignore, Must own, Must not own.)
'Ignore'
Bond condition type*
The type of conditional check made on the bond. (None: no checks are made. State: checks against the state are made using the conditional checkboxes. Scripted: the 'Bond condition' script is used.)
'State'
Bond pending
Process this message when the bond state is Pending.
<true>
Bond open
Process this message when the bond state is Open.
<true>
*These fields are automatically populated.
Your Bond form should look like this:
Navigate to Outbound > Trigger.
Outbound Trigger Fields
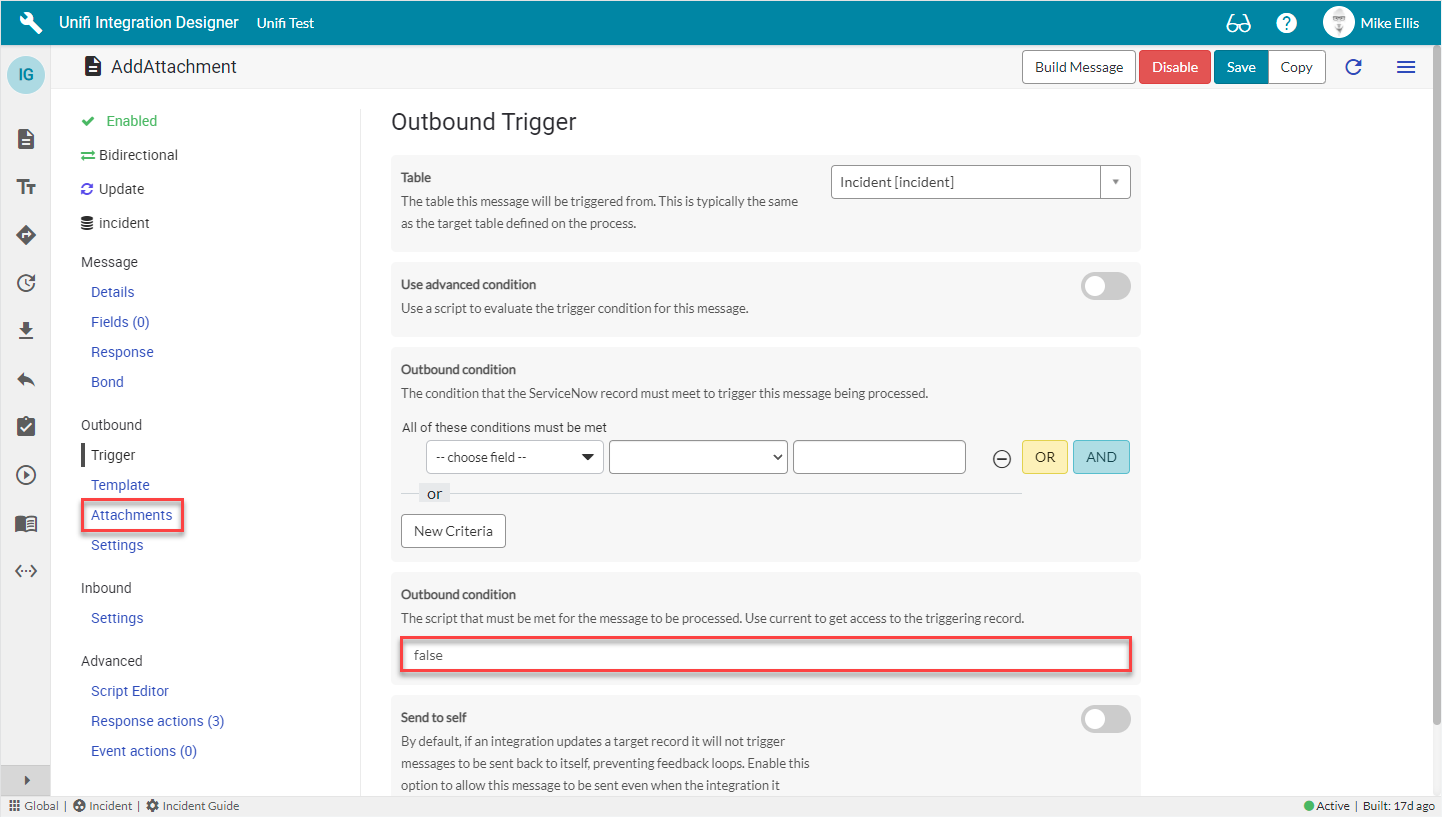
The Outbound Trigger fields to be configured (as required)* are as follows:
Outbound condition*
The condition that the ServiceNow record must meet to trigger this message being processed.
Update the Outbound condition script field with the code below
*Outbound condition (as required):
It is not always necessary for you to enter a condition. The value given is an example. You may create any condition (or not) to align with your business process requirements. In this case, it makes sense to set the Outbound Condition to false because we do not want Unifi to send this message on any update of the source record. Typically, we would configure different messages to align with state changes (e.g. Close, Resolve).
The code in the 'Outbound condition' script field should look like this:
Your Outbound Trigger form should look like this:
Navigate to Outbound > Attachments.
Outbound Attachments Fields
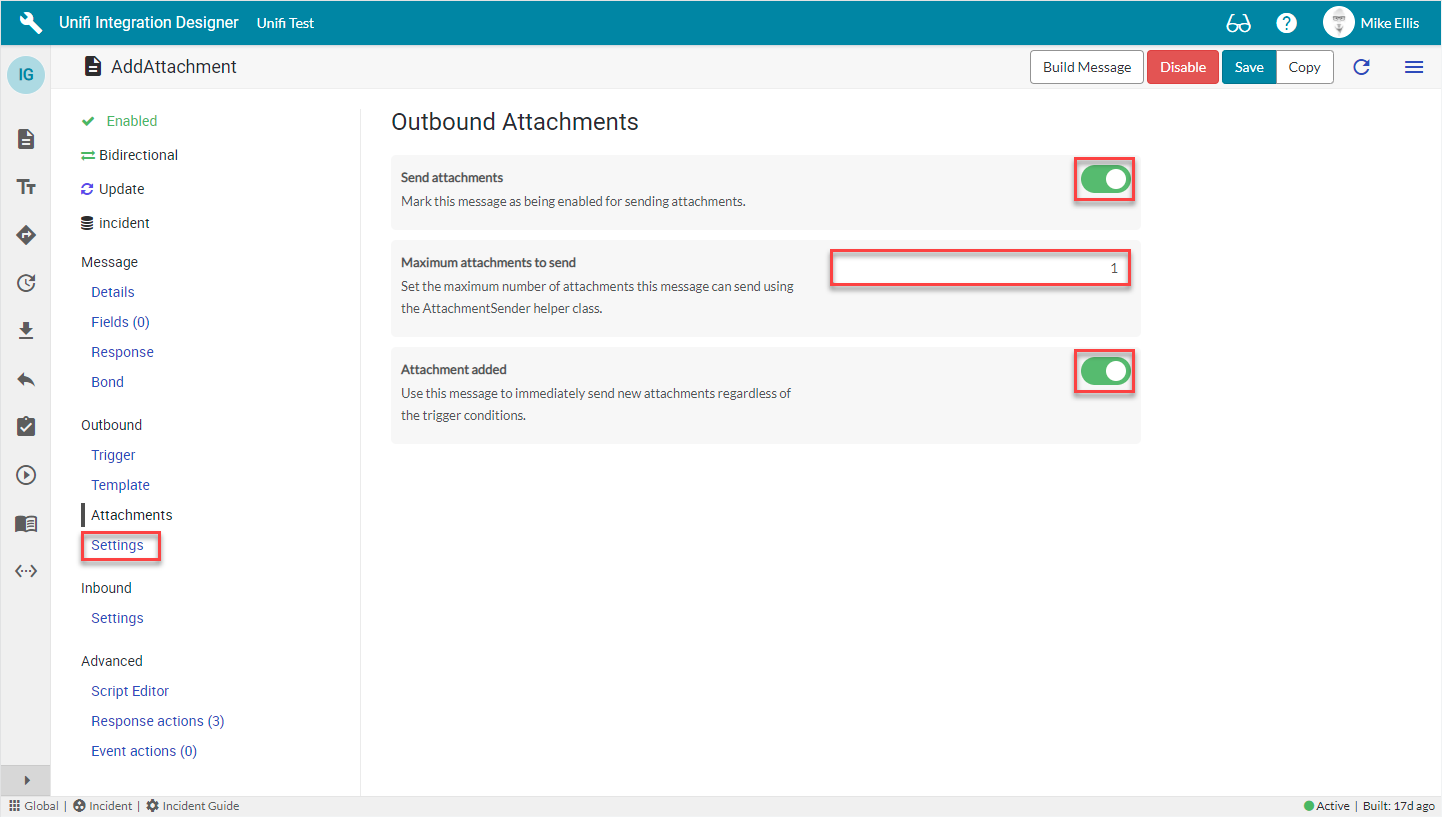
The Outbound Attachments fields to be configured are as follows:
Send attachments
Mark this message as being enabled for sending attachments.
<true>
Maximum attachments to send*
Set the maximum number of attachments this message can send using the AttachmentSender helper class.
'1'
Attachment added
Use this message to immediately send new attachments regardless of the trigger conditions.
<true>
*This field is automatically populated.
Your Outbound Attachments form should look like this:
Navigate to Outbound > Settings.
Outbound Settings Fields
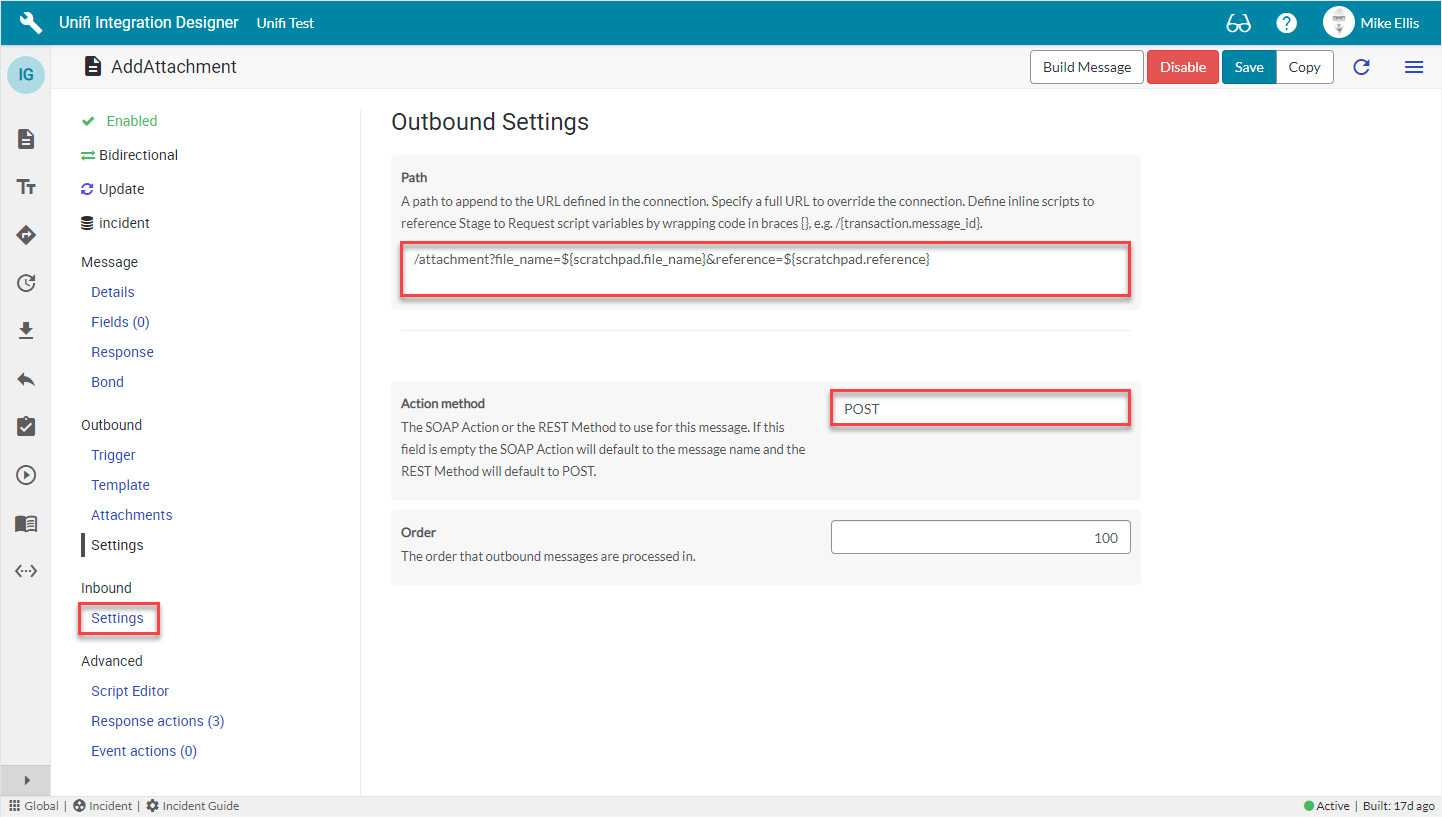
The Outbound Setting fields to be configured are as follows:
Path
A path to append to the URL defined in the connection. Specify a full URL to override the connection. Define inline scripts to reference Stage to Request script variables by wrapping code in braces {}, e.g. /{transaction.message_id}.
Update the Path field with the code below
Action method
The SOAP Action or the REST Method to use for this message. If this field is empty the SOAP Action will default to the message name and the REST Method will default to POST.
'POST'
The code in the 'Path' field should look like this:
The /attachment element of the Path is required when using the Unifi Scripted REST API to automatically generate the Scripted REST Resource. We shall discuss this further on the Scripted REST Resource page.
Please note the following when using the Unifi Scripted REST API to automatically generate the Scripted REST Resource:
If you have attachment messages which were configured before the auto-generated Scripted REST Resources, you must add the /attachment element to the Path of those messages. Otherwise, they may generate "Content type not allowed" errors.
Your Outbound Settings form should look like this:
Navigate to Inbound > Settings.
Inbound Settings Fields
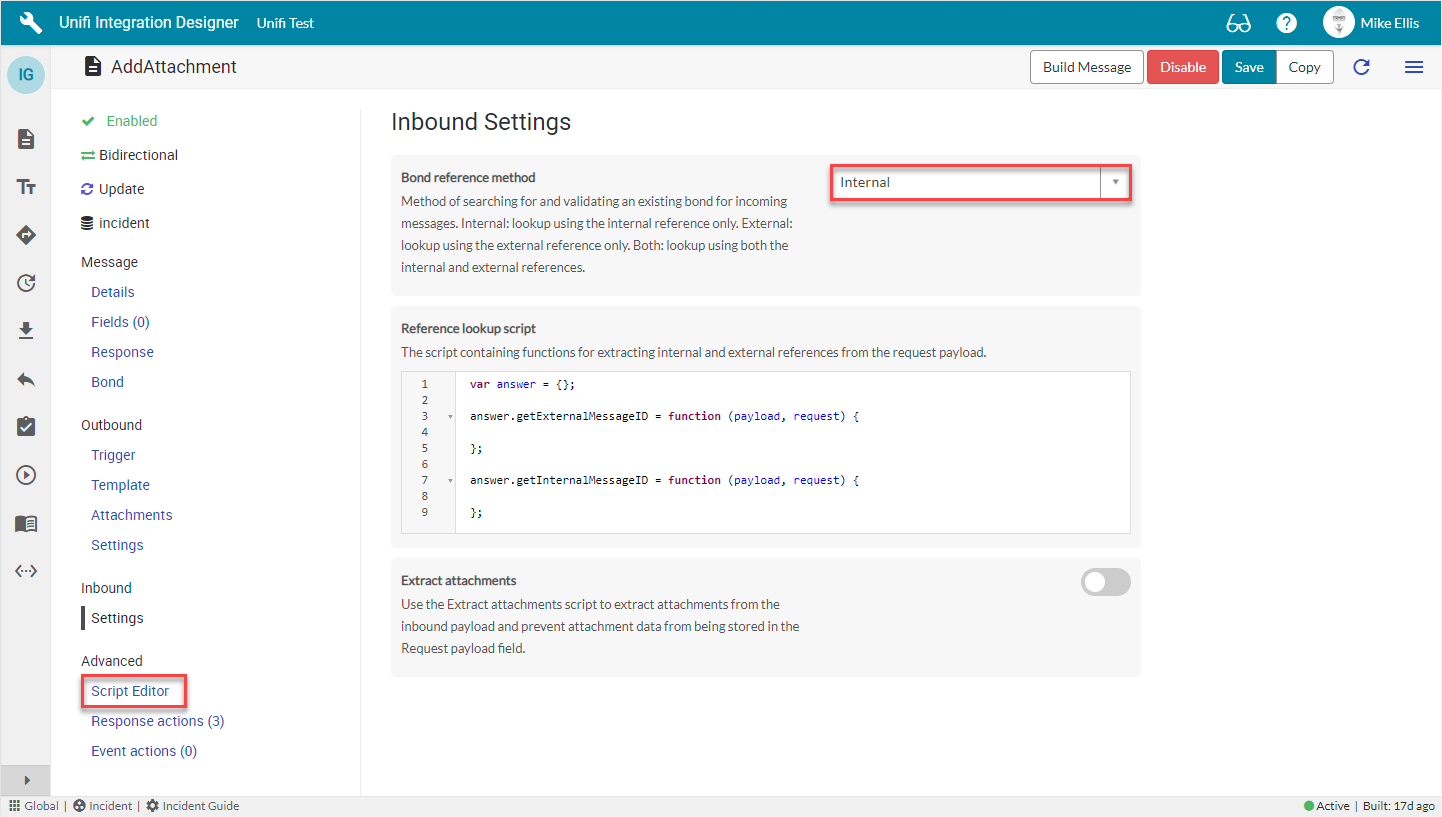
The Inbound Settings fields to be configured are as follows:
Bond reference method
Method of searching for and validating an existing bond for incoming messages.
'Internal'*
*Bond reference method value choices: Internal - lookup using the internal reference only. External - lookup using the external reference only. Both - lookup using both the internal and external references.
Choose the value depending on what is needed.
For attachments we only use the Internal lookup because we are not passing both references. Lookup could be done on External or Both, but the references would need to be added to the inbound request.
Make sure to set either stage.internal_reference or stage.external_reference (or both) to match in the Payload to Stage Script (see below).
Your Inbound Settings form should look like this:
Navigate to Advanced > Script Editor.
Script Editor Fields
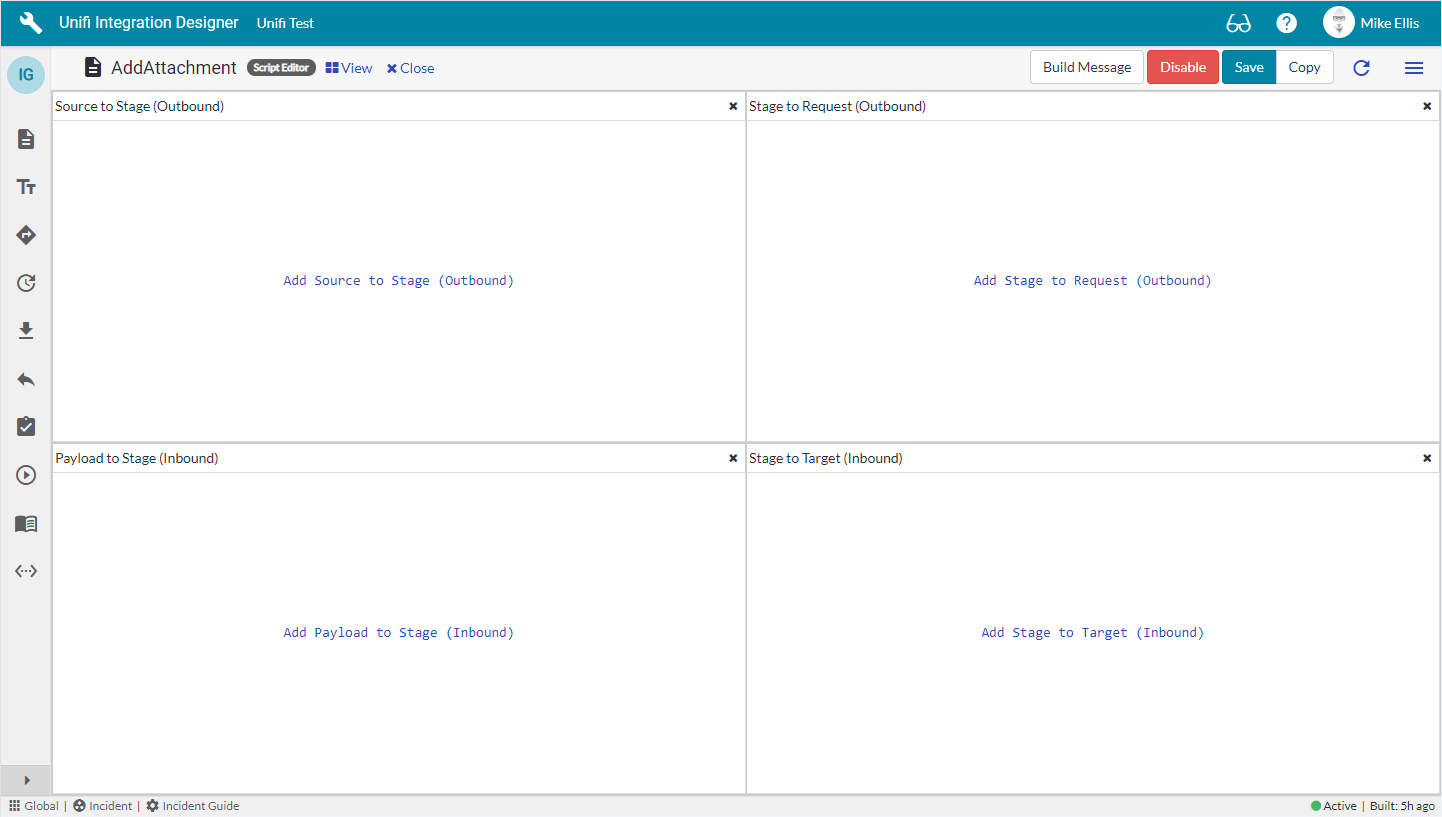
When you first open Script Editor, it should look like this:
The Script Editor fields to be configured are as follows:
Stage to Request
Method of searching for and validating an existing bond for incoming messages.
Update the code in the Stage to Request script field so that it looks like the code below
Payload to Stage
The script containing functions for extracting internal and external references from the request payload.
Update the code in the Payload to Stage script field so that it looks like the code below
Stage to Request (Outbound)
The code in the ‘Stage to Request’ script field should look like this:
file_name: It is necessary to encode the file_name so that the characters are converted into a format that can be transmitted and understood in the endpoint URL. Not doing so could cause the Transaction to fail (particularly if the file_name contains special characters).
payload: To stream outbound, you will need to set the payload to be "sys_attachment:<sysid>". Unifi will recognise this and automatically stream the attachment out.
You would configure other message data within the URL or the headers.
Payload to Stage (Inbound)
The code in the ‘Payload to Stage’ script field should look like this:
We have chosen to set the internal reference on stage as we have set the Bond reference method to 'Internal' (see above). I_f we had set the Bond reference method to 'External', we would need to set the stage external reference here (or both if we had set the Bond reference method to 'Both')._
Your Script Editor fields should now look like this:
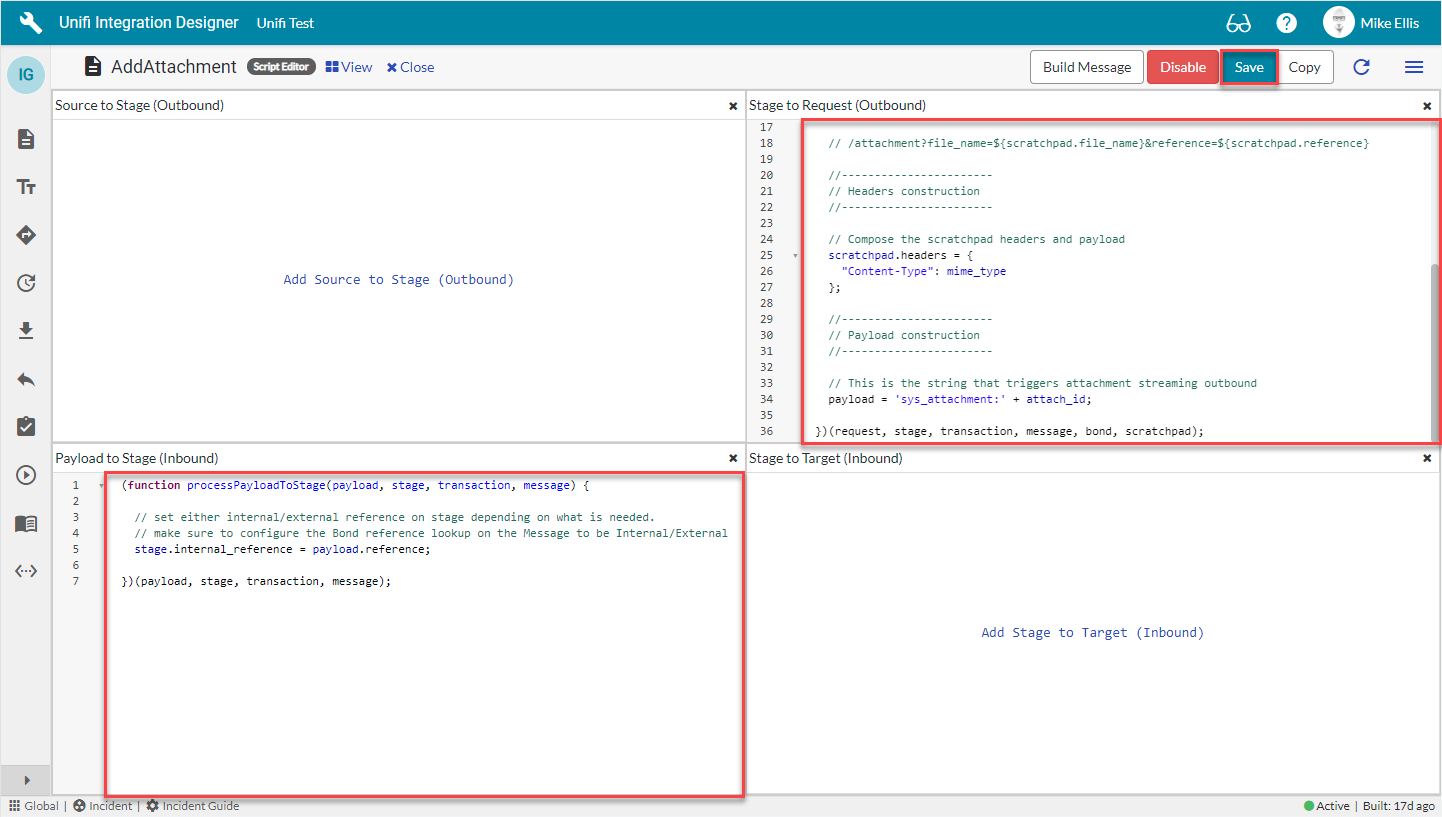
Save the message.
Next, we shall configure the Scripted REST Resource.
Was this helpful?
