LogoLogo
AboutSupport
4.2
4.2
  • Unifi User Documentation
  • Install
    • Release Notes
      • Unifi 4.2 Release Notes
      • Unifi 4.1 Release Notes
      • Unifi 4.0 Release Notes
      • Unifi 3.1 Release Notes
      • Unifi 3.0 Release Notes
      • Unifi 2.2 Release Notes
      • Unifi 2.1 Release Notes
      • Unifi 2.0 Release Notes
    • Install or Upgrade
      • Global Utility
      • Hotfix
  • Configure
    • Integration Designer
    • Processes
    • Integrations
    • Connections
    • Messages
    • Message Scripts
    • Fields
    • Field Maps
    • Response Actions
    • Event Actions
    • Datasets
      • Create a New Dataset
      • Dataset Extras
    • Polling
      • Pollers
      • Poll Processors
    • Administration
      • Activity Logs
      • Data Stores
      • Properties
      • Scheduled Scripts
      • System Logs
    • Attachments
      • Extracting Attachments
      • Fetching Attachments
      • Embedded Attachments
    • Scripting
      • Snippets
      • Variables
    • Documentation
    • How to guides
      • How to Handle Attachments
        • Message
        • Scripted REST Resource
        • Test AddAttachment
      • How to Manually Close a Bond
      • How to Poll for Large Response Payloads
      • How to Setup an OAuth Connection
        • Identity Provider Instance
        • Identity Consumer Instance
        • OAuth Refresh Token Job
      • How to Setup Heartbeat Messages
  • Deploy
    • Package
    • Instance Clone
  • Operate
    • Bonding
      • Bonds
      • Bonded Attachments
    • Transport
      • Snapshots
      • Transactions
      • Stages
      • HTTP Requests
      • Dataset Requests
      • Poll Requests
    • Error Handling
      • Integration Pause and Resume
      • Integration Repair
      • Request Retry
      • Transaction & Request Replay
      • Transaction Ignore
  • Test
    • Overview
    • Integration Test
    • Test Scenario
    • Test Scenario Data
    • Test Result
    • Test Scenario Result
    • Generating Tests
    • Running Tests
    • Exploring Results
  • Integration Guides
    • Outbound Incident Guide
      • Getting Started
      • Process
      • Integration
      • Connection
      • Create Scenario
        • CreateIncidentResponse Message
        • CreateIncidentResponse Fields
        • CreateIncident Message
        • CreateIncident Fields
        • Trigger
        • Test CreateIncident
      • Update Scenario
        • Response Message
        • UpdateIncident Message
        • UpdateIncident Fields
        • Test UpdateIncident
      • Resolve Scenario
        • ResolveIncident Message
        • ResolveIncident Fields
        • Test ResolveIncident
      • Build - Integration Level
      • Conclusion
    • Bidirectional Asynchronous Incident Guide
      • Getting Started
      • Process
      • Web Service
      • Integration
      • Connection
      • Create Scenario
        • Response Message
        • CreateIncidentReceipt Message
        • CreateIncidentReceipt Fields
        • CreateIncident Message
        • CreateIncident Fields
        • Trigger
        • Test CreateIncident
      • Update Scenario
        • Receipt Message
        • UpdateIncident Message
        • UpdateIncident Fields
        • Test UpdateIncident
      • Resolve Scenario
        • ResolveIncident Message
        • ResolveIncident Fields
        • Test ResolveIncident
      • Build - Integration Level
      • Build the Other Half
        • Move the Integration
        • Reconfigure the Connections
      • Conclusion
    • Incident Update Poller Guide
      • Polling
        • Poll Processor
        • Poller
      • Inbound Message
        • UpdateIncidentInbound Message
        • UpdateIncidentInbound Fields
      • Message Identification
      • Bond Identification
        • Edit Incident Form
        • Edit CreateIncident Message
      • Test Update Poll
      • Conclusion
    • Incident Multiple Message Poller Guide
      • Polling
        • Poll Processor
        • Poller
      • Inbound Messages
        • ResolveIncidentInbound Message
        • ResolveIncidentInbound Fields
      • Testing
        • Test UpdateIncidentInbound
        • Test ResolveIncidentInbound
      • Conclusion
    • Incident Create Poller Guide
      • Polling
        • Connection Variables
        • Poll Processor
        • Poller
      • Messages
        • CreateIncidentInboundReceipt Message
        • CreateIncidentInboundReceipt Fields
        • CreateIncidentInbound Message
        • CreateIncidentInbound Fields
      • Build - Integration Level
      • Test Create Poll
      • Conclusion
    • Incident Parent and Child Poller Guide
      • Polling
        • Connection Variables
        • Child Poll Processor
        • Child Poller
        • Parent Poll Processor
        • Parent Poller
      • Inbound Messages
      • Testing
        • Test UpdateIncidentInbound
        • Test ResolveIncidentInbound
      • Conclusion
    • Incident Attachment Poller Guide
      • Polling
        • Connection Variables
        • Edit Endpoint URLs
        • Get Attachment Poll Processor
        • Get Attachment Poller
        • Select Attachments Poll Processor
        • Select Attachments Poller
        • Edit Child Poll Processor
        • Edit Child Update Poller
      • Messages
        • AddAttachmentInbound Message
      • Testing
        • Test Outbound Scenarios
        • Test CreateIncidentInbound
        • Test UpdateIncidentInbound
        • Test ResolveIncidentInbound
        • Test AddAttachmentInbound
      • Conclusion
  • Troubleshooting
    • Attachments
      • Inbound SOAP/Base64 attachments stopped working
      • New record attachments are not sent from Portal
      • Special characters in attachment file names
    • Datasets
    • Development
      • Bonding to existing records
      • Copying an existing Unifi trigger rule doesn't work
      • Duplicate messages being sent
      • Deleted records are not packaged
      • Multipart Form Data
      • Undefined error when building an integration
    • Diagnostic
    • Installation
      • Latest version of Unifi not accessible
    • Integration Responses
      • Transaction has been processed already
      • Initiating transaction not found for inbound receipt
      • Message has already been processed
      • Message ID not found
      • Message is not valid for this bond
      • Message name not recognised
      • No retry for requests with 401 response
      • Unable to identify message name from request
    • Other
      • Dynamic stage does not render
      • Duplicate bonds on Request integrations
    • Self-test
  • About
    • Quick Tour
    • Supported Features
    • Application Modules
    • Data Model
    • Transport Data Flow
Powered by GitBook
On this page
  • Create Application Registry
  • Configure Connection
  • Outbound Connectivity
  • Connection Details

Was this helpful?

Export as PDF
  1. Configure
  2. How to guides
  3. How to Setup an OAuth Connection

Identity Provider Instance

These are the configuration changes to be made in the identity provider instance when setting up an OAuth Connection.

PreviousHow to Setup an OAuth ConnectionNextIdentity Consumer Instance

Was this helpful?

These instructions apply to ServiceNow. Other identity providers may vary.

Create Application Registry

In native ServiceNow, navigate to System OAuth > Application Registry and click New.

img

On the interceptor page, click Create an OAuth API endpoint for external clients.

The fields to be configured for the Application Registry record are as follows:

Field
Description
Value

Name

Name of the OAuth app

<Your Unique Name>

Client ID*

The client id of the OAuth app

[read-only] (automatically generated)

Client Secret*

The client secret of the OAuth app

Leave [Blank] to automatically generate

Refresh Token Lifespan*

The number of seconds a refresh token issued will be good for

8,640,000 (default value - automatically populated)

Access Token Lifespan*

The number of seconds an access token issued will be good for

1,800 (default value - automatically populated)

Comments

Comments about the OAuth app

<Your description of the purpose of the OAuth entity>

*These values are to be left as-is.

Your Application Registries New Record should look like this:

Submit the record.

If you re-open the record after submitting it, you will see that the Client Secret has been populated.

Configure Connection

In Unifi Integration Designer, navigate to Connections and click New.

We have chosen to configure a Connection for the Pre-Production environment because we have already configured connections in the Consumer Instance for both the Development and Test environments. Choose whichever environment is appropriate for your requirements.

The fields to be configured for the New Connection modal are as follows:

Field
Description
Value

Environment

The environment this connection applies to.

'Pre-Production'

Endpoint URL

The external system's access URL.

<External system Endpoint URL>

Active

Use this connection for the integration when true.

<true>

Outbound Connectivity

The format of the Endpoint URL is as follows:

https://<your_consumer_instance>.service-now.com/<your_consumer_resource_path>

The entire Endpoint URL can be easily obtained from the automatically created Message Resource on the Unifi Scripted REST API (displayed in the widget at the top of the Connections page) in the other instance.

Your New Connection modal should look like this:
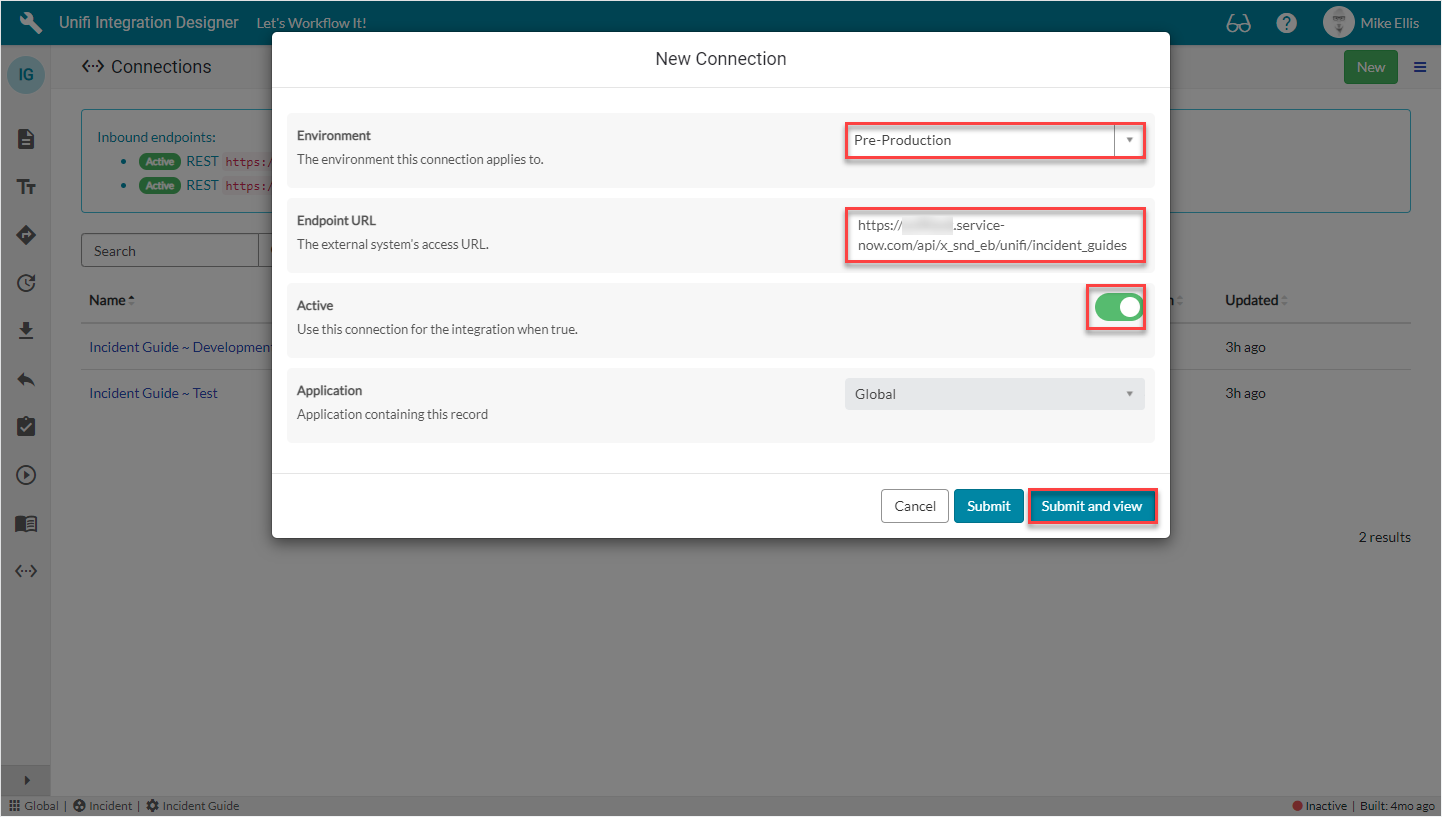
Submit and view to further configure the Connection.

Connection Details

Although we will be providing an OAuth Token for the external instance to consume when connecting to this instance, we will use Basic authentication to connect outbound with the Consumer Instance.

The fields to be configured for the Details form are as follows:

Field
Description
Value

Authentication

The authentication method to use for this connection.

'Basic'

User

The username used in basic authentication.

<external.system.user>

Password

The password used in basic authentication.

<External system user password>

Inbound user

The user profile used by the external system for authentication. An active connection must be found for the user to gain access.

lookup: <Your Inbound User>

Your Details form should look like this:
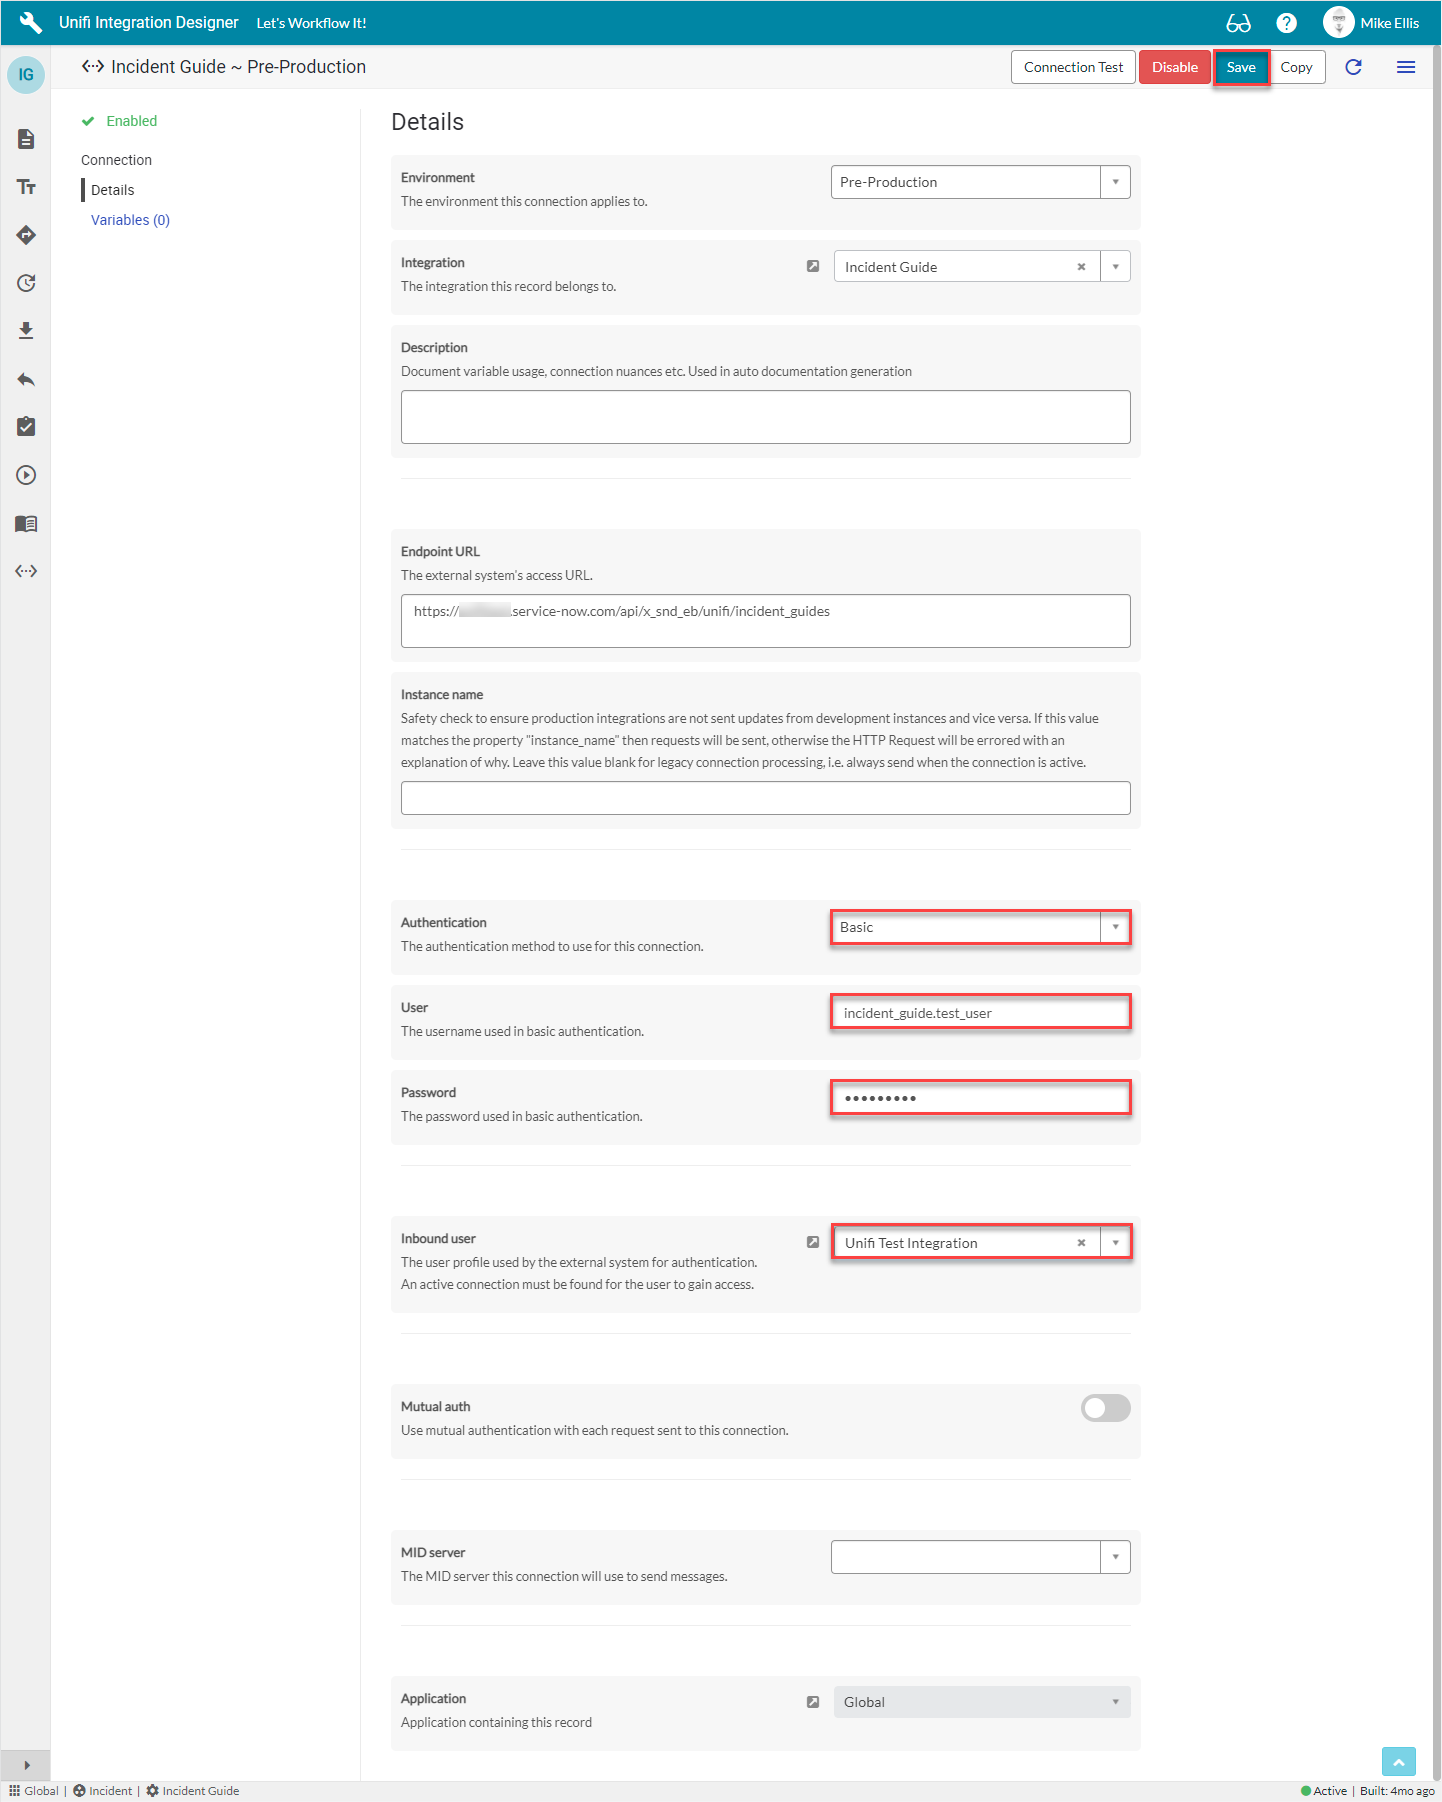
Save the Connection.

Next, configure the Identity Consumer Instance.

img
img

If you haven't already done so, you will need to create an Inbound user in this instance. See for details.

At this point you can perform a basic Connection test. For instructions, see .

here
here