Loading...
Loading...
Loading...
Loading...
Loading...
Loading...
Loading...
Loading...
The Response Message is the immediate synchronous response that is sent to acknowledge the successful transport of another Message.
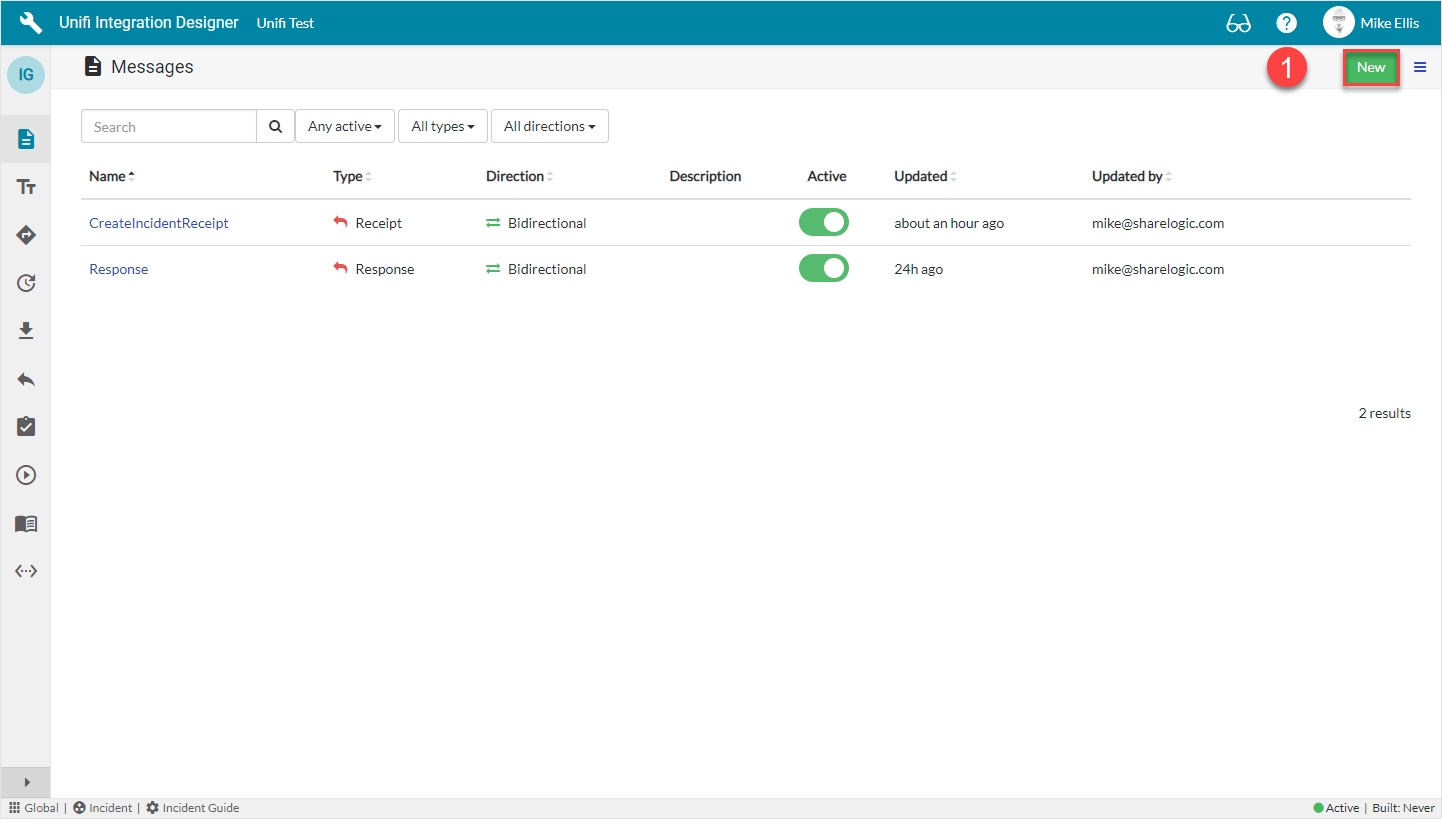
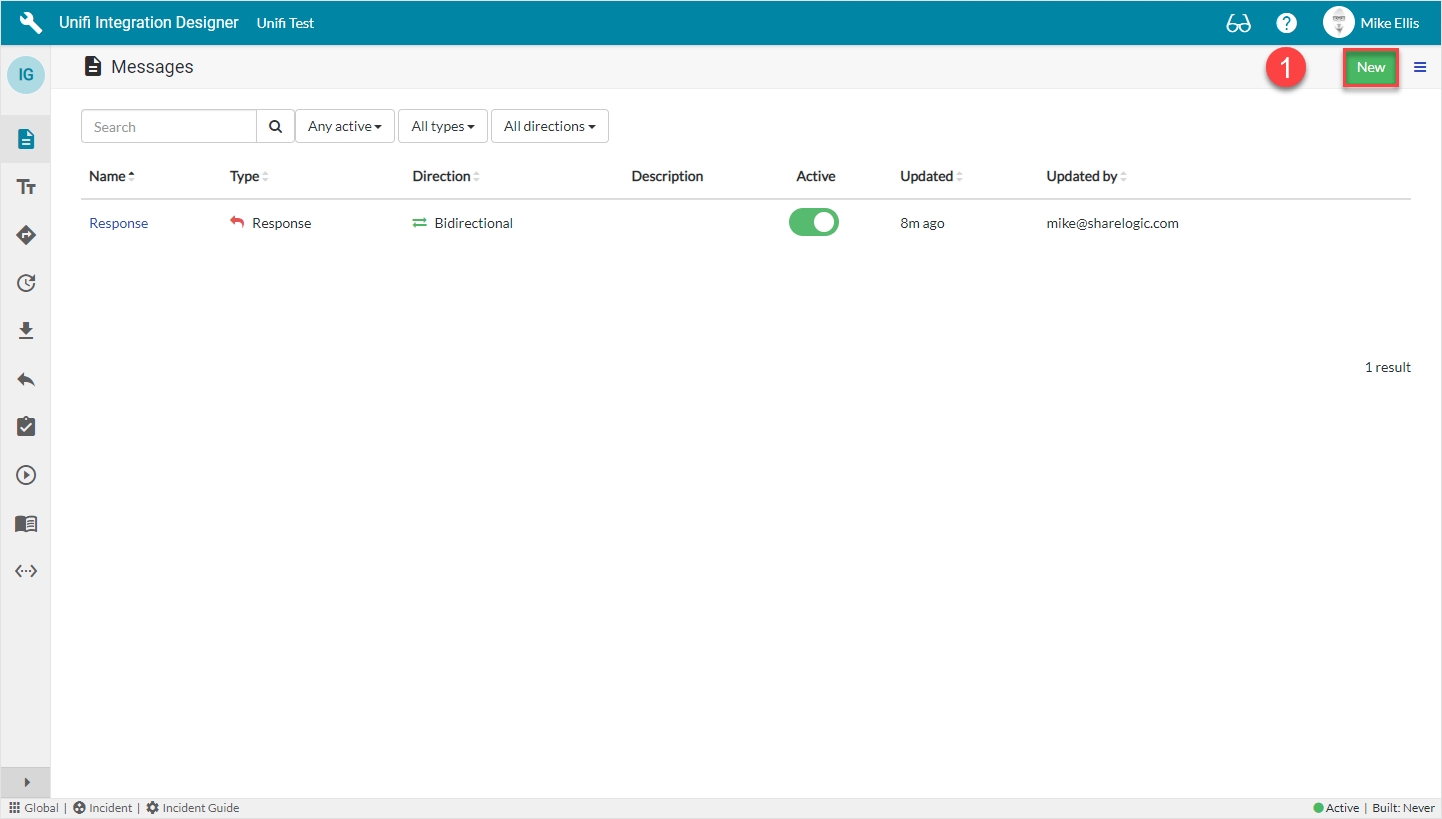
In Unifi Integration Designer, click on the 'Messages' icon & then New to begin configuring the Response Message.
The fields to be configured for the New Message modal are as follows:
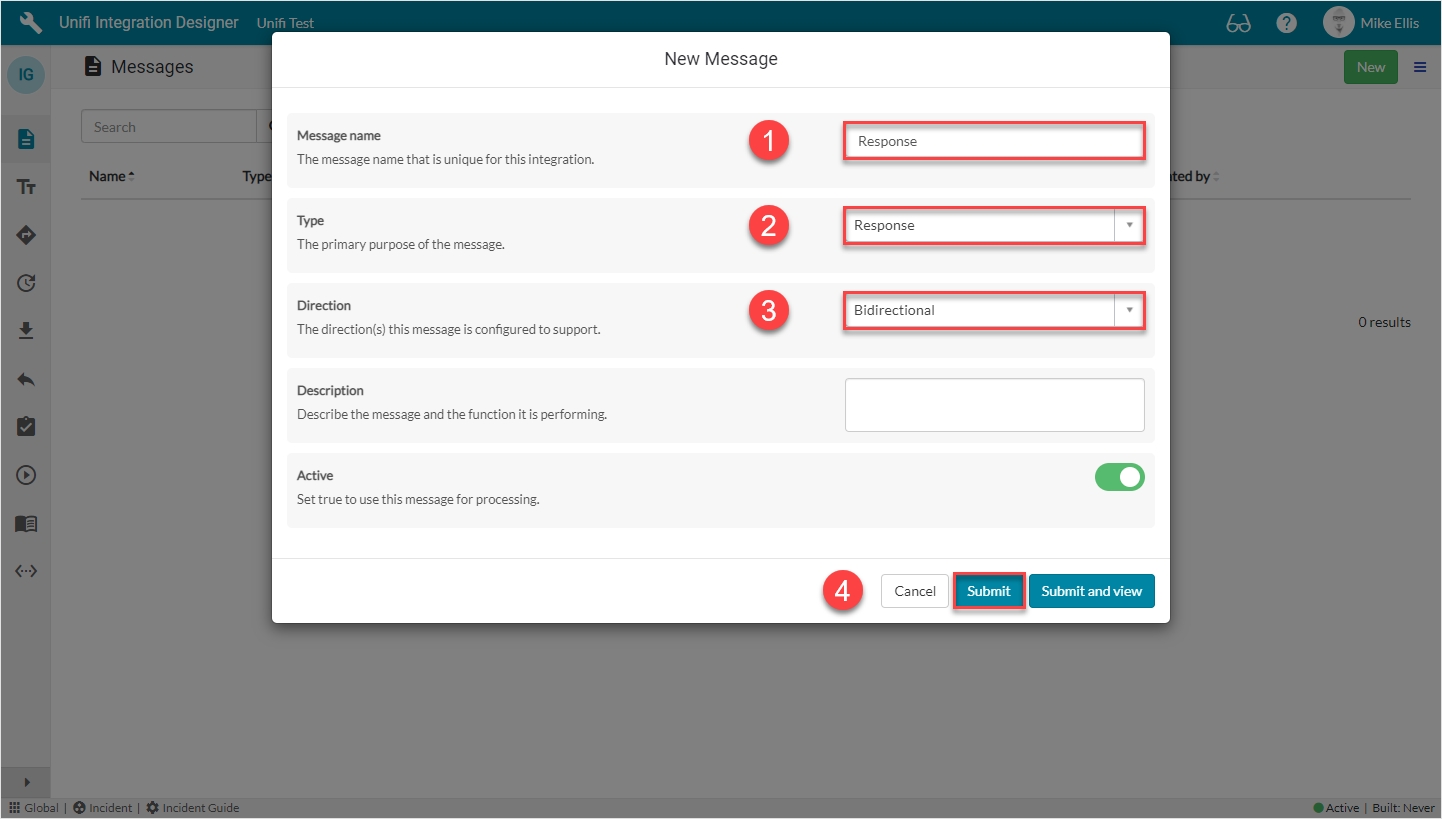
Message name
The message name that is unique for this integration.
'Response'
Your Response New Message modal should look like this:
Click Submit.
You will be redirected to the Messages page. We need not configure our Response Message any further.
Next, we shall move on and configure the CreateIncidentReceipt Message.
For each of our Scenarios we will need to configure the relevant Messages & Fields. This scenario will need to be tested before moving on to the next.
The Messages we shall be configuring for our Create Scenario are:
Response
CreateIncidentReceipt
CreateIncident
The scenario will need to be successfully tested before we can say it is complete.
We shall look in detail at each of the Messages and their respective Fields in turn over the next few pages, before moving on to Test.
Type
The primary purpose of the message.
'Response'
Direction
The direction(s) this message is configured to support. (Choices: Inbound, Outbound, Bidirectional)
'Bidirectional
We will utilise the Field & Field Map records to configure the Message Scripts for the CreateIncidentReceipt Message.
The Field Maps we shall use for our CreateIncidentReceipt Field records are:
Message Header
Receipt Status
To copy the Message Header Field Map, navigate to the 'Field Maps' icon.
Click on the ellipsis to the right of the Message Header Field Map & then click Copy.
The fields to edit for the Copy Field Map modal are as follows:
*This field is automatically populated.
Name: We have chosen to prefix the existing Field Map Name with the initials of our Integration (you are free to choose any appropriate means of identifying/differentiating).
Your Copy Field Map modal should look like this:
Click Copy.
You will be redirected to the Details page of the newly created Field Map.
Repeat the process for the Receipt Status Field Map.
From the CreateIncidentReceipt Message, navigate to Message > Fields. Click New.
The fields to be configured for our message_header New Field modal are as follows:
*These fields are automatically defaulted to true, or automatically populated.
**Field map: Value may vary. Choose the copy Field Map you created for your Integration.
Your 'message_header' New Field modal should look like this:
Submit the record.
You will be redirected back to the Fields page of the CreateIncidentReceipt Message.
Click New.
The fields to be configured for our transaction_details New Field modal are as follows:
*These fields are automatically defaulted to true, or automatically populated.
**Field map: Value may vary. Choose the copy Field Map you created for your Integration.
Your 'transaction_details' New Field modal should look like this:
Submit the record.
You will be redirected back to the Fields page of the CreateIncidentReceipt Message.
Now that we’ve configured the Field records for the CreateIncidentReceipt message, we are ready to build our message scripts.
The following Field records should now be in place for your CreateIncidentReceipt messsage:
Feature Alert: In the picture above you will notice that a 'Build Integration' button has appeared in the banner at the top of the page. Whenever a change is made to a Field record that is associated to a Message (whether that is being created, updated, or deleted) the button will be available and acts as a visual reminder that changes have been made and Message Script(s) need to be built. We will talk more about this feature in the page.
Navigate to Advanced > Script Editor.
When you first open the Script Editor, you will see the following:
Having visibility of your message scripts in the one pane makes scripting so much more efficient.
Click on Build Message.
You will see the 'Message build successful' Info Message.
Your Script Editor fields should now look like this:
You can click View to adjust the layout and change the view to show various combinations of, or individual script fields.
Once you have finished examining the code, click 'Close' to navigate back to the Fields page of the CreateIncidentReceipt Message.
We are now ready to configure our CreateIncident Message.
The Field Map this Field record is linked with.
'IG - Message Header'**
Map to field*
Use this Field record to represent a field on a source/target table.
<false>
Path
Where in the payload the data will be placed.
'message'
Property
The property in the payload the data will be written to.
'message_header'
Inbound*
Set to true to use for inbound Messages.
<true>
Outbound*
Set to true to use for outbound Messages.
<true>
The Field Map this Field record is linked with.
'IG - Receipt Status'**
Map to field*
Use this Field record to represent a field on a source/target table.
<false>
Path
Where in the payload the data will be placed.
'message'
Property
The property in the payload the data will be written to.
'transaction_details'
Inbound*
Set to true to use for inbound Messages.
<true>
Outbound*
Set to true to use for outbound Messages.
<true>
Name
The name of your field map. (If left unedited, it will append the word 'Copy' to the existing name.)
<Your Name>
Integration*
The integration this field map is associated with.
<Your Integration>
Message*
The Message this Field record is linked with.
'CreateIncidentReceipt'
Description
Describe what this field is for and any specific details that might help you in future.
'The protocol message header'
Active*
Set to true to use this Field record for processing.
<true>
Message*
The Message this Field record is linked with.
'CreateIncidentReceipt'
Description
Describe what this field is for and any specific details that might help you in future.
'Used to send and receive transaction process errors'
Active*
Set to true to use this Field record for processing.
<true>
Field map
Field map
//===== [ws] Begin Unifi Auto Generated Code =====//

/*
 * This code (between the Begin and End comments) is generated from the
 * Field and Field mapping records which are configured as part of the integration.
 *
 * All code either above or below the comments will be automatically maintained
 * through the build cycle.
 *
 * WARNING: Do not edit the Begin or End comments.
 */

(New auto-generated code will appear here)

//===== [ws] End Unifi Auto Generated Code =====//

(Old pre-existing code will appear here)The Trigger is a Business Rule which stipulates the conditions under which Messages will be sent for the Process concerned.
There is no need for you to manually create a Trigger (Business Rule). If you have more than one, you will make duplicate updates.
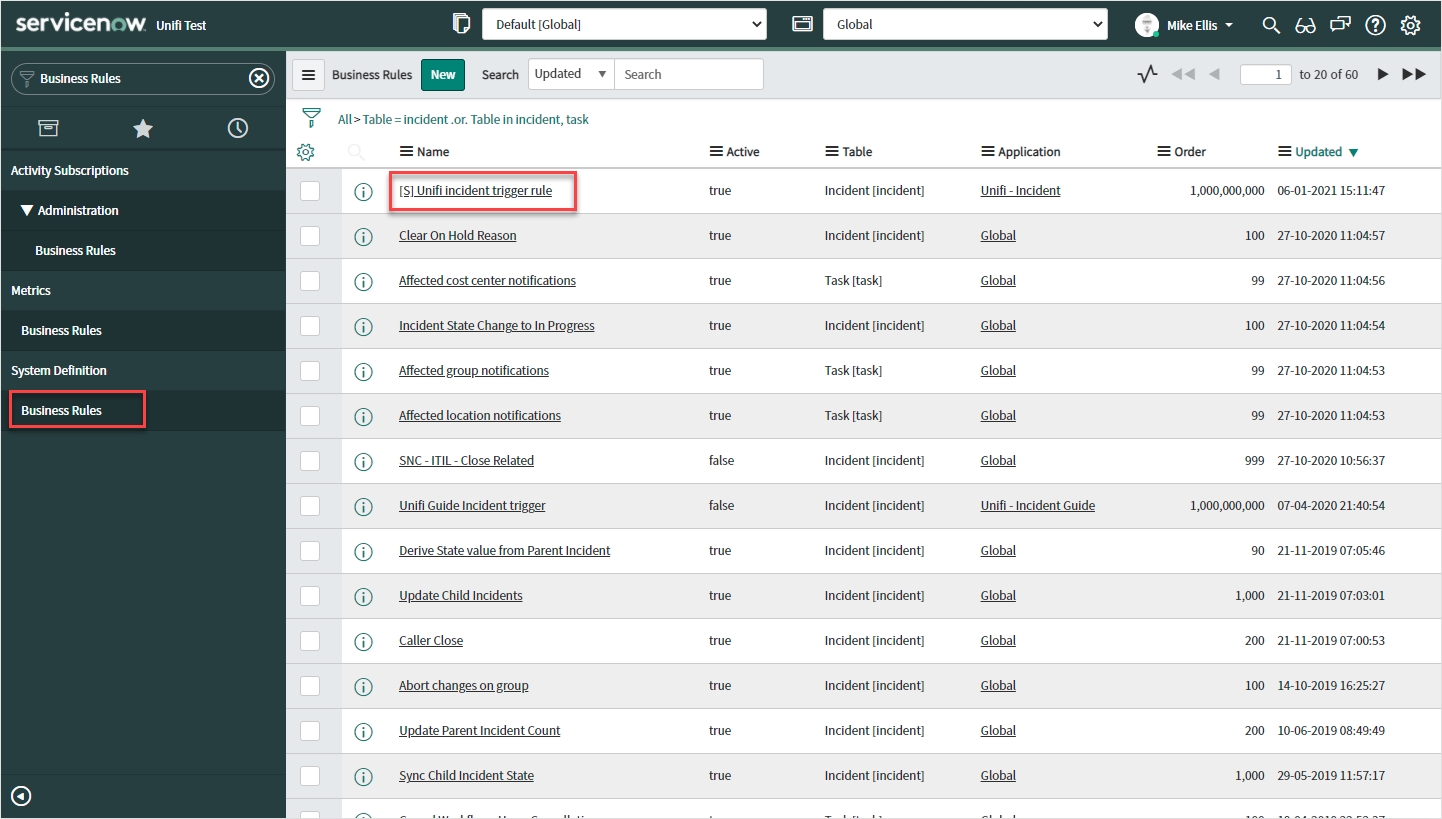
In native ServiceNow, navigate to System Definition > Busines Rules. Find and navigate to the automatically generated Business Rule.
The top section of your Business Rule record should look like this:
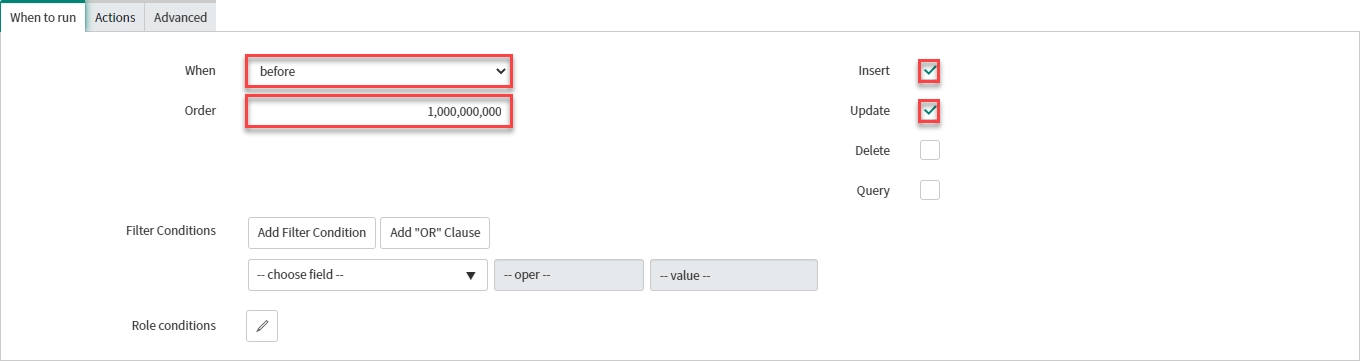
Your 'When to run' tab should look like this:
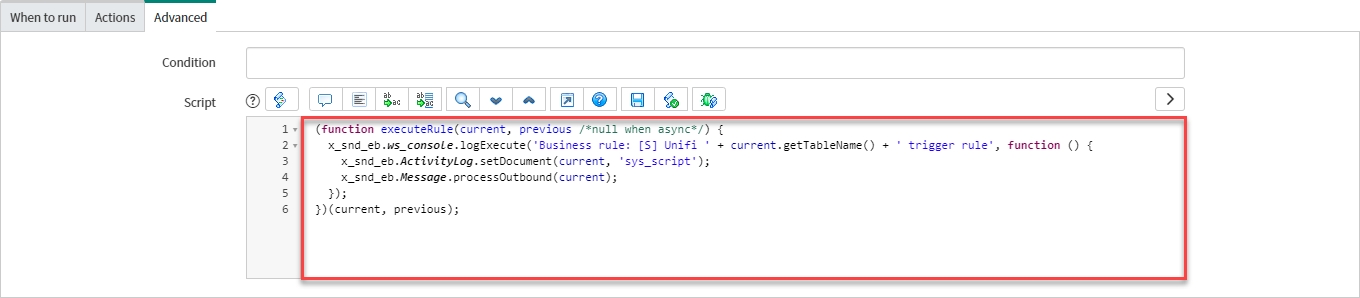
The code in the script field should look like this:
Your 'Advanced' tab should look like this:
We have confirmed the main elements are in place for our Integration to work. We are now ready to Test our CreateIncident Message.
The CreateIncident Message will create a ticket on the target table of the integrated system.
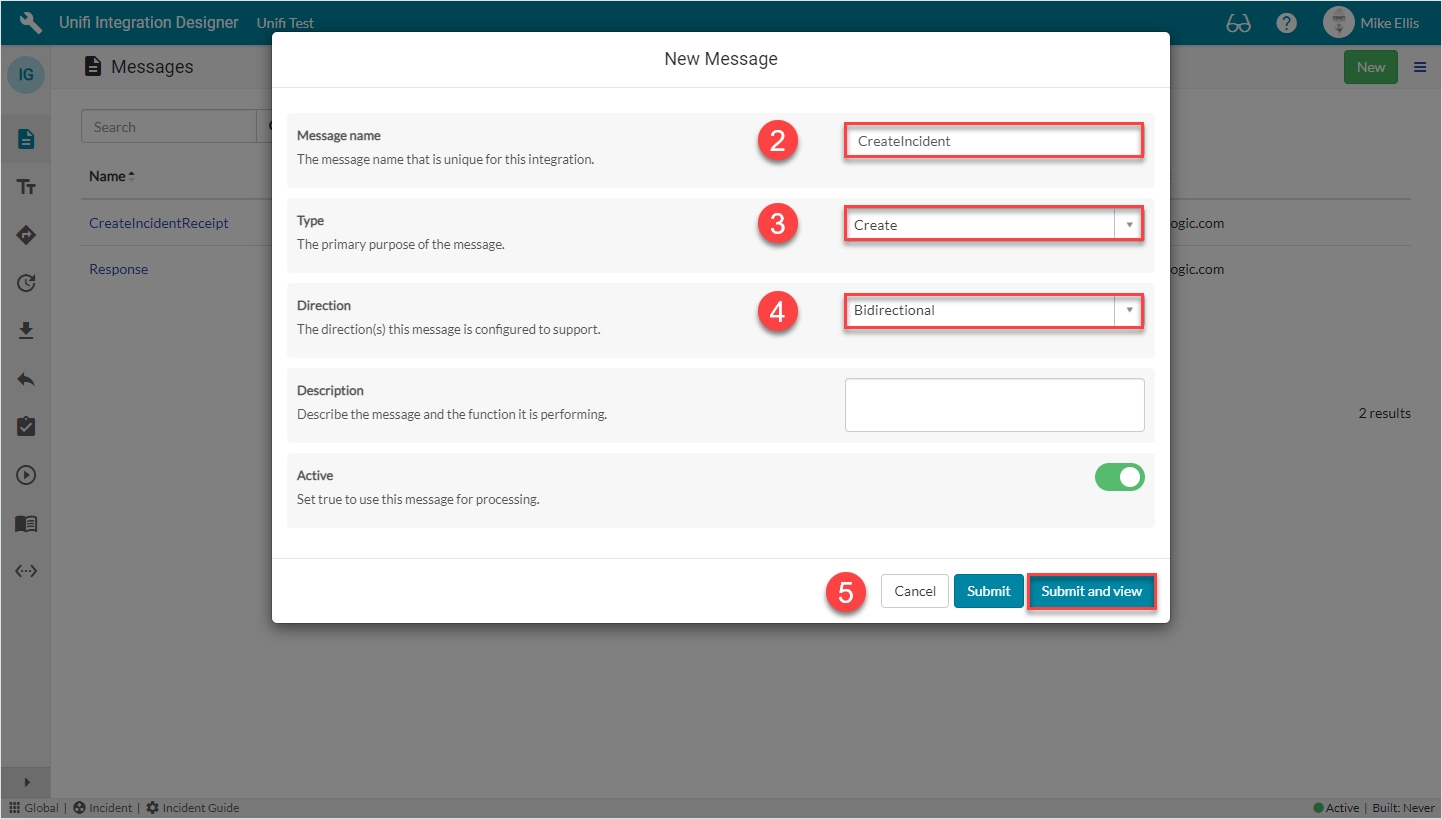
Message name
The message name that is unique for this integration.
'CreateIncident'
Type
The primary purpose of the message.
'Create'
Direction
The direction(s) this message is configured to support.
'Bidirectional'
Your CreateIncident New Message modal should look like this:
Submit and view to further configure the Message.
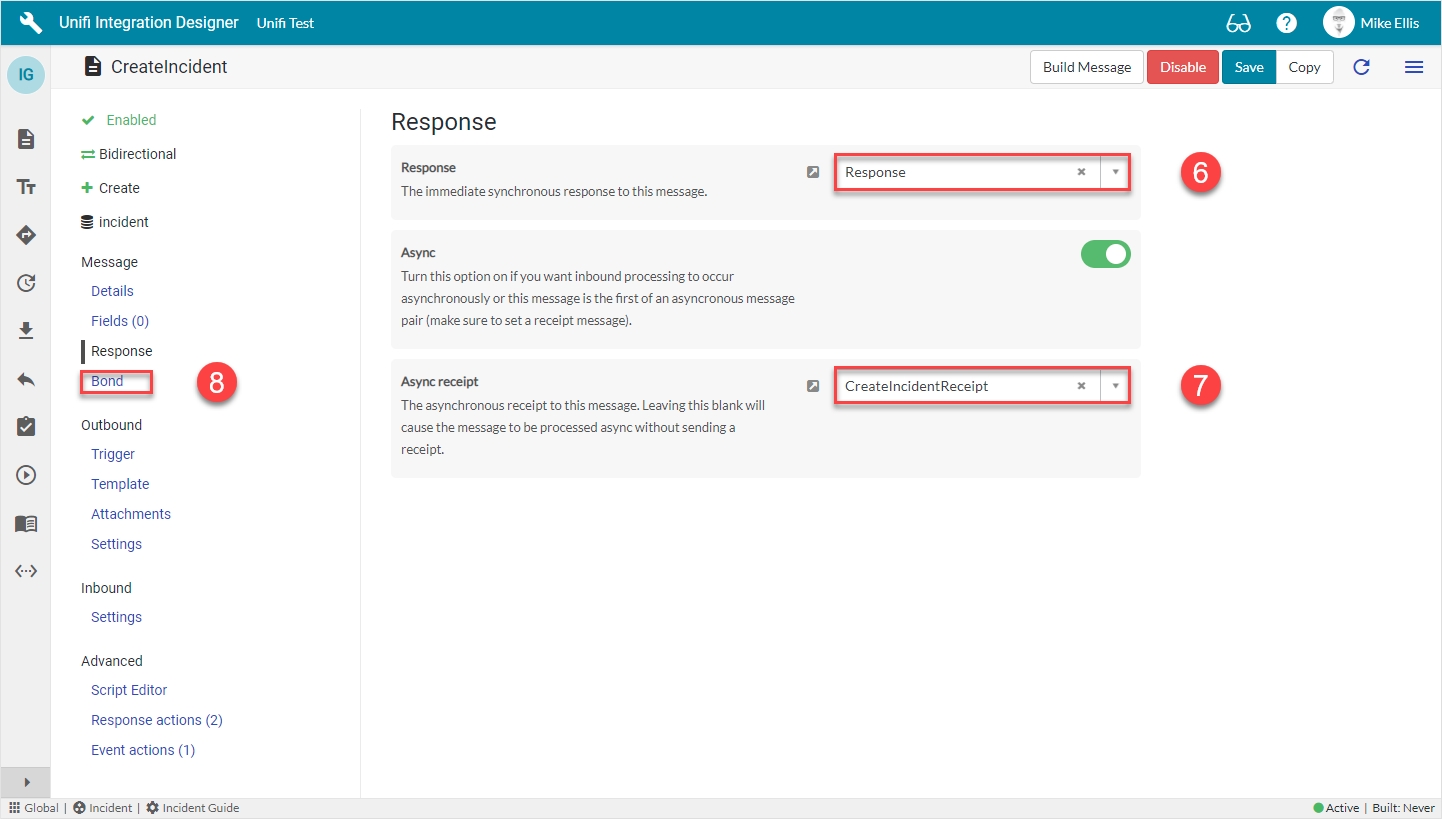
Navigate to Message > Response.
The Response fields to be configured are as follows:
Response
The immediate synchronous response to this message.
lookup: 'Response'
Async*
Turn this option on if you want inbound processing to occur asynchronously or this message is the first of an asyncronous message pair.
<true>
Async receipt
The asynchronous receipt to this message.
lookup: 'CreateIncidentReceipt'
*This field is automatically defaulted to true.
Your Response form should look like this:
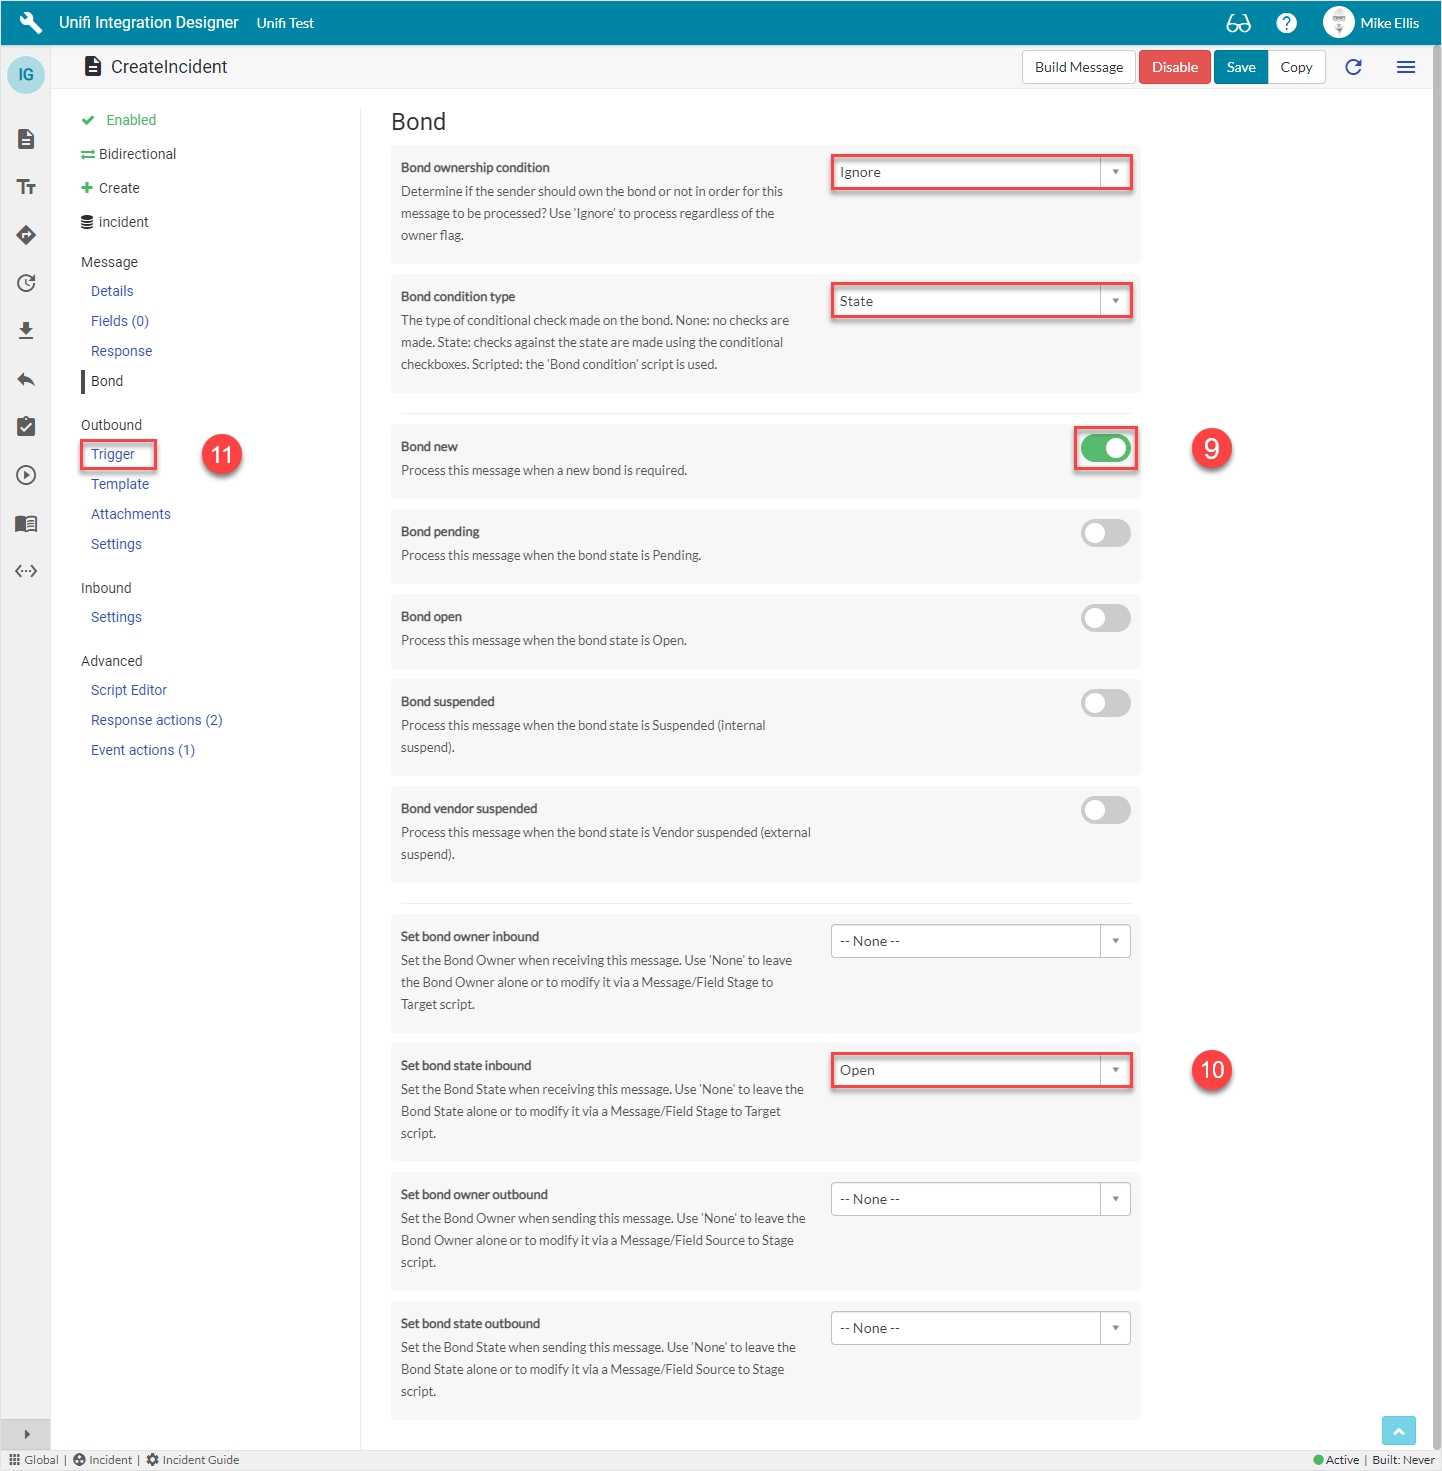
Navigate to Message > Bond.
The Bond fields to be configured are as follows:
Bond ownership*
Determine if the sender should own the bond or not in order for this message to be processed? Use 'Ignore' to process regardless of the owner flag. (Choices: Ignore, Must own, Must not own.)
'Ignore'
Bond condition type*
The type of conditional check made on the bond. (None: no checks are made. State: checks against the state are made using the conditional checkboxes. Scripted: the 'Bond condition' script is used.)
'State'
Bond new
Process this message when a new bond is required.
<true>
*These fields are automatically populated.
Your Bond form should look like this:
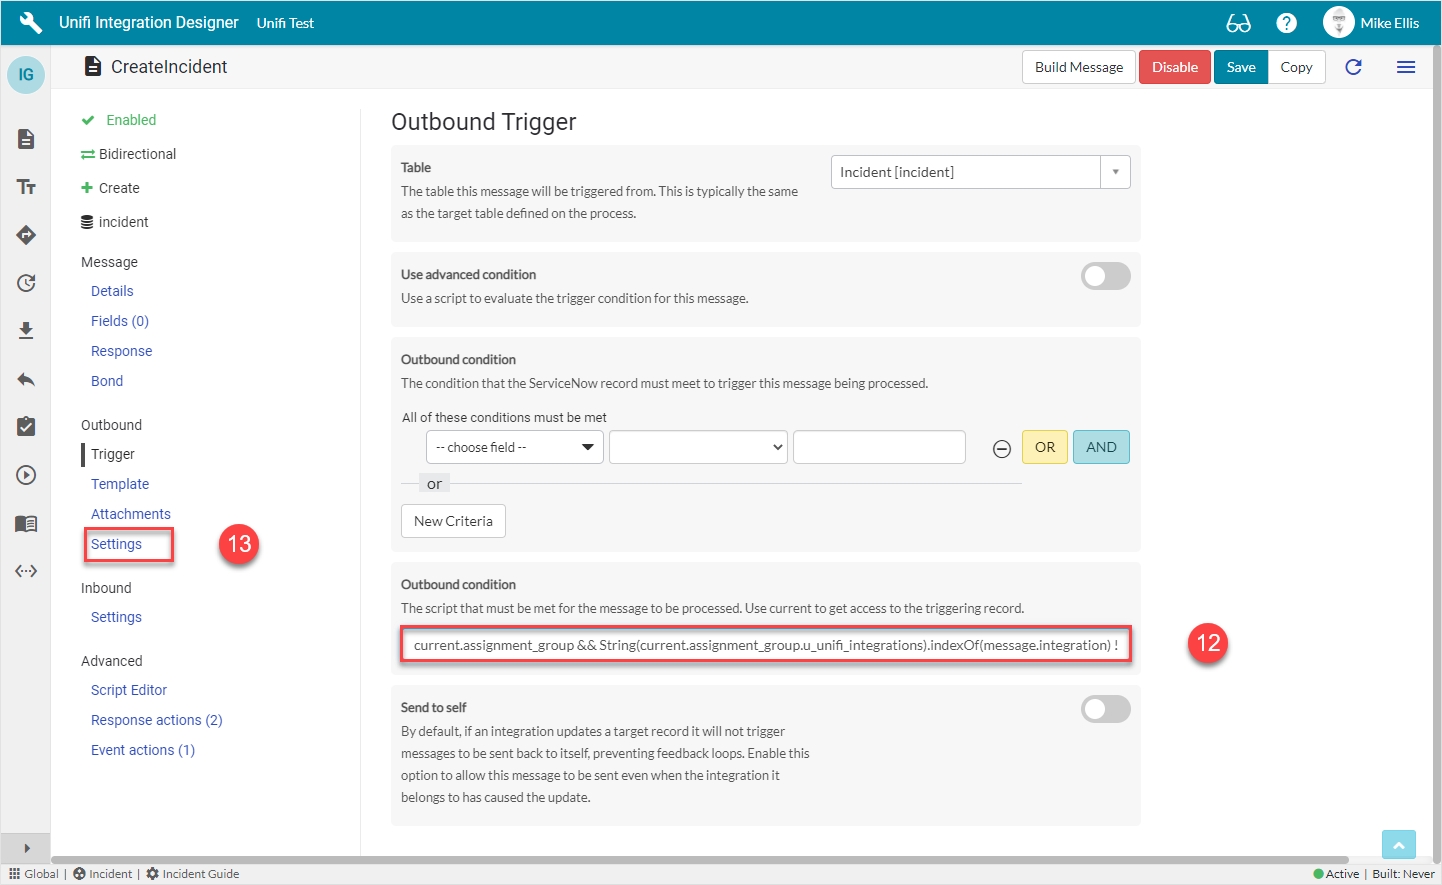
Navigate to Outbound > Trigger.
The Outbound Trigger fields to be configured (as required)* are as follows:
Outbound condition*
The condition that the ServiceNow record must meet to trigger this message being processed.
Update the Outbound condition script field with the code below
The code in the 'Outbound condition' script field should look like this:
This is an example of data-driving the trigger condition. This script checks whether the integration that this message belongs to is listed in a custom field on the assignment group which references the integration.
Your Outbound Trigger form should look like this:
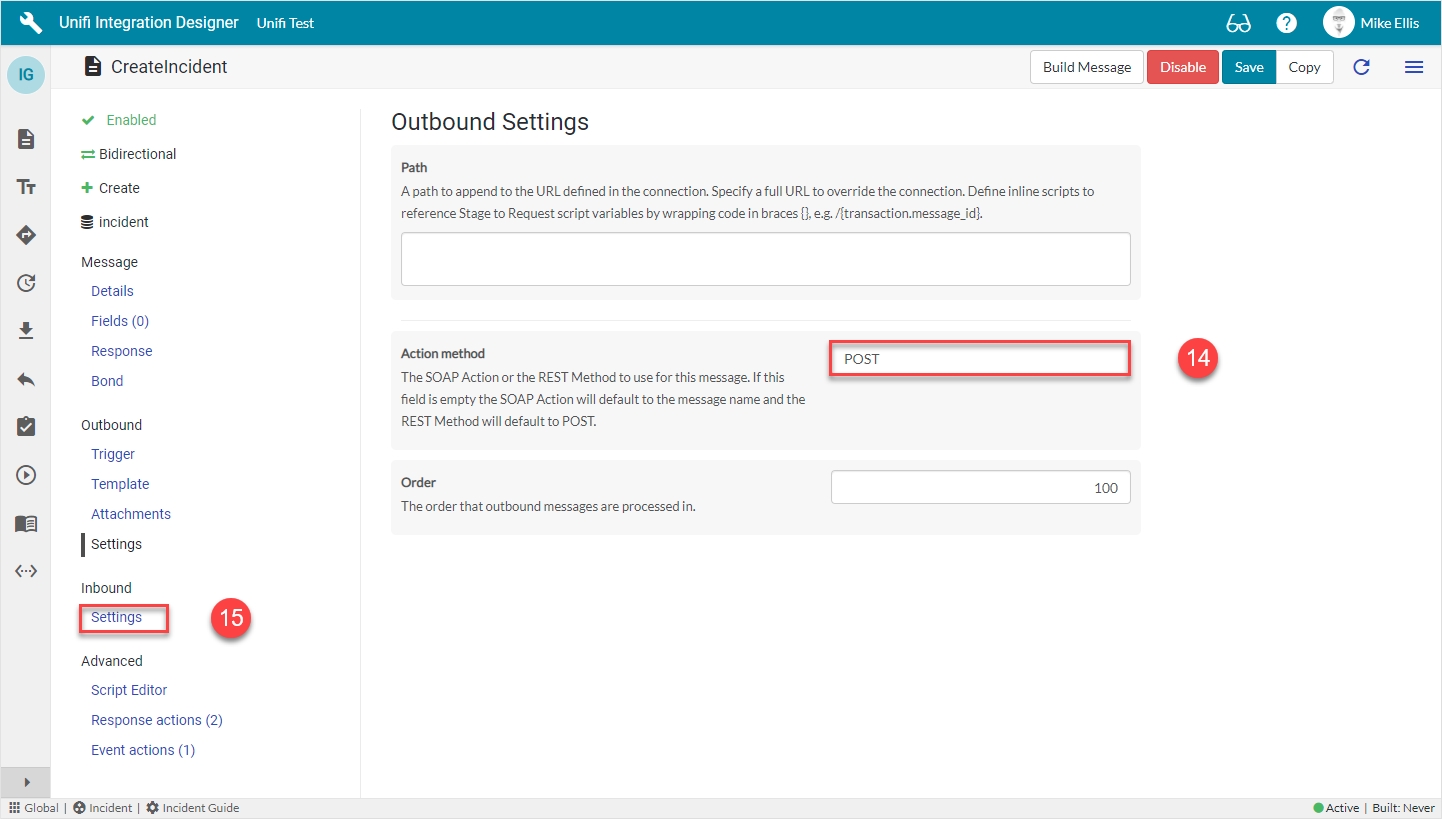
Navigate to Outbound > Settings.
The Outbound Settings fields to be configured are as follows:
Action method
The SOAP Action or the REST Method to use for this message. If this field is empty the SOAP Action will default to the message name and the REST Method will default to POST.
'POST'
Your Outbound Settings form should look like this:
Navigate to Inbound > Settings.
The Inbound Settings fields to be configured are as follows:
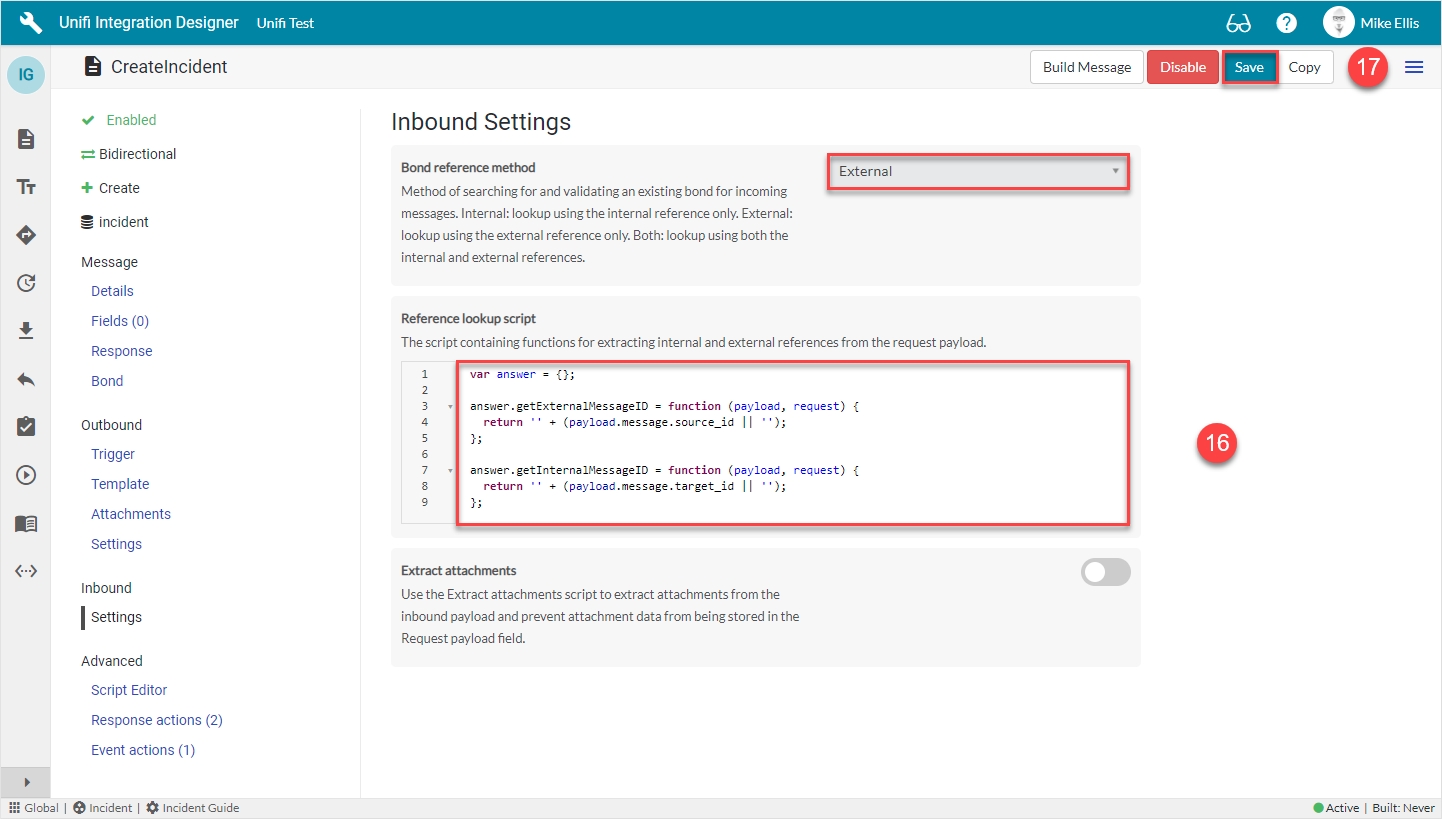
Bond reference method*
Method of searching for and validating an existing bond for incoming messages.
'External'
Reference lookup script
The script containing functions for extracting internal and external references from the request payload.
Update the code in the Reference lookup script field so that it looks like the code below
Bond reference method: The perspective of the available choices is in relation to the receiving instance i.e. Internal (internal reference) means the bonded ticket in our instance and External (external reference) means the bonded ticket in their instance.
Primarily used in relation to create and update type messages, these settings define which values to lookup against to search for and validate whether or not a bond already exists.
In the case of a create type message, we use 'External' because there is not yet a bonded ticket in the receiving instance to reference (if we were to receive a create type message which referenced a bond that already existed it would be rejected because we don't want to create another bond for a record we've already seen ).
In the case of an update type message, we use 'Both' because it's a more accurate method of validating updates are being sent to/received from the correct bonded records.
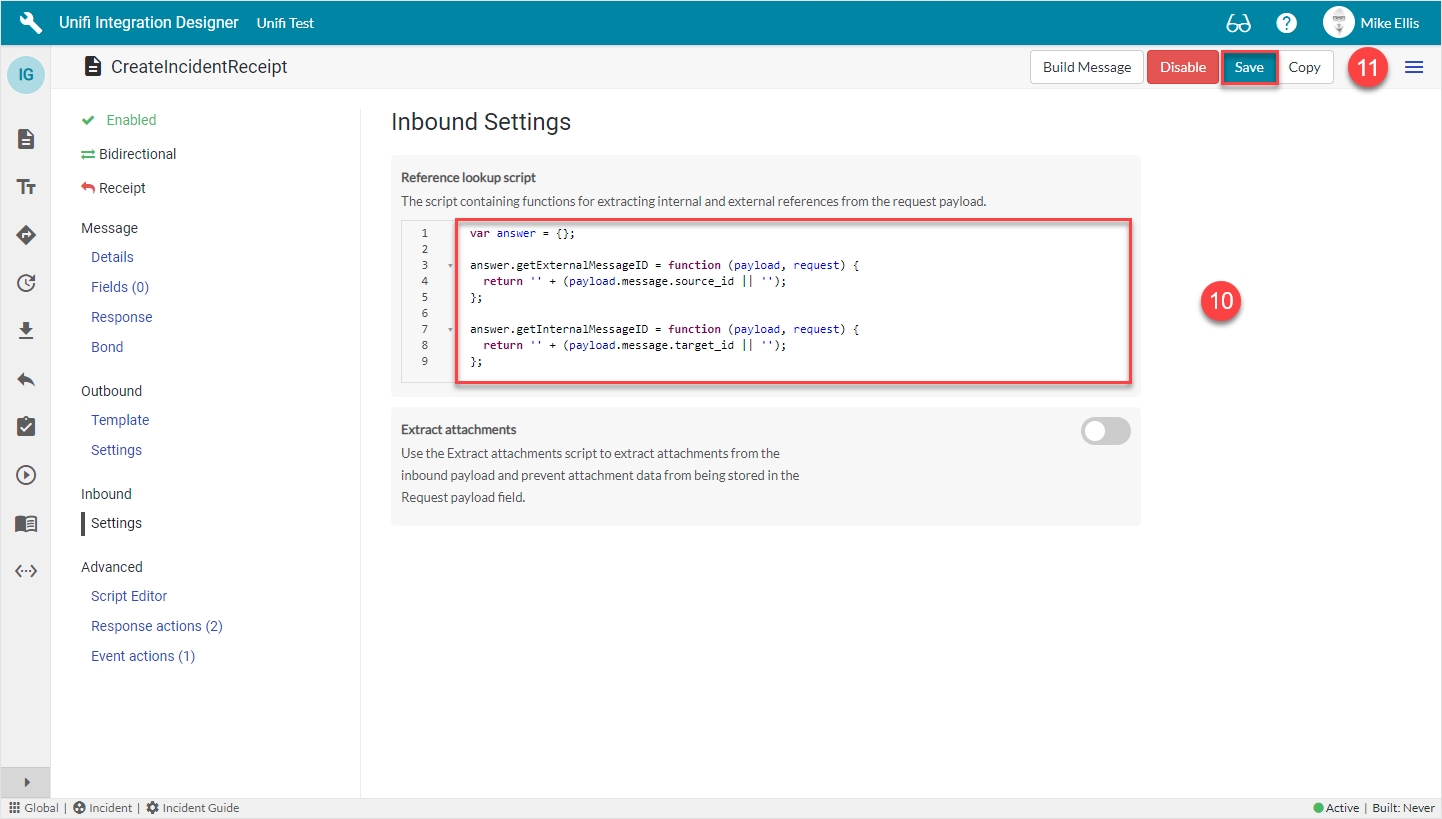
The code in the 'Reference lookup script' field should look like this:
Your Inbound Settings form should look like this:
Click Save.
We are now ready to configure the Fields for our CreateIncident Message.
current.assignment_group && String(current.assignment_group.u_unifi_integrations).indexOf(message.integration) != -1var answer = {};
answer.getExternalMessageID = function (payload, request) {
return '' + (payload.message.source_id || '');
};
answer.getInternalMessageID = function (payload, request) {
return '' + (payload.message.target_id || '');
};(function executeRule(current, previous /*null when async*/) {
x_snd_eb.ws_console.logExecute('Business rule: [S] Unifi ' + current.getTableName() + ' trigger rule', function () {
x_snd_eb.ActivityLog.setDocument(current, 'sys_script');
x_snd_eb.Message.processOutbound(current);
});
})(current, previous);Set bond state inbound
Set the Bond State when receiving this message. Use 'None' to leave the Bond State alone or to modify it via a Message/Field Stage to Target script. (Choices: None, Pending, Open, Suspended, Vendor suspended, Closed)
'Open'


The CreateIncidentReceipt Message is the asynchronous receipt that is sent after processing the Createincident Message.
You will have been redirected to the Messages page after submitting the Response Message. If navigating from elsewhere, click the 'Messages' icon and you will see the following screen (note: the previously configured message is visible in the list):
Click New.
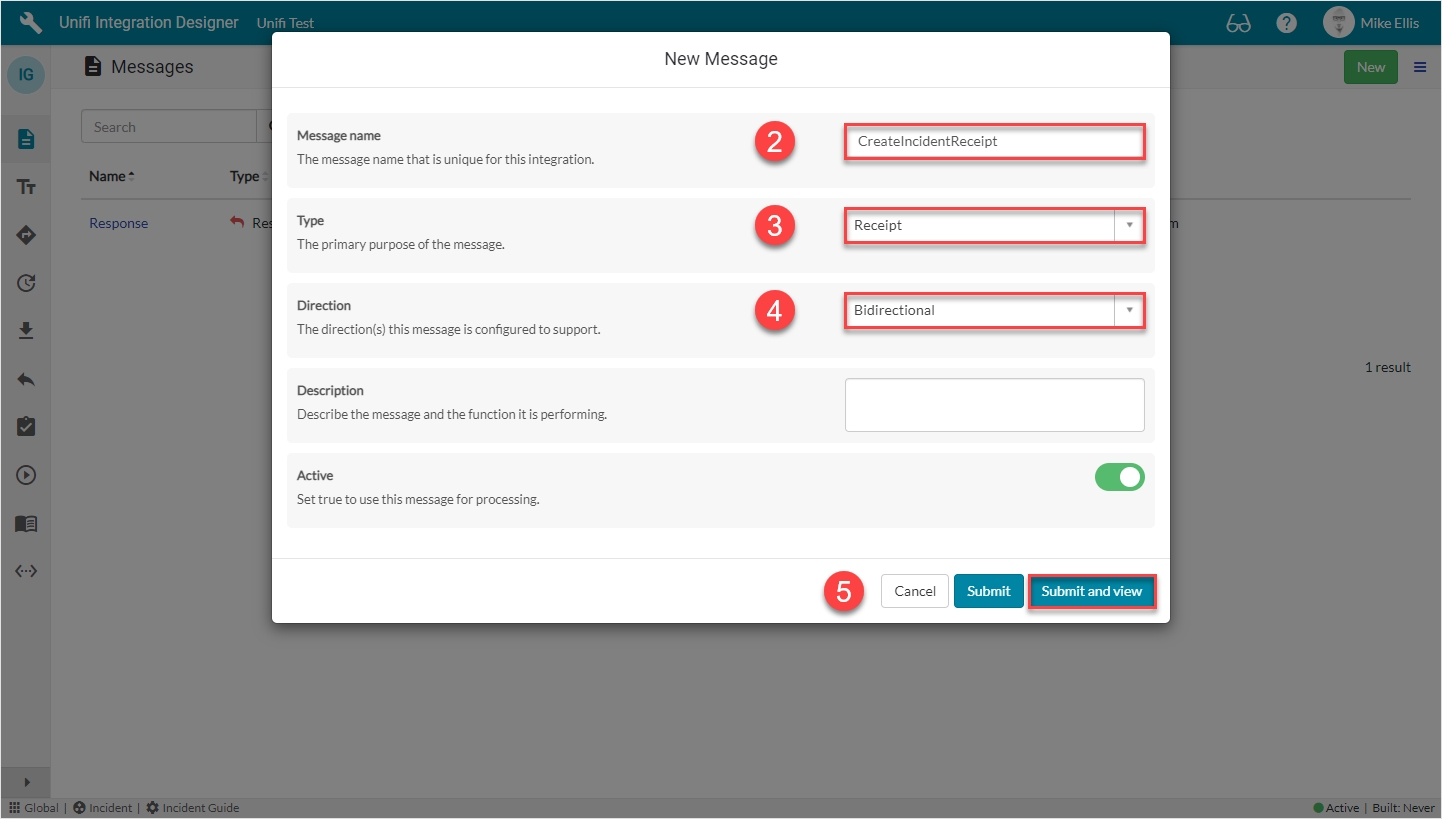
The fields to be configured for the CreateIncidentReceipt New Message modal are as follows:
Your CreateIncidentReceipt New Message modal should look like this:
Submit and view to further configure the Message.
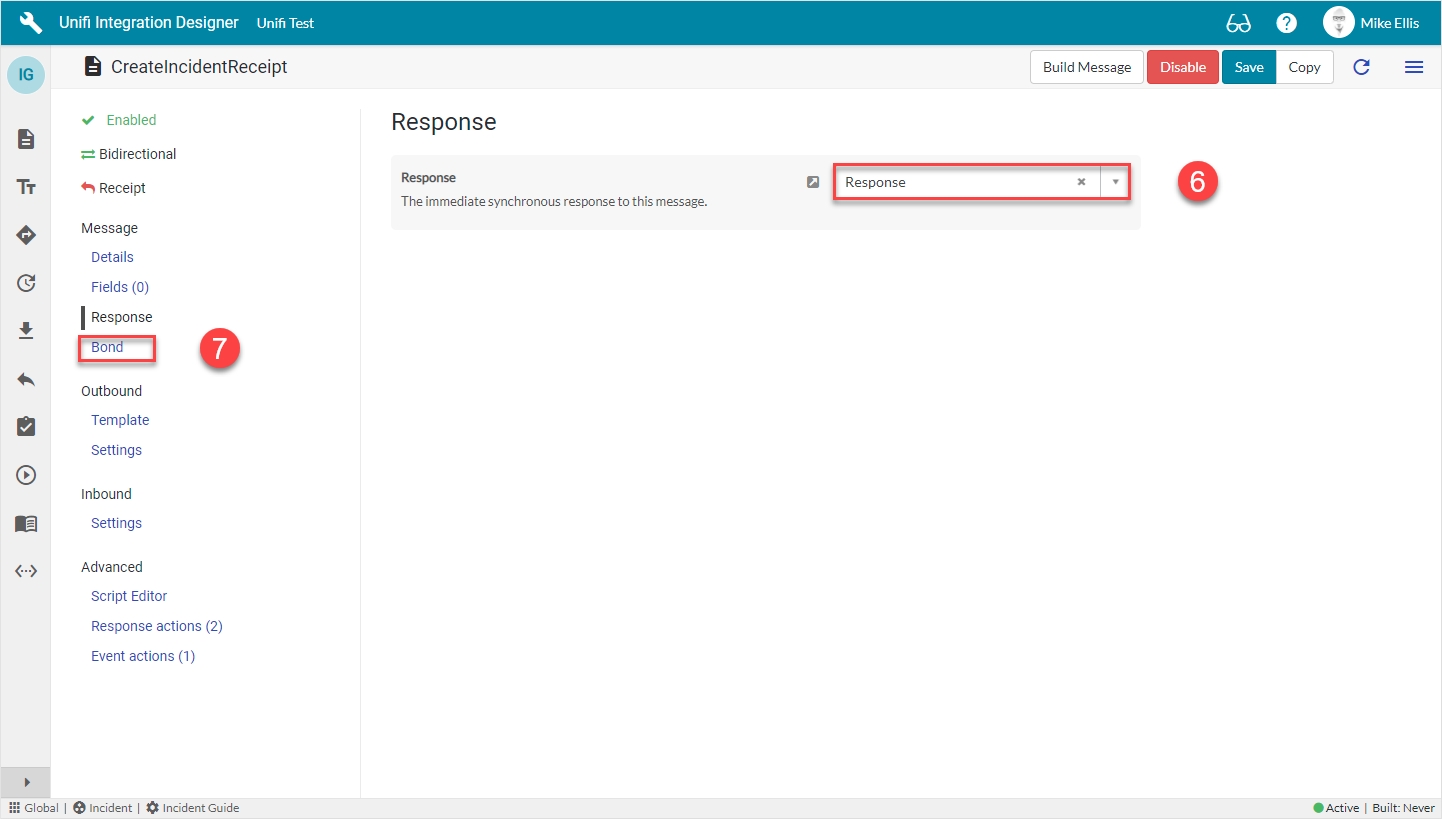
Navigate to Message > Response.
The Response fields to be configured are as follows:
Your Response form should look like this:
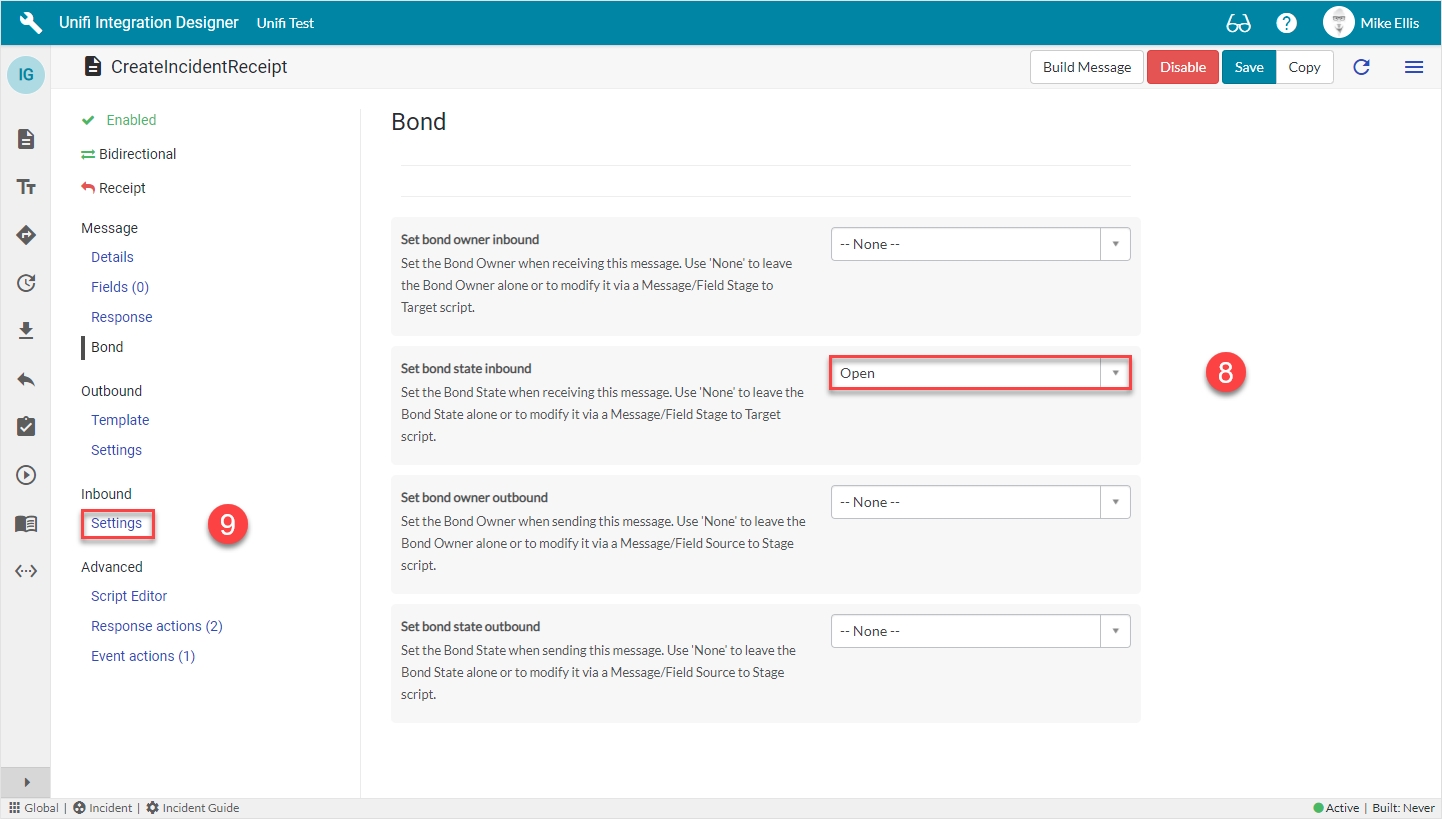
Navigate to Message > Bond.
The Bond fields to be configured are as follows:
Your Bond form should look like this:
Navigate to Inbound > Settings.
The Inbound Settings fields to be configured are as follows:
The code in the 'Reference lookup script' field should look like this:
Your Inbound Settings form should look like this:
Click 'Save'.
We are now ready to configure the Fields for our CreateIncidentReceipt Message.
Message name
The message name that is unique for this integration.
'CreateIncidentReceipt'
Type
The primary purpose of the message.
'Receipt'
Direction
The direction(s) this message is configured to support. (Choices: Inbound, Outbound, Bidirectional)
'Bidirectional'
Response
The immediate synchronous response to this message.
lookup: 'Response'
Set bond state inbound*
Set the Bond State when receiving this message. Use 'None' to leave the Bond State alone or to modify it via a Message/Field Stage to Target script.
'Open'
Reference lookup script
The script containing functions for extracting internal and external references from the request payload.
Update the code in the Reference lookup script field so that it looks like the code below

var answer = {};

answer.getExternalMessageID = function (payload, request) {
  return '' + (payload.message.source_id || '');
};

answer.getInternalMessageID = function (payload, request) {
  return '' + (payload.message.target_id || '');
};
Follow these steps to test the CreateIncident Message.
Because we have configured Unifi to connect to itself, we don't need to wait until we've connected to the external system before we test. We can test both sending and receiving Messages in the one instance. It goes without saying that these tests should be repeated once we have connected to the external instance.
To test, we will create an incident in our instance and then follow the data as it flows through the Unifi transport stack and on to the newly created ticket (whether that be in our instance, or in the external system we are integrating with).
We have data-driven the trigger for our Create Message so that it fires when a ticket is assigned to an assignment group which has the integration referenced on it. In order to test then, we’ll need to add our integration to the Unifi Integrations field on the assignment group that triggers our incidents. We will create a new assignment group as an example.
In native ServiceNow, navigate to User Administration > Groups. Click New.
The Group fields to be configured are as follows:
Your Group record should look like this:
Submit the record.
In native ServiceNow, navigate to Incident > Create New.
The Incident fields to configure are as follows:
Your Incident form should look like this:
Right-click & Save.
Note the values entered (including State), so that you can check them against the mapped fields on the corresponding record in the instance being integrated to.
You should see an Info Message, confirming the CreateIncident Message is being sent to your Integration:
When you scroll down to the 'Unifi Integrations' related list (you may have to configure the related lists to add it to your Incident form), notice:
A Bond has been created. The External reference is populated & the State has changed to 'Open'. Click the Bond Number link to open the Bond record.
Note: You may need to refresh the list by clicking the Bonds breadcrumb to view the changes.
Your Bond record should look like this:
Bond details:
Integration: < Your Integration >
Connection: < Your Connection >
Table: 'Incident [incident]'
Document: < Your Incident >
Transaction:
Message ID: Internal system's unique Transaction identifier
External Message ID: External system's unique Transaction identifier
Message: 'Createincident'
Direction: 'Outbound'
Transaction process next queued: Logs from checking whether there are any other transactions queued and processing those.
Transaction receive message: Logs from processing the inbound asynchronous receipt.
Transaction sending: Logs from taking the Stage data, building the Request record & sending the Request to the integrated system.
Business rule: < Your Trigger >: Logs from the Business Rule that triggered Unifi.
Click through to the Transaction record from the related list on the Bond.
Your Transaction record should look like this:
Transaction details:
Table: 'Incident [incident]'
Document: < Your Incident >
Integration: < Your Integration >
Connection: < Your Connection >
Errors:
Error: (If there was a transactional error the Transaction state would show as 'Error' and the details would be captured here).
Process error: (If there was a process error the Process state would show as 'Rejected' and the details would be captured here)
Stages:
Direction: 'Outbound' & 'Inbound'
Message: 'CreateIncident' & 'CreateIncidentReceipt'
Internal reference: < ServiceNow ticket reference > (Same as 'Document')
External reference: < External system's ticket reference >
Click through to the Outbound Stage record from the related list on the Transaction. (If you wish, you could also do the same for the Inbound Stage record.)
Check the values in the fields match what you expect.
Your Stage record should look like this:
Stage details:
Direction: 'Outbound'
Internal reference: < ServiceNow ticket reference >
Snapshot: < Snapshot record reference >
Message: 'CreateIncident'
Mapped Staged Data fields (yours may differ depending on which Field records you created):
caller_id: < Your caller.id >
short_description: < Your Short description >
state: '1'
Click through to the outbound HTTP Request record from the related list on the Transaction. (If you wish, you could also do the same for the Inbound HTTP Request.)
Your HTTP Request record should look like this:
HTTP Request details:
Integration: < Your Integration >
Connection: < Your Connection >
Transaction: < Your Transaction >
Message: 'CreateIncident'
Response details:
Status code: '200'
Response headers: < The header of the response being received >
Response payload: < The payload of the response being received >
Navigate to the corresponding Incident in the external system.
Check the values in the fields match those you noted when you saved the Incident in the internal system.
Your external system's Incident record should look like this (depending on the system you're integrating with, your record may look different; the important matter is that the values match):
Caller: < Your Caller >
State: < Your State >
Short description: < Your Short description >
Activities: < Note showing activity on the Incident > (Opened by < your.external.system.user > configured in the Connection)
Bond: Note that a bond exists in the external system in an 'Open' state and the 'Internal reference' & 'External reference' are reversed
If completing this test after having integrated with the external system (as opposed to connecting to your own instance), it would be good to test the CreateIncident Message in both directions.
We are now ready to move to the Update Scenario.
A brief description of the incident.
<Your Short description>
State: 'Open' (Message exchange is available)
Status: 'OK' (All transactions have completed)
Internal reference: < ServiceNow ticket reference > (Same as 'Document')
External reference: < External system's ticket reference >
Transaction state: 'Complete' (The data has been successfully transported)
Process state: 'Accepted' (The transaction was accepted as within the scope of the business logic that's in place)
Bond: < Your Bond >
Message: 'CreateIncident'
Direction: 'Outbound'
Transaction state: 'Complete' (The data has been successfully transported)
Process state: 'Accepted' (The transaction was accepted as within the scope of the business logic that's in place)
Transaction: < Your Transaction >
Integration: < Your Integration >
Direction: 'Outbound'
Request state: 'OK' (There are no errors with the HTTP Request.)
Attempt number: < Number of HTTP Request attempts > (Failed requests are retried up to the maximum attempts number as configured on the Integration.)
Endpoint URL: < The external system’s access URL >
Action Method: 'POST'
Request headers: < The header of the request being sent >
Request payload: < The payload of the request being sent >
Name
Descriptive name, e.g. DBAs, Network, etc.
<Your Name>
Type
Types of this group.
'itil', 'eBonding'
Unifi Integrations*
Glide List referencing the Integration [x_snd_eb_integration] table.
<Your Integration>
Caller*
Person who reported or is affected by this incident.
<Your Caller>
State*
The Incident lifecycle state.
'New' - Default (Automatically populated)
Assignment group
The group which triggers the Integration.
<Your Group>
Short description*


We will utilise the Field & Field Map records to configure the Message Scripts for the CreateIncident Message.
It is now easier than ever to create a Message level Field record for its Integration level counterpart.
From the CreateIncident Message, navigate to Message > Fields.
Find the message.message_header (Integration level) Field & set Active to true.
Feature Alert: The ‘Build Integration’ button becomes visible in the banner and the empty 'circle icon' (next to the Field name) turns green & contains a green ‘check’ (to indicate that Message level configuration exists for this Field). Note: the empty 'circle icon' indicates that the Integration level Field is available to add to the Message.
By simply setting the Active flag to true on the Integration level Field record listed on the Message, Unifi has automatically created the Message level counterpart. The Integration level record still exists (and can be seen when you click on the ‘Fields’ icon to navigate to the Fields page), but is no longer visible in the list view on the Message because the Message level record has been created.)
We will now configure Field records for a select few Incident record field elements.
Depending on your requirements, you will need to create Field records for each of the relevant Incident record field elements (see the table below for an example). For the sake of brevity, this Guide will focus on a select few. If you wish, however, you are free to continue & configure the remaining Field records. The table below lists an example of the Incident record field elements you may wish to map and the relevant Field Maps required to configure each Field record. For a fuller definition of available Field Maps, please see the relevant page in our .
The Field records we will focus on will be for Caller (Reference), Short description (String) and State (Choice).
If you haven't already, you will need to copy the relevant additional Field Maps for the CreateIncident Field records as follows:
Reference
String
Choice
See (on the 'CreateIncidentReceipt Fields' page) for details.
From the CreateIncident Message, navigate to Message > Fields. Click New.
The fields to be configured for the incident.caller_id New Field modal are as follows:
*These fields are automatically defaulted to true, or automatically populated.
**Field map: Value may vary. Choose the copy Field Map you created for your Integration.
Your 'incident.caller_id' New Field modal should look like this:
Submit the record.
You will be redirected back to the Fields page of the CreateIncident Message.
Click New.
The fields to be configured for the incident.short_description New Field modal are as follows:
*These fields are automatically defaulted to true, or automatically populated.
**Field map: Value may vary. Choose the copy Field Map you created for your Integration.
Your 'incident.short_description' New Field modal should look like this:
Submit the record.
You will be redirected back to the Fields page of the CreateIncident Message.
Field records can exist at both the Integration and the Message level (a Field record exists at the Integration level if it isn't linked to a Message i.e. the 'Message' field element is left blank). We noted previously that an Integration level Field record is automatically created when we first create one at the Message level. We will utilise and configure both when mapping 'incident.state'.
The 'incident.state' Field record is a Choice 'type' Field. These are used when you’re mapping choice field elements with static values that don't change per Message (e.g. State, Impact, Urgency) i.e. you're not going to have one set of choices/values for create and another for update.
Rather than configure choices for each Message, configure choices once at the Integration level. This means you only need define them once. The Field Map will take care of it and any 'incident.state' Field records that are set at the Message level (i.e. with a value in the 'Message' field) would use the choices configured at the Integration level.
We'll first configure the Message level Field and then move on to configure the choices on its Integration level counterpart.
From the CreatIncident Message, navigate to Message > Fields. Click New.
The fields to be configured for our incident.state (Message level) New Field modal are as follows:
*These fields are automatically defaulted to true, or automatically populated.
**Field map: Value may vary. Choose the copy Field Map you created for your Integration.
Your 'incident.state' (Message level) New Field modal should look like this:
Submit the record.
You will be redirected back to the Fields page of the CreateIncident Message.
Navigate to the 'Fields' icon to open the Fields page.
Click to open the incident.state (Integration level) Field record (the one where Message is empty).
The incident.state Field record opens to the Details page.
Navigate to Field > Field Choices.
Click Generate field choices.
Click Generate on the 'Generate field choices' modal which displays.
The Field Choices are generated & now visible in the list.
At this stage, you could carry on and configure any remaining Field records for the rest of the Incident record field elements (as per your requirements - see the at the top of this section). However, we will now run the Build process to auto-generate our Message Scripts.
Now that we’ve configured the Field records for the CreateIncident message, we are ready to build our message scripts.
From the CreateIncident message, navigate to Message > Fields.
The following Field records should now be in place for your CreateIncident messsage:
Click on Build Message.
You will see the 'Message build successful' Info Message.
Navigate to Advanced > Script Editor to view the auto-generated code.
Your Script Editor fields should look like this:
__
We are now ready to Test our CreateIncident Message.
Before we do, let's view the Trigger which Unifi automatically created when we ran 'Build Message'.


urgency
Choice
state
Choice
comments
Journal field
work_notes
Journal field
The Field Map this Field record is linked with.
'IG - Reference'**
Map to field*
Use this Field record to represent a field on a source/target table.
<true>
Table*
The primary source/target table that this Field record is mapped to.
'Incident' [incident]
Element
The field on the source/target table this Field record is mapped to.
'Caller'
Path
Where in the payload the data will be placed.
'detail'
Property*
The property in the payload the data will be written to.
Automatically populated
Inbound*
Set to true to use for inbound Messages.
<true>
Outbound*
Set to true to use for outbound Messages.
<true>
The Field Map this Field record is linked with.
'IG - String'**
Map to field*
Use this Field record to represent a field on a source/target table.
<true>
Table*
The primary source/target table that this Field record is mapped to.
'Incident' [incident]
Element
The field on the source/target table this Field record is mapped to.
'Short description'
Path
Where in the payload the data will be placed.
'detail'
Property*
The property in the payload the data will be written to.
Automatically populated
Inbound*
Set to true to use for inbound Messages.
<true>
Outbound*
Set to true to use for outbound Messages.
<true_>_
The Field Map this Field record is linked with.
'IG - Choice'**
Map to field*
Use this Field record to represent a field on a source/target table.
<true>
Table*
The primary source/target table that this Field record is mapped to.
'Incident' [incident]
Element
The field on the source/target table this Field record is mapped to.
'State'
Path
Where in the payload the data will be placed.
'detail'
Property*
The property in the payload the data will be written to.
Automatically populated
Inbound*
Set to true to use for inbound Messages.
<true>
Outbound*
Set to true to use for outbound Messages.
<true>
caller_id
Reference
short_description
String
description
String
category
Choice
impact
Choice
Message*
The Message this Field record is linked with.
'CreateIncident'
Description
Describe what this field is for and any specific details that might help you in future.
'The caller on this incident'
Active*
Set to true to use this Field record for processing.
<true>
Message*
The Message this Field record is linked with.
'CreateIncident'
Description
Describe what this field is for and any specific details that might help you in future.
'The short description of the incident'
Active*
Set to true to use this Field record for processing.
<true>
Message*
The Message this Field record is linked with.
'CreateIncident'
Description
Describe what this field is for and any specific details that might help you in future.
'The incident lifecycle state'
Active*
Set to true to use this Field record for processing.
<true>
Field map
Field map
Field map


//===== [ws] Begin Unifi Auto Generated Code =====//

/*
 * This code (between the Begin and End comments) is generated from the
 * Field and Field mapping records which are configured as part of the integration.
 *
 * All code either above or below the comments will be automatically maintained
 * through the build cycle.
 *
 * WARNING: Do not edit the Begin or End comments.
 */

(New auto-generated code will appear here)

//===== [ws] End Unifi Auto Generated Code =====//

(Old pre-existing code will appear here)