Testing
You should have successfully configured two Poll Processors and two Pollers (plus edited the previously configured Child Poller & Poll Processor and edited the Endpoint URLs. Now to test.
If active, it may help to turn off the Parent Update Poller we created (set Active to 'false') whilst conducting these tests and to manually execute it as required (this can still be done even if the Poller is inactive). This is so that we don't have to wait for the Poller to run, but rather manually activate it when needed by clicking 'Execute Now'.
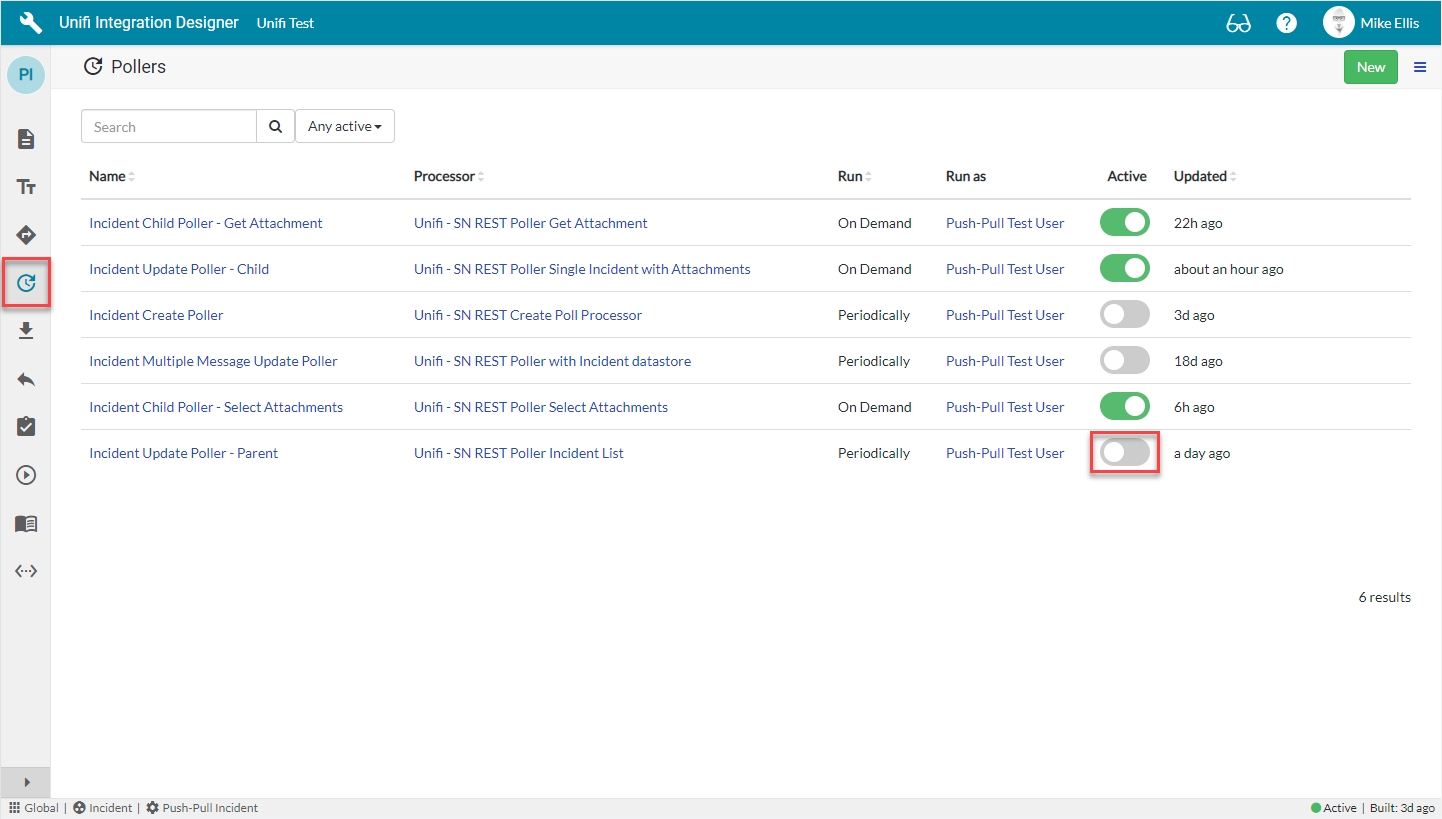
To turn it off, in Unifi Integration Designer, click the 'Pollers' icon, locate the Parent Update Poller & set Active to false.
If you have edited the Connection, Poll Processors & Outbound Message Paths and because our Poll Processors have been configured to poll for updates from our PDI and make a decision - telling Unifi which Message to use to process that data, it will be necessary to test, utilising all the previously configured Messages, along with the new one. The Message Scenarios we shall be testing are:
CreateIncident
UpdateIncident
ResolveIncident
CreateIncidentInbound
UpdateIncidentInbound
ResolveIncidentInbound
AddAttachmentInbound
We will look in more detail at the steps for each over the next several pages.
First, we shall test the Outbound Scenarios.
Test Outbound ScenariosTest CreateIncidentInboundTest UpdateIncidentInboundTest ResolveIncidentInboundTest AddAttachmentInboundTest Outbound Scenarios
Follow these instructions to test the outbound Message scenarios.
We will create some bonded tickets in the remote instance - initially testing the outbound Message scenarios. Those bonded tickets will then also be available to test the inbound Message scenarios.
Test CreateIncident
In native ServiceNow, navigate to Incident > Create New.
The Incident fields to configure are as follows:
Caller
Person who reported or is affected by this incident.
<Your Caller>
Short description
A brief description of the incident.
<Your Short description>
Description
Detailed explanation on the incident.
<Your Description>
Your Incident form should look like this:
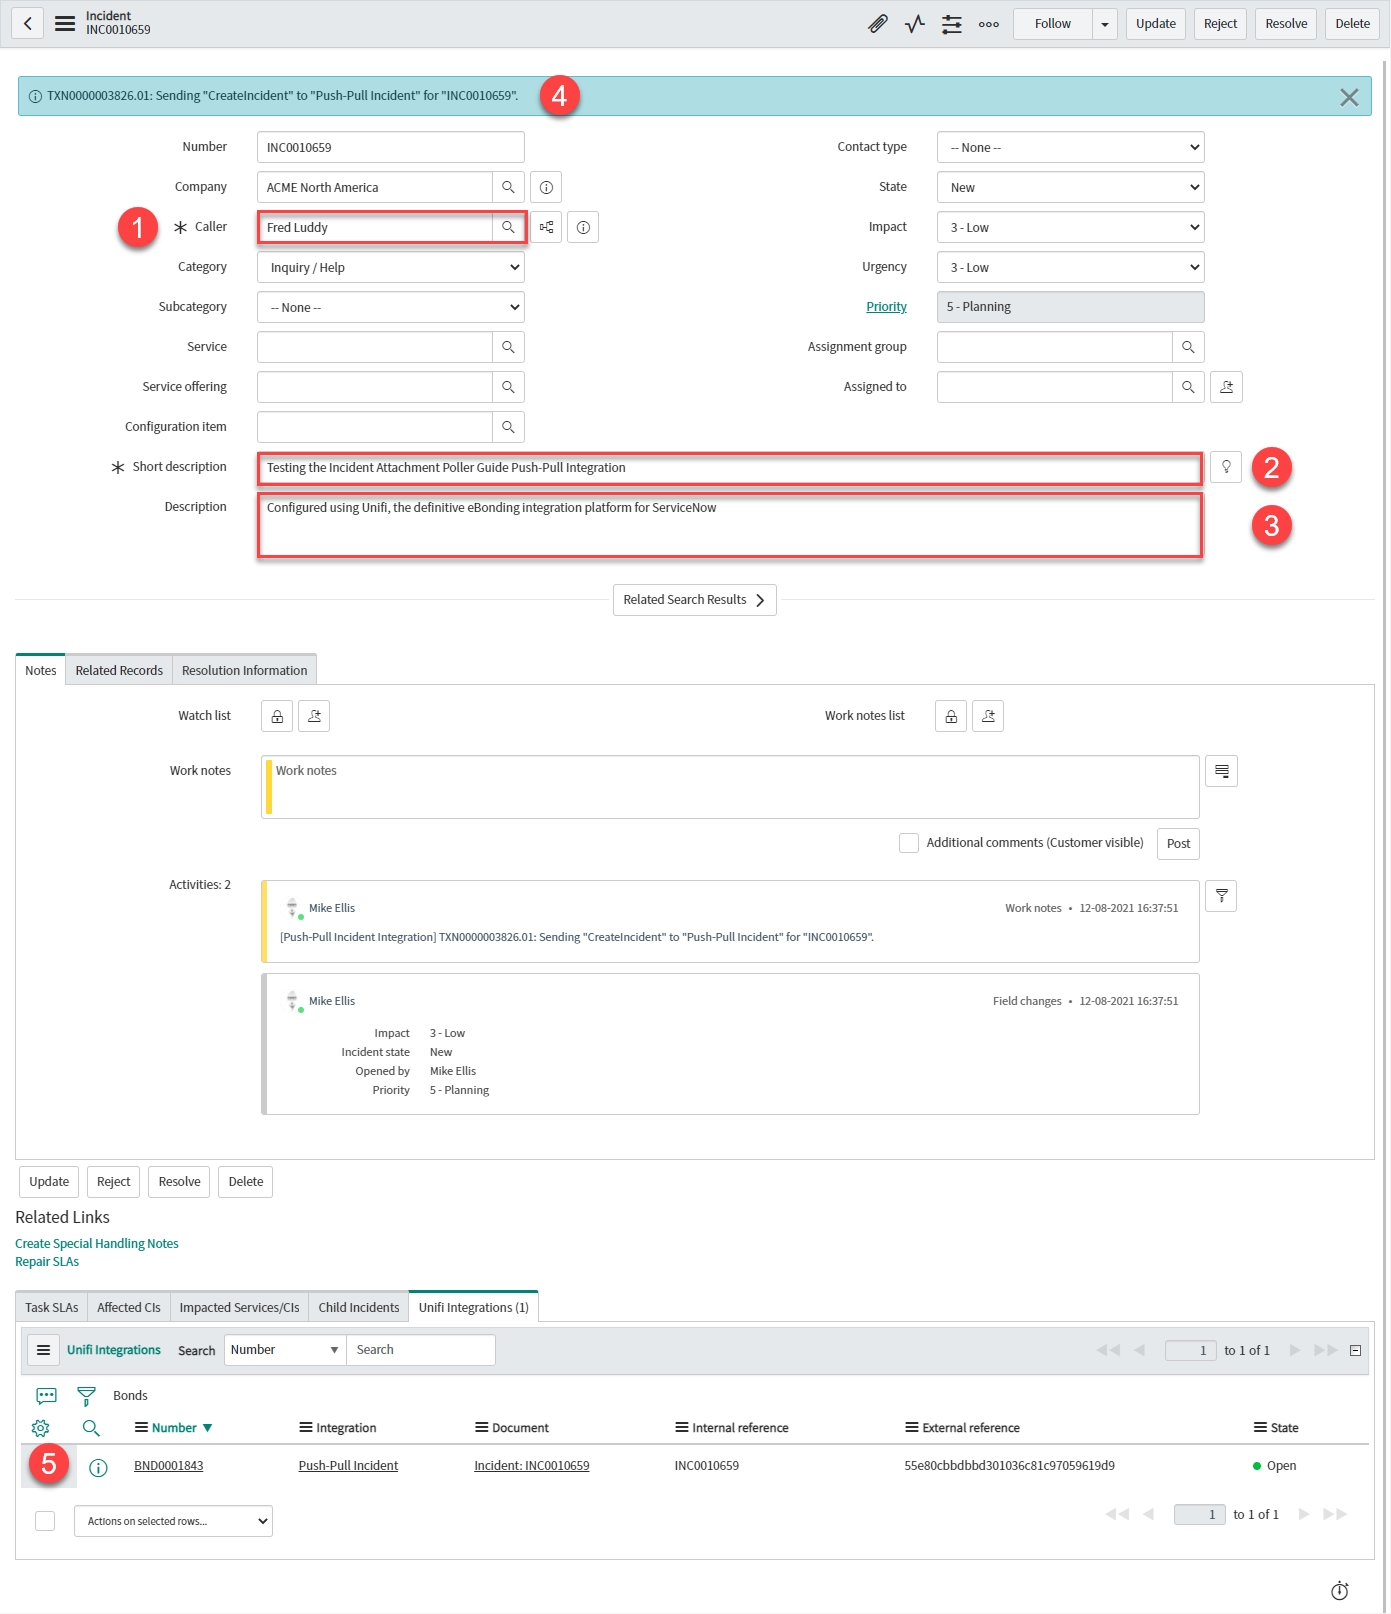
After you right-click & 'Save', note the Info Message confirming the CreateIncident Message is being sent to your Integration.
Note the Bond is 'Open' and both the Internal & External reference are in place.
Repeat as necessary so that there are three bonded tickets in the remote instance:

Test UpdateIncident
Update one of the bonded tickets in the originating instance to cause the UpdateIncident Message to fire:

View the Transactions that have been sent. This can be done either in Native ServiceNow, or in Unifi Operations Manager.
Navigate to Unifi > Transport > Transactions.

Navigate to Unifi > Unifi Operations Manager.
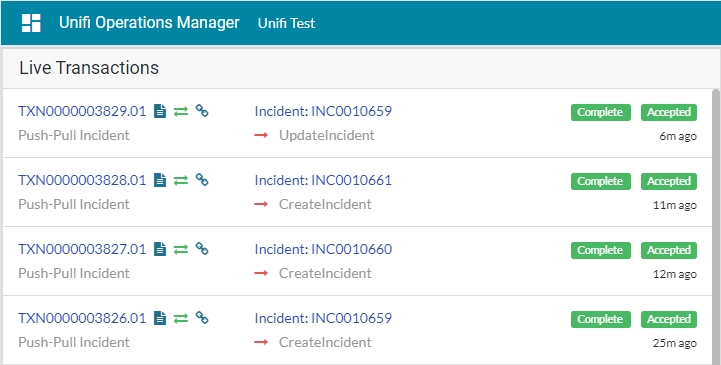
We can see that the three CreateIncident messages & one UpdateIncident message have been sent. All are Complete & Accepted & display the relevant Incident & Bond numbers.
Confirm the Transaction has updated the bonded ticket in the remote instance:
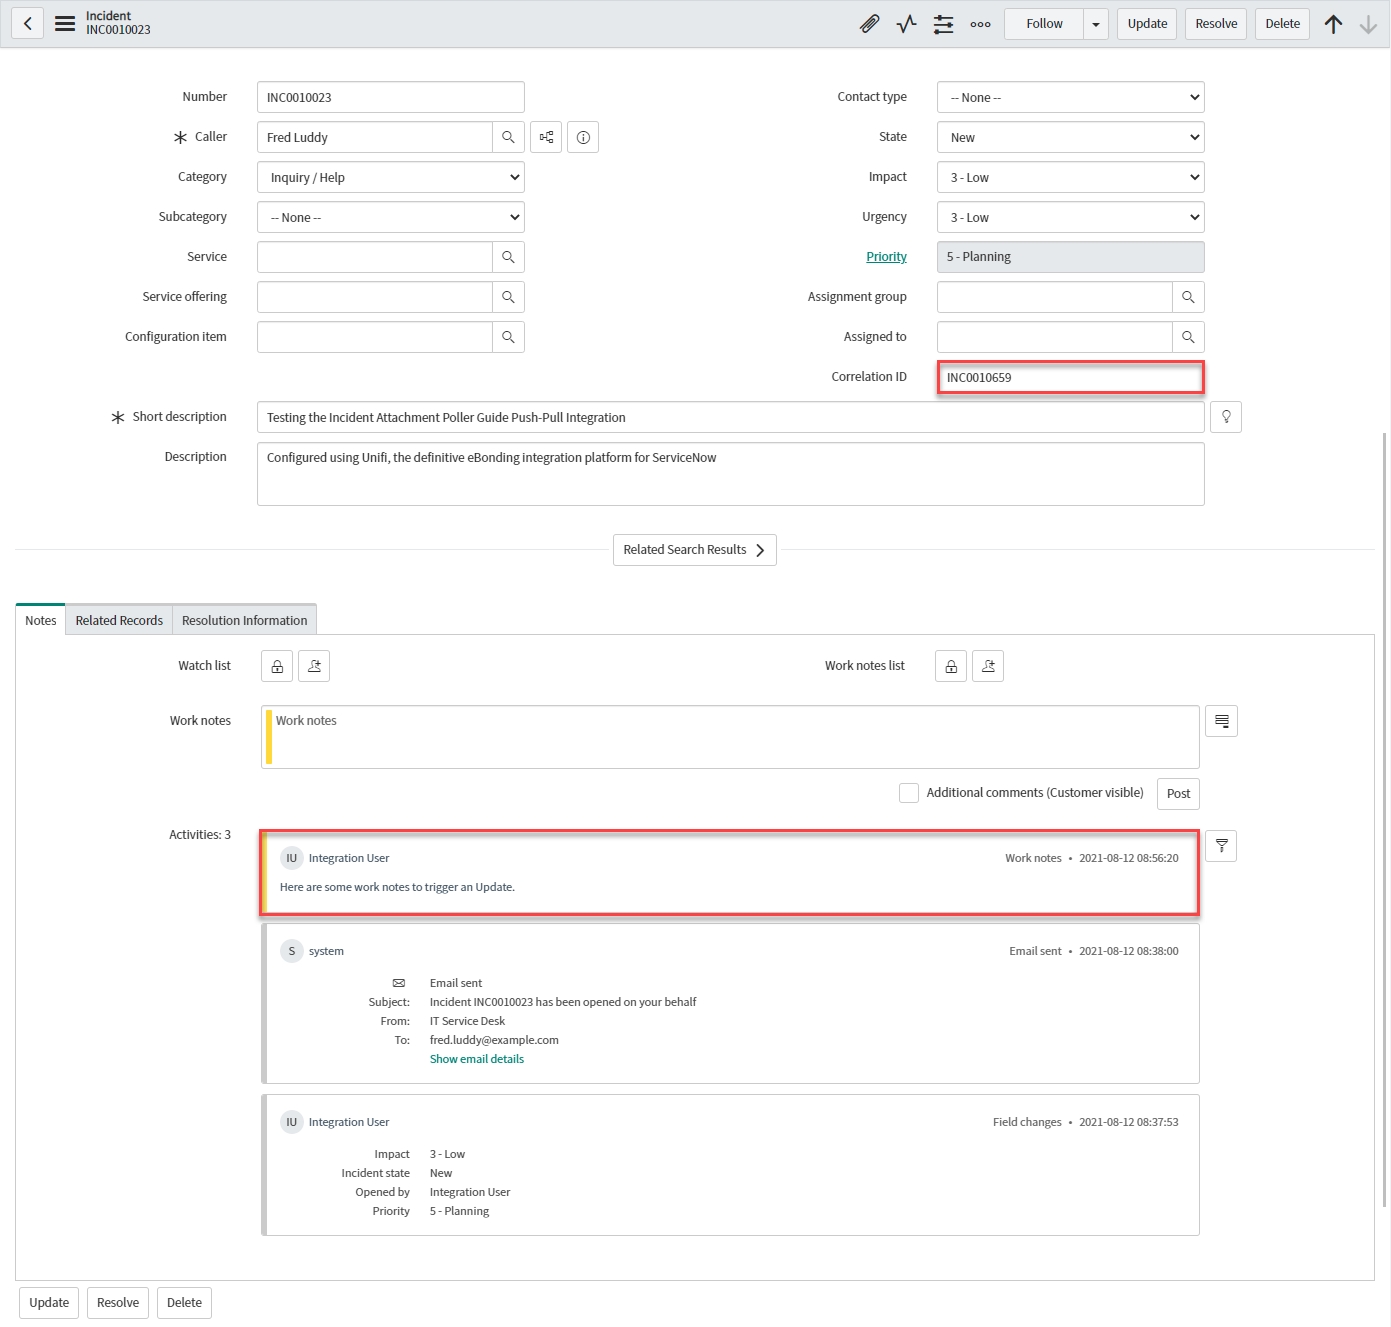
We can see that the update has reached the bonded ticket (& that the correlation id matches the outbound Incident number)
Test ResolveIncident
Resolve the same bonded ticket in the originating instance to cause the ResolveIncident Message to fire:
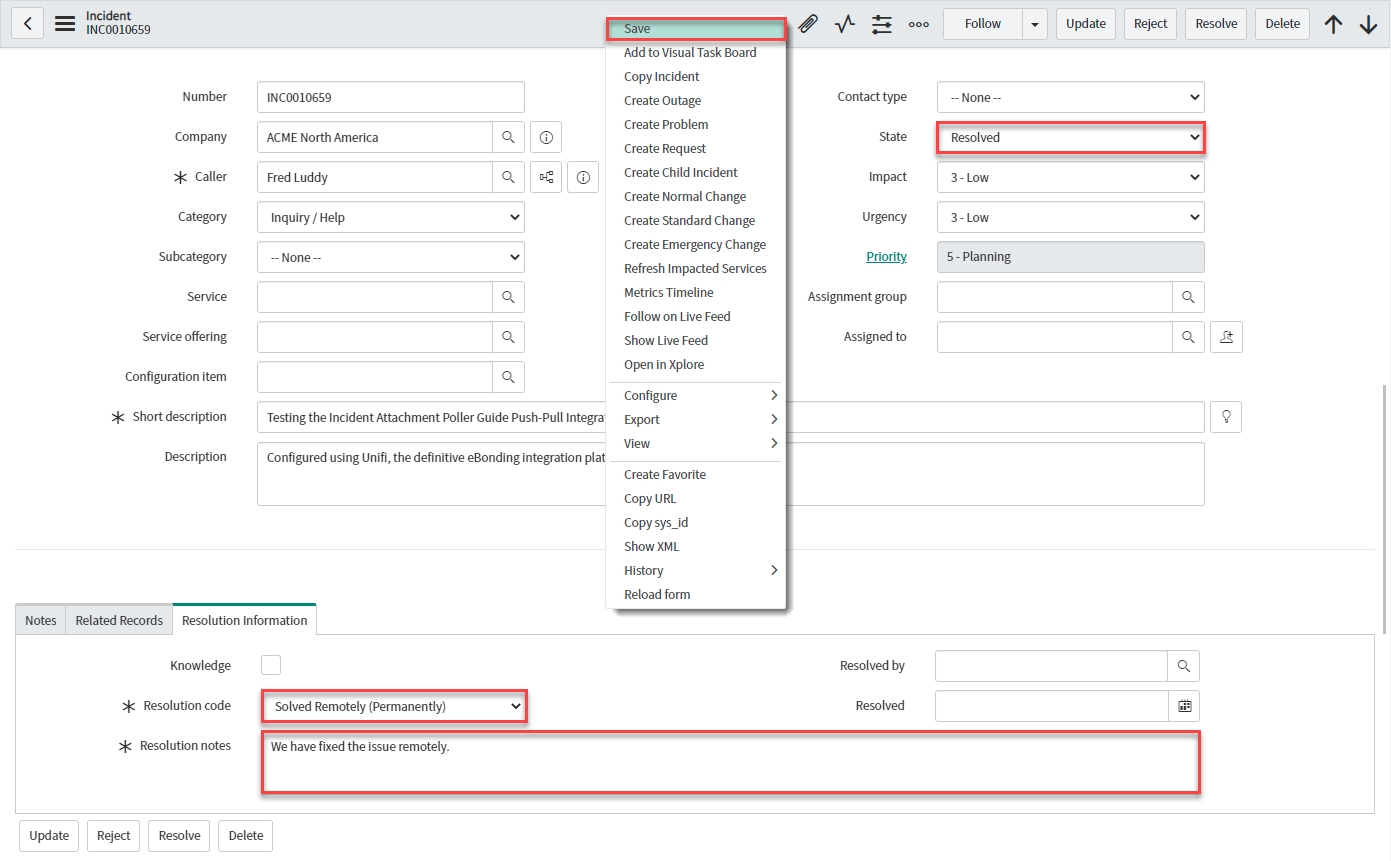
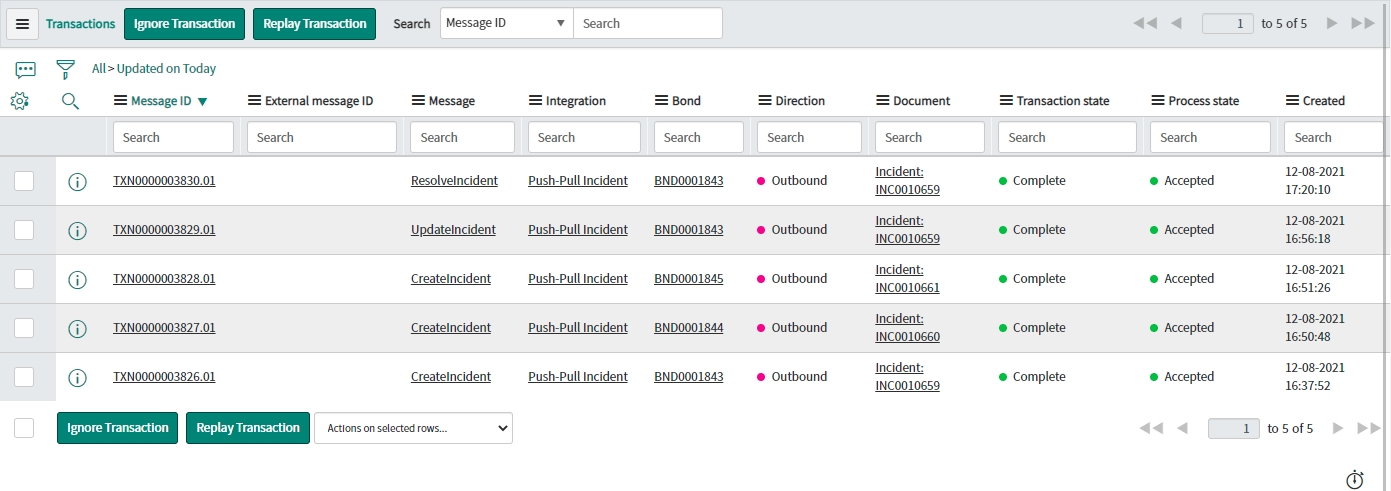
View the Transactions that have been sent. This can be done either in Native ServiceNow, or in Unifi Operations Manager.
Navigate to Unifi > Transport > Transactions.
Navigate to Unifi > Unifi Operations Manager.
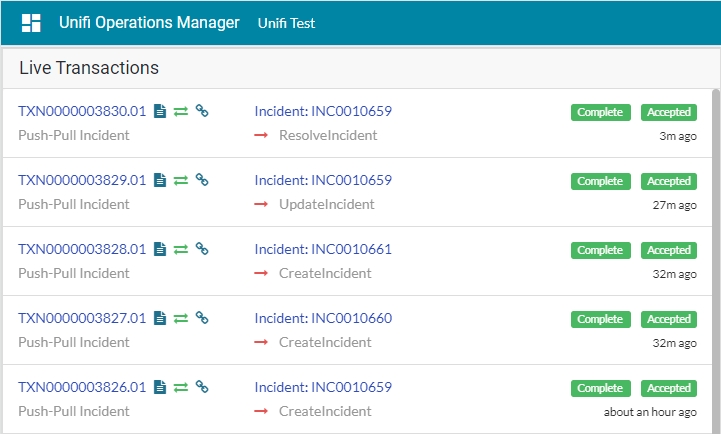
We can see that the ResolveIncident messages has been sent. It is Complete & Accepted & displays the relevant Incident & Bond numbers.
Confirm the Transaction has updated the bonded ticket in the remote instance:
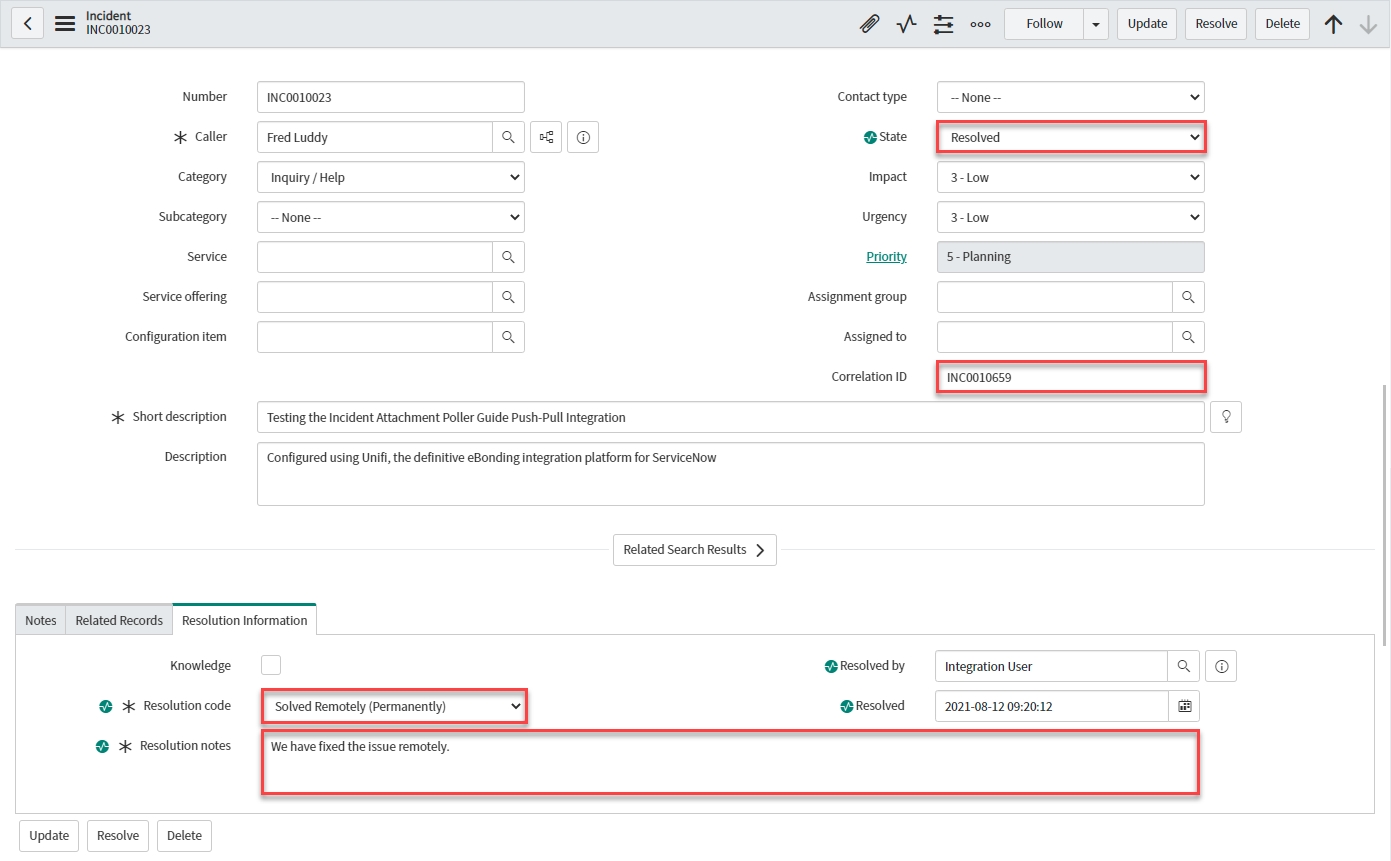
We can see that the State, Resolution code & Resolution notes have been updated on the bonded ticket (& that the correlation id matches the outbound Incident number)
Navigate to the Notes tab to view the Activities stream:
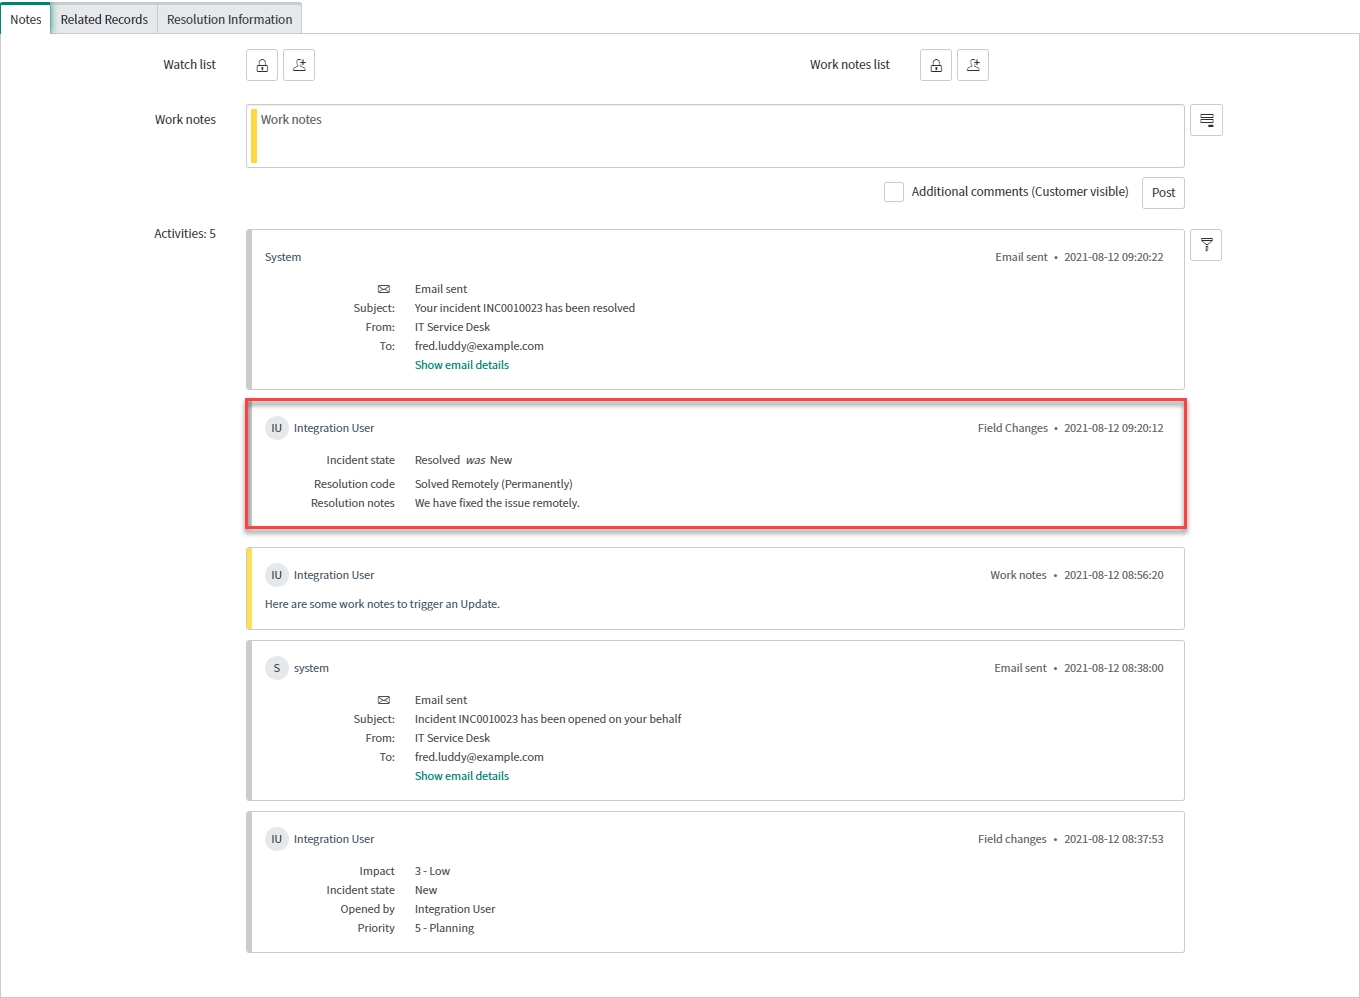
We can see that the update has also been logged in the Activities stream.
Next, we shall test the CreateIncidentInbound Message.
Test CreateIncidentInbound
Follow these instructions to test the CreateIncidentInbound Message.
Create Test Incident
In your PDI, navigate to Incident > Create New.
The Incident fields to configure are as follows:
Caller
Person who reported or is affected by this incident.
<Your Caller>
Impact
Measure of the business criticality of the affected service.
<Your Impact>
Urgency
The extent to which resolution of an incident can bear delay.
<Your Urgency>
Assignment group*
The group to which the ticket is assigned.
_<_Your Assignment group>
Short description
A brief description of the incident.
<Your Short description>
Description
Detailed explanation on the incident.
<Your Description>
Your Incident form should look like this:
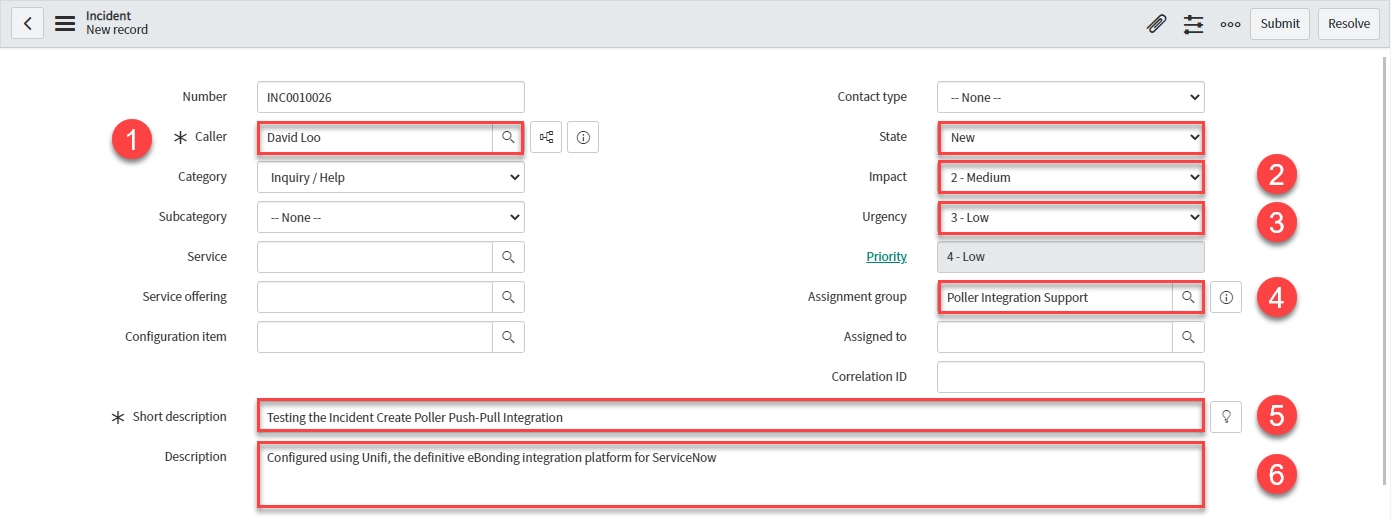
Note the values entered (including State), so that you can check them against the mapped fields on the corresponding record in the instance being integrated to.
You should now have a non-bonded ticket in the remote instance (assigned to <Your Assignment group>):

Poll for Creates
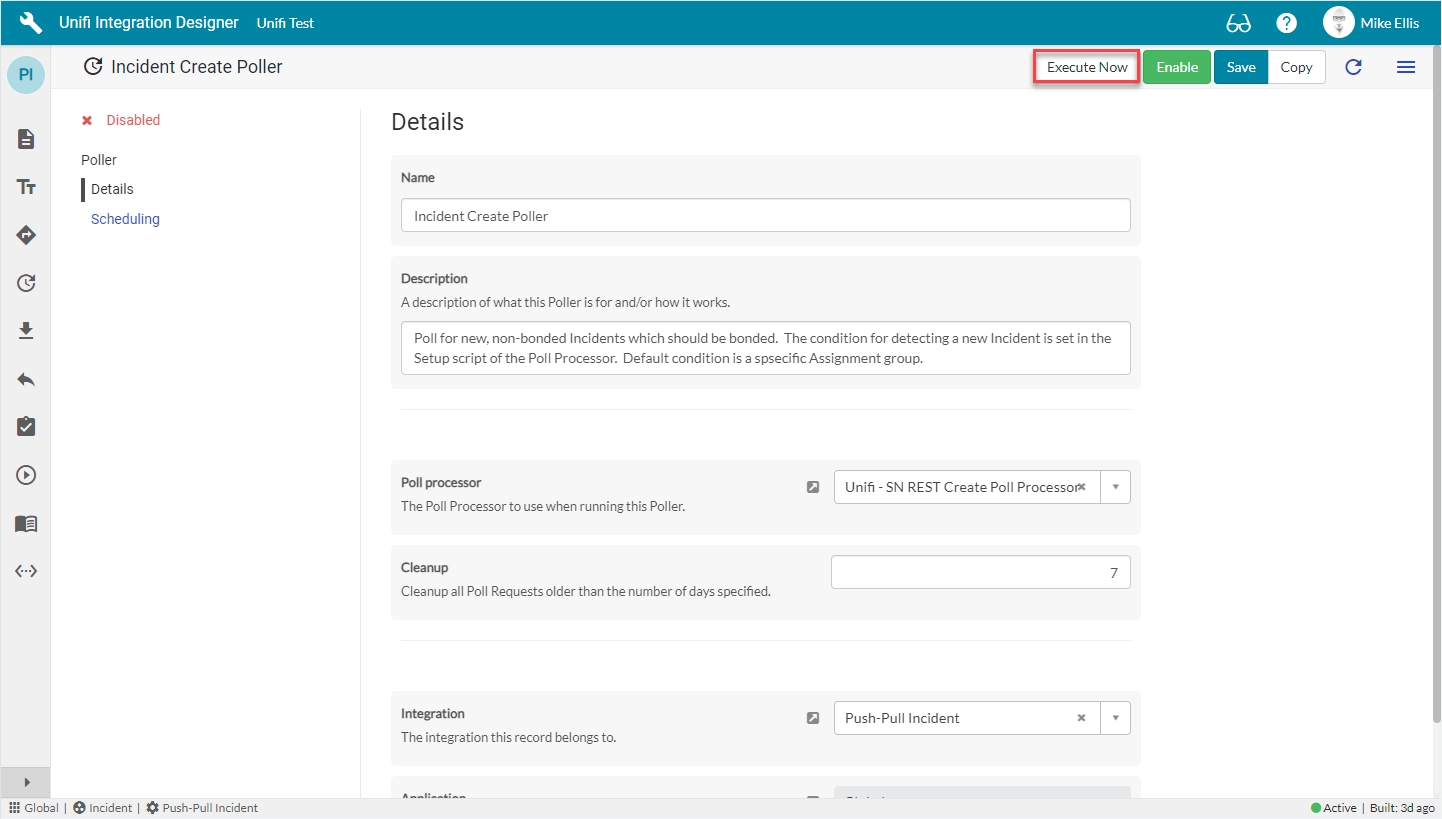
In Unifi Integration Designer, click on the 'Pollers' icon. Navigate to & open < Your Create Poller > (created on the 'Poller' page of the Incident Create Poller Guide). & click Execute Now:
In native ServiceNow, navigate to Unifi > Polling > Poll Requests. Click to Open & view the generated Poll Request. Confirm that only the one Incident was found (this is exactly as we expect because we are only polling for Incidents assigned to a specific Assignment group):
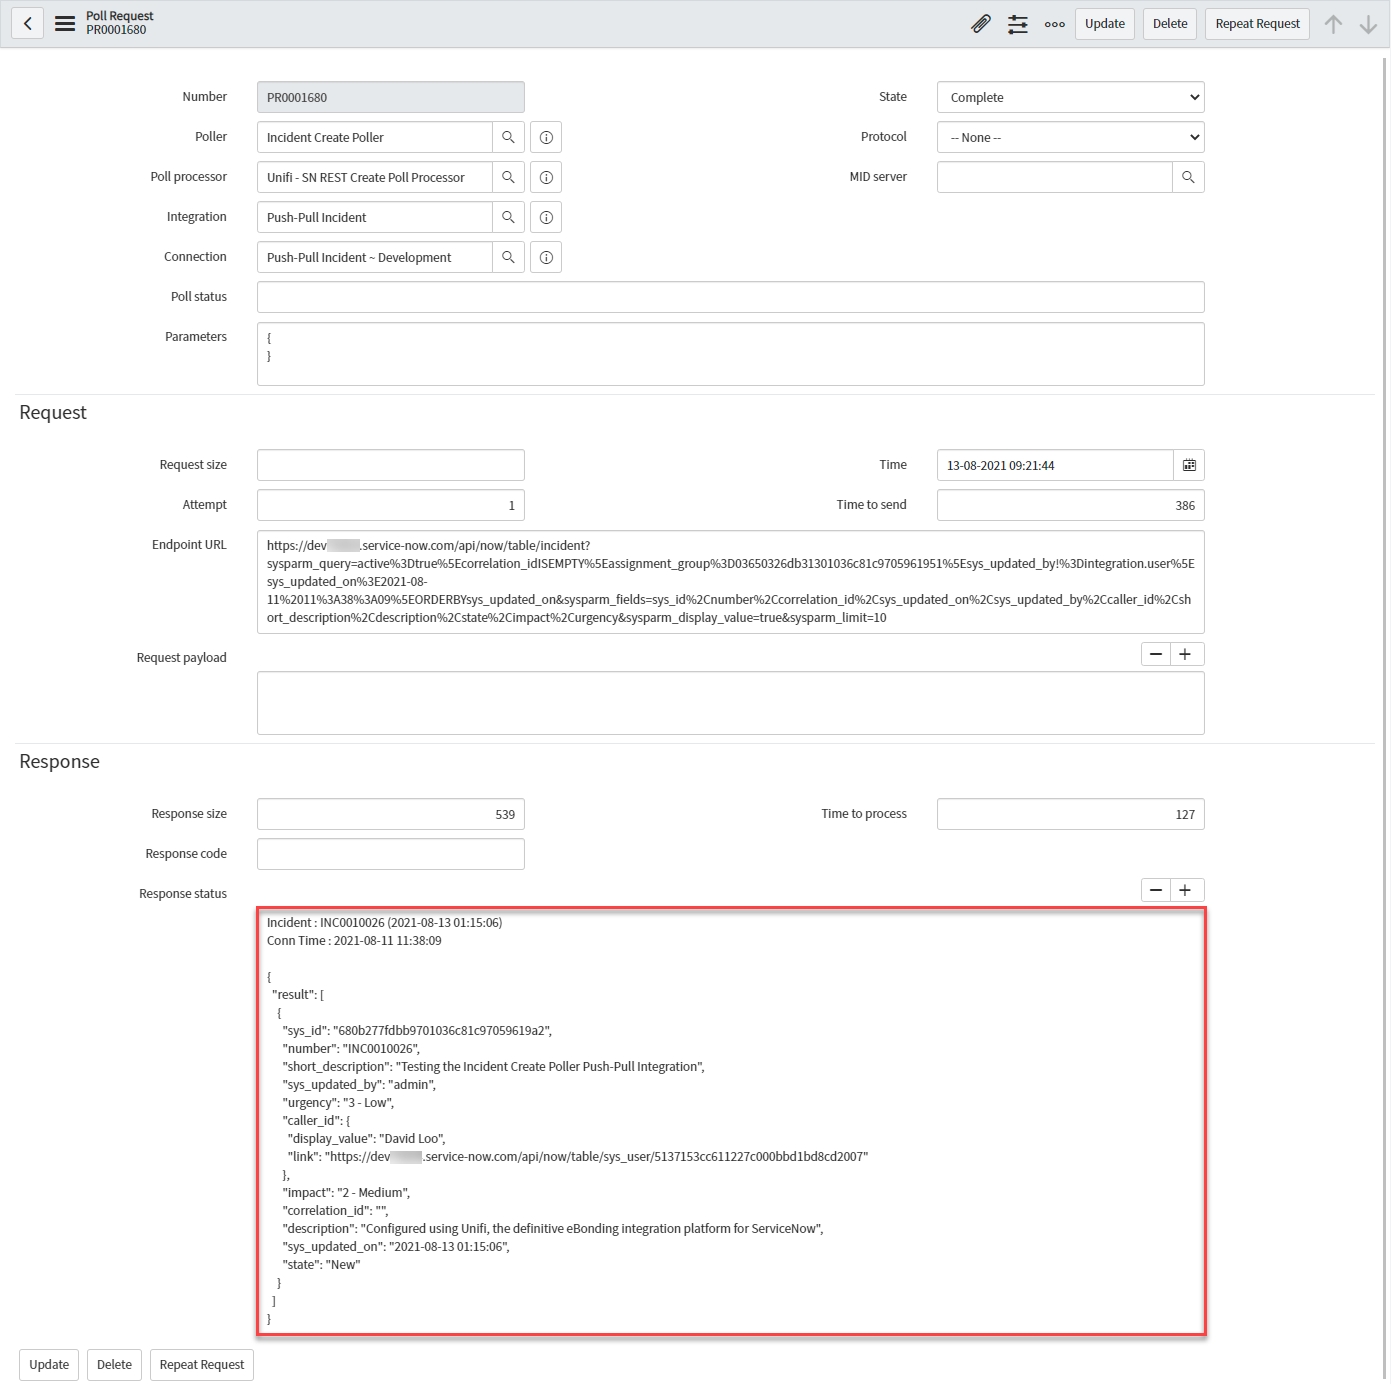
View the Transactions that have been sent. This can be done either in Native ServiceNow, or in Unifi Operations Manager.
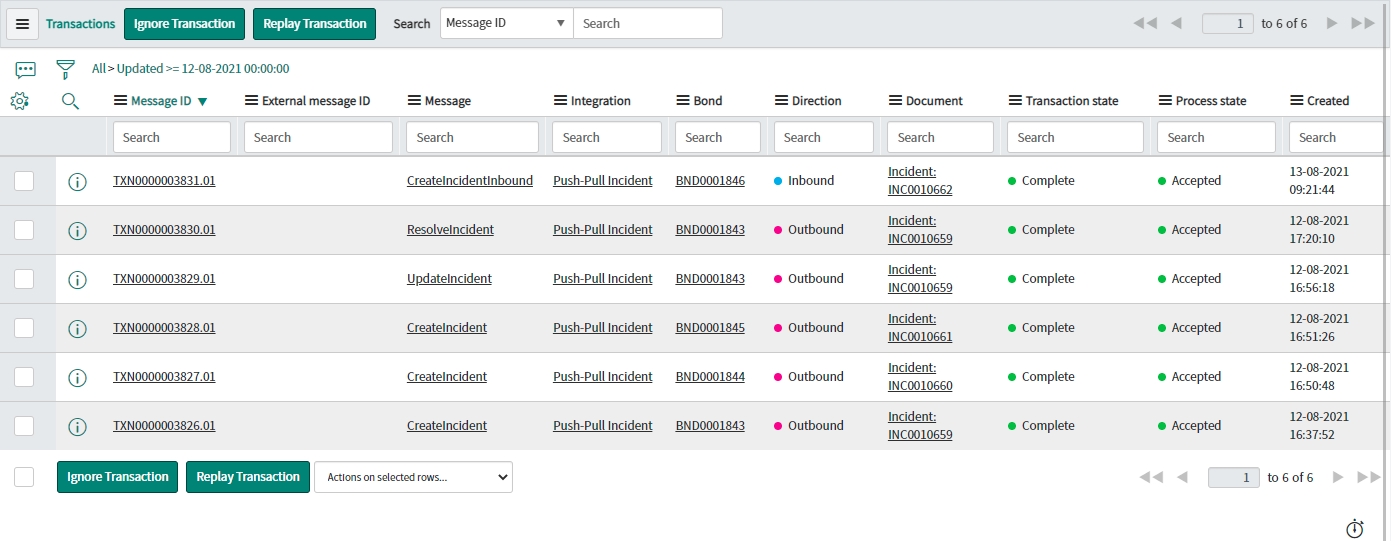
Navigate to Unifi > Transport > Transactions.
Navigate to Unifi > Unifi Operations Manager.
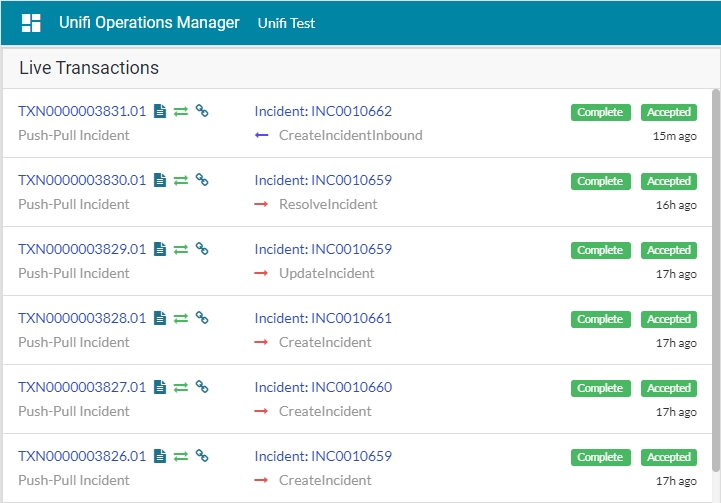
We can see the CreateIncidentInbound message has been received. It is Complete & Accepted and displays the relevant Incident & Bond numbers.
Confirm the following:
The Transaction has created the bonded ticket in this instance.
Your new Incident should look like this:
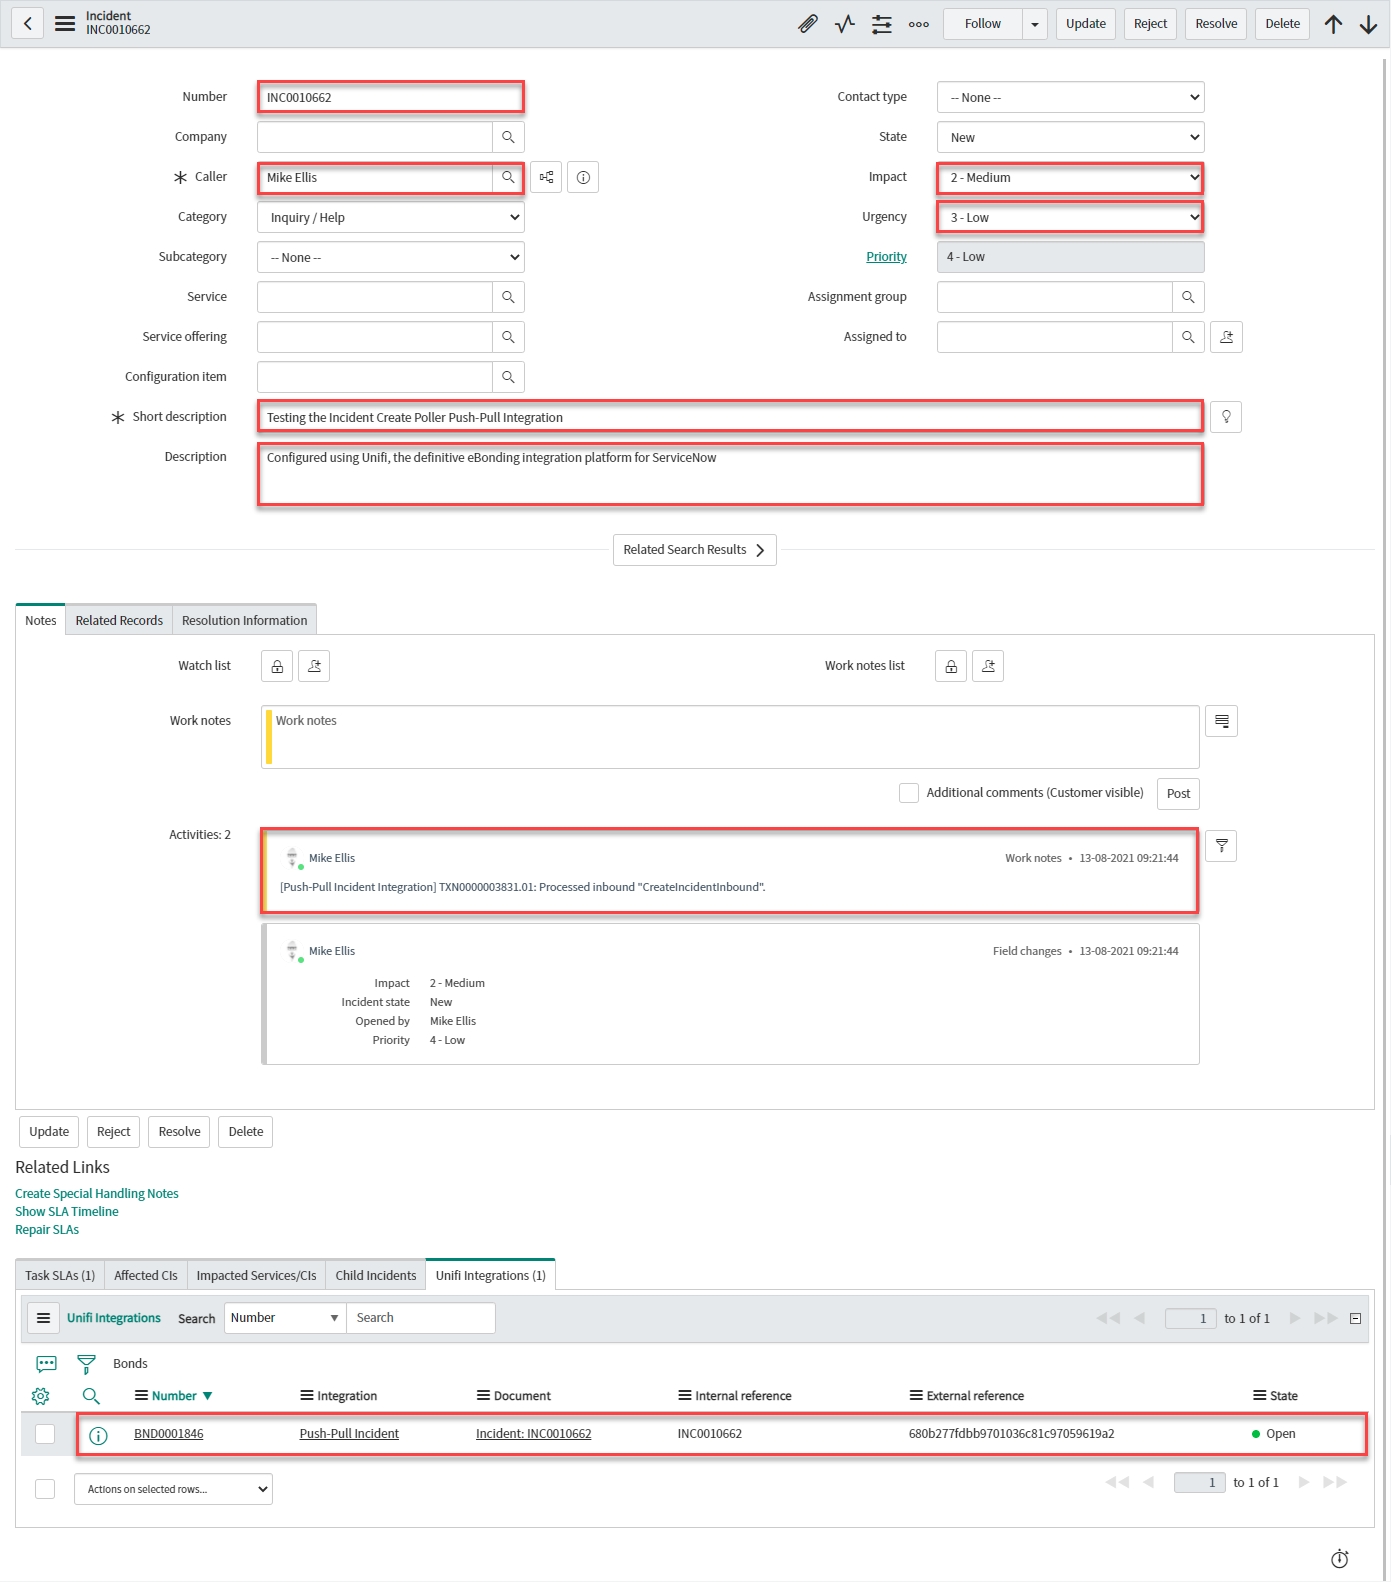
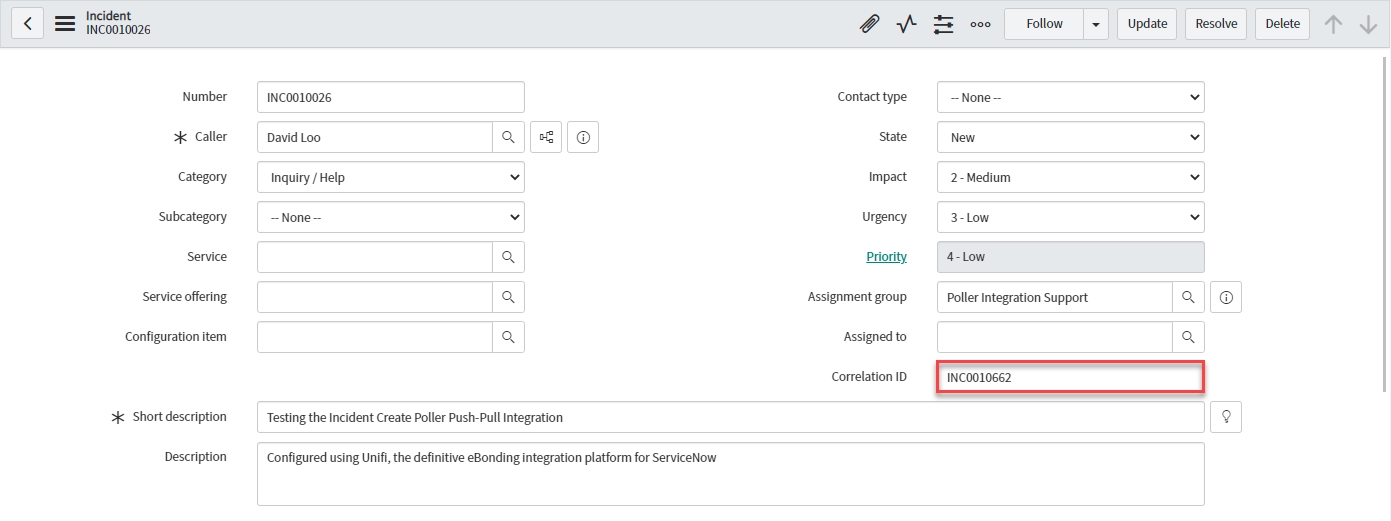
The Transaction has updated the bonded ticket in the remote instance (your PDI) (with the correlation id).
Your originating Incident should look like this:
Next, we shall test the UpdateIncidentInbound Message.
Test UpdateIncidentInbound
Follow these instructions to test the UpdateIncidentInbound Message.
Update from Remote Instance
In the remote instance, update two of the bonded tickets in turn.
Poll for Updates
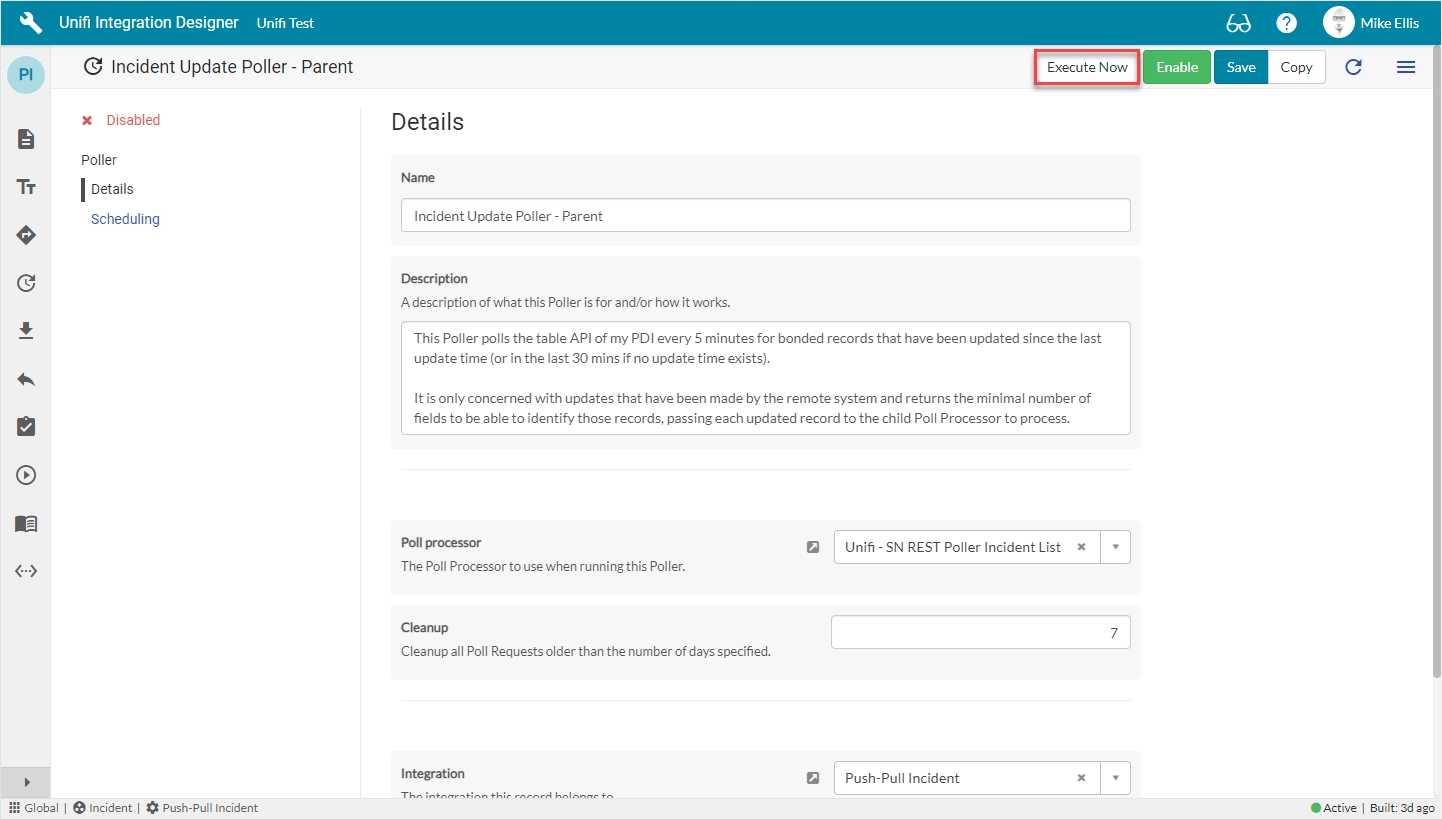
Back in the originating instance, navigate to & open < Your Parent Poller > (as configured on the 'Parent Poller' page of the Incident Parent and Child Poller Guide). Click Execute Now.
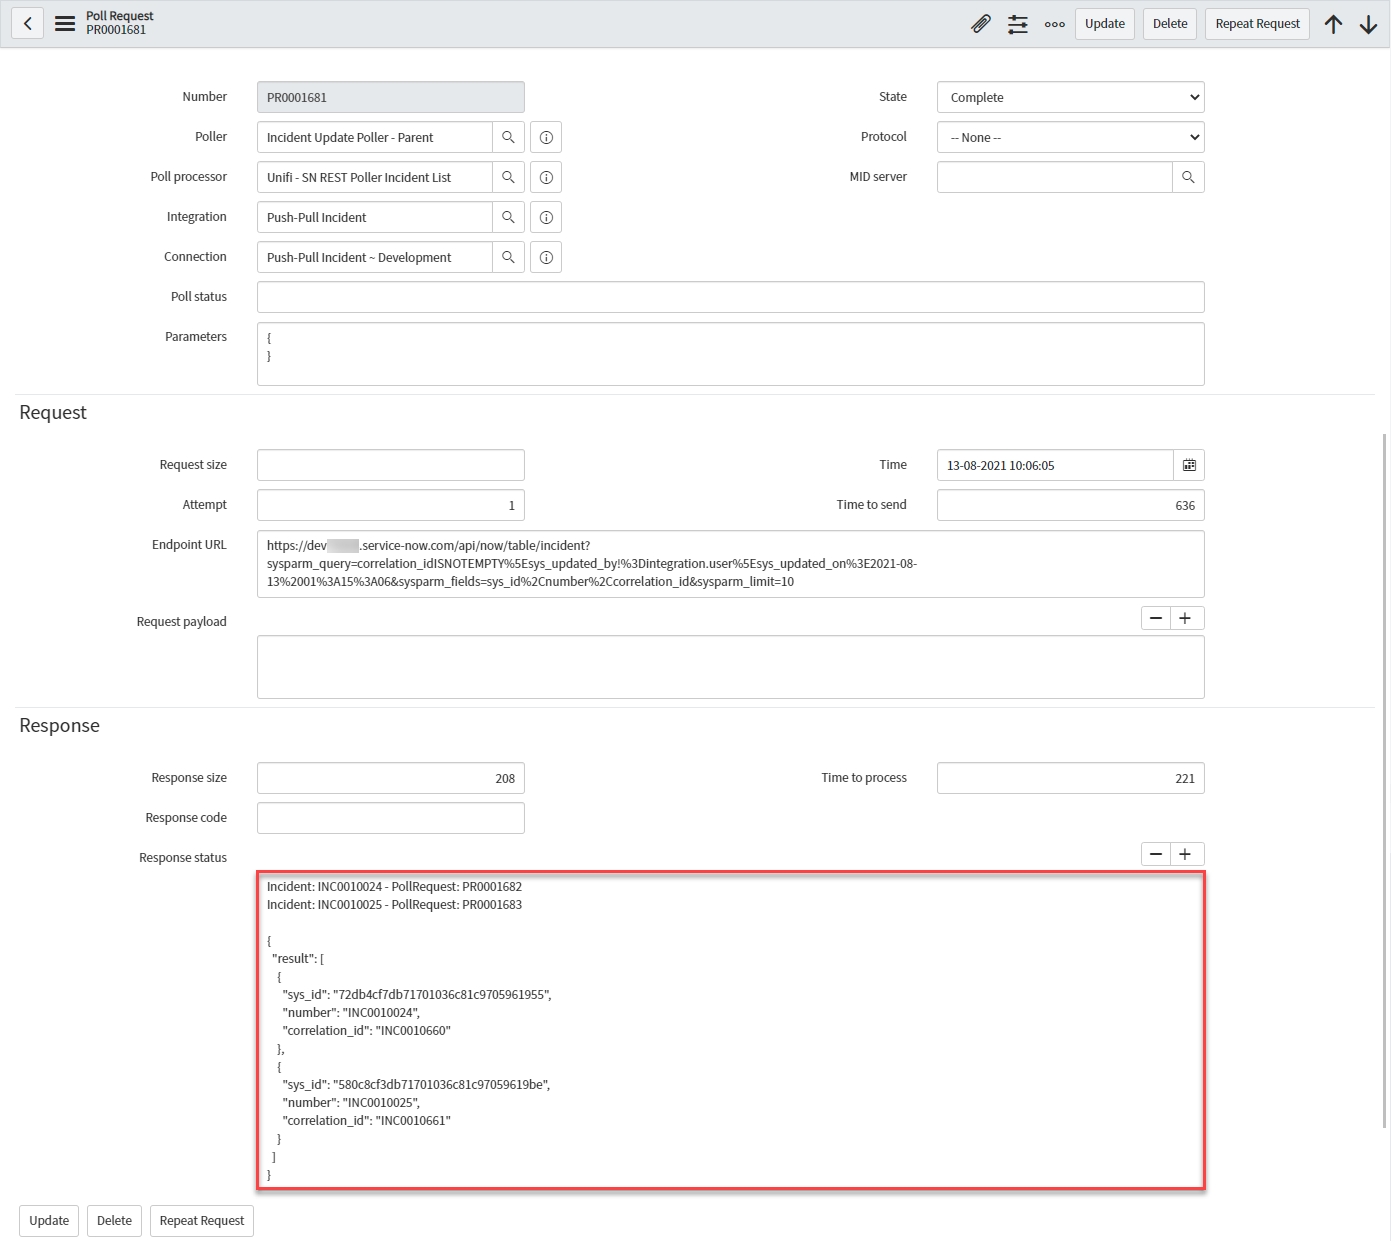
Open the corresponding Parent Poll Request & confirm that both Incidents were found (and only those) and that subsequent child Poll Requests were also triggered:
Notice the Parent & Child Poll Requests:
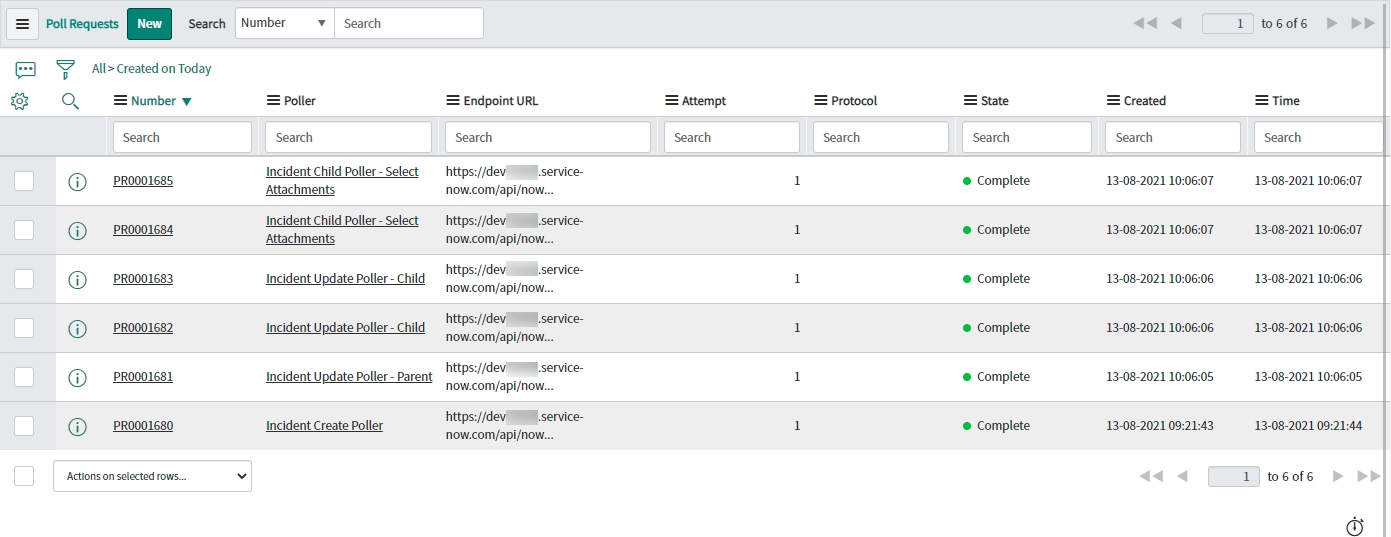
Open each of the corresponding Child Update Poll Requests & confirm that the Message name was UpdateIncidentInbound (found in the Response status).
Open each of the corresponding Select Attachments Poll Requests & confirm that the Response status says No Attachments returned (this is expected because no attachments were added).
View the Transactions that have been sent. This can be done either in Native ServiceNow, or in Unifi Operations Manager.
Navigate to Unifi > Transport > Transactions.
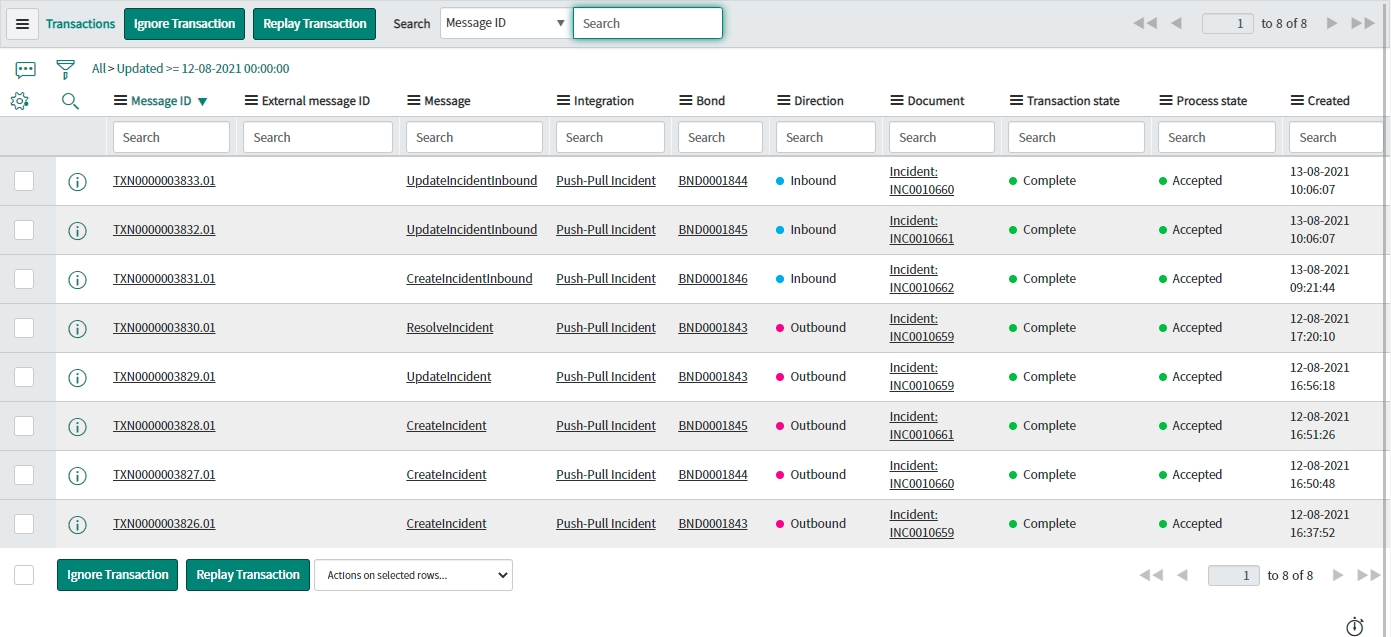
Navigate to Unifi > Unifi Operations Manager.
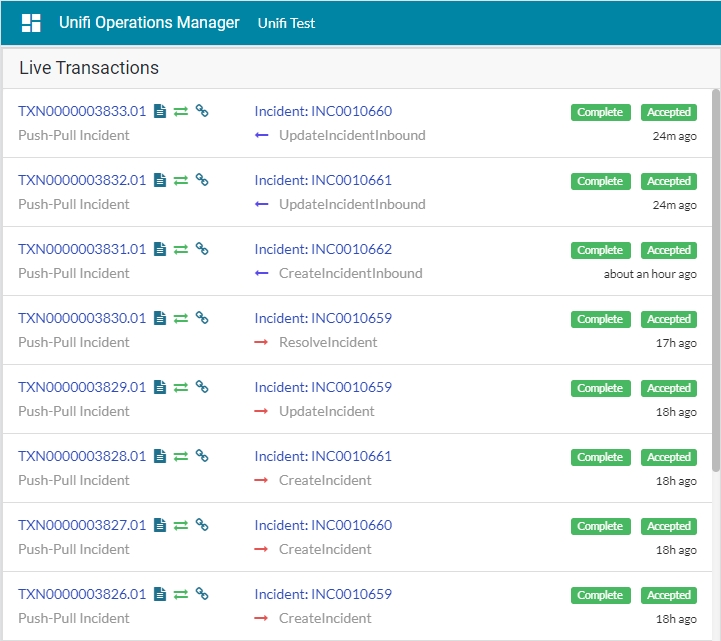
We can see that two UpdateIncidentInbound messages have been received. Both are Complete & Accepted & display the relevant Incident & Bond numbers.
Confirm the Transactions have updated the bonded tickets in the originating instance.
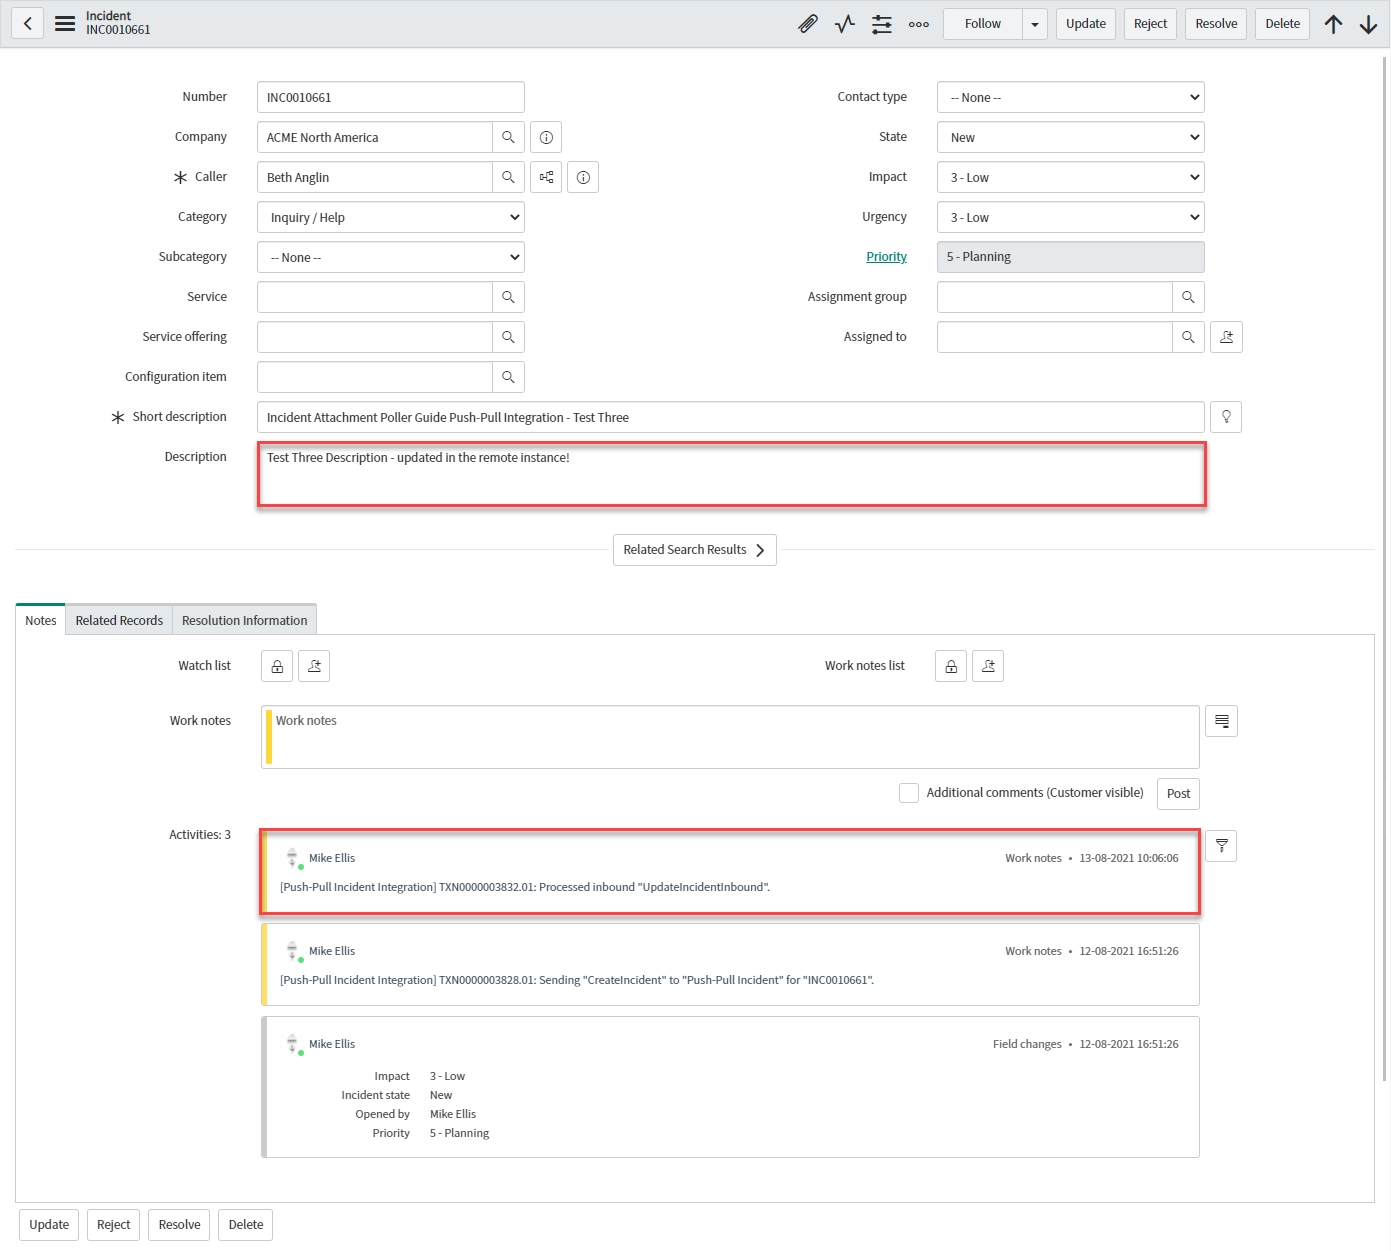
Next, we shall test the ResolveIncidentInbound Message.
Test ResolveIncidentInbound
Follow these instructions to test the ResolveIncidentInbound Message.
Resolve Test Incident
In the remote instance (your PDI), navigate to one of < Your Incidents > updated in the earlier test.
Update the Incident record as follows:
State
The Incident lifecycle state.
‘Resolved’
Resolution code
The Incident resolution code.
<Your Resolution code>
Resolution notes
The Incident resolution notes.
<Your Resolution notes>
Your Incident record should look like this:
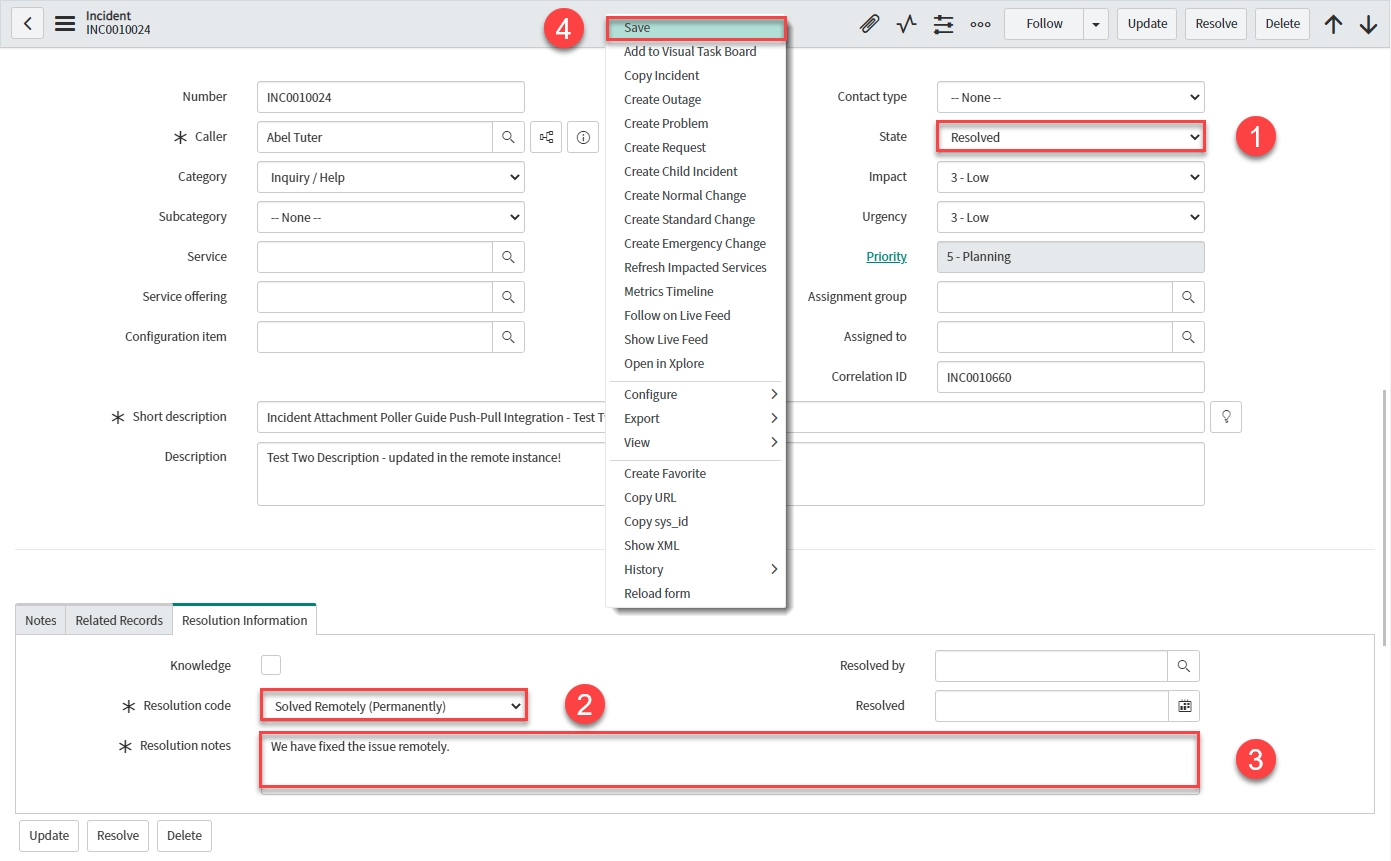
Right-click & Save.
Poll for Updates
Back in the originating instance, navigate to & open < Your Parent Poller >. Click Execute Now.

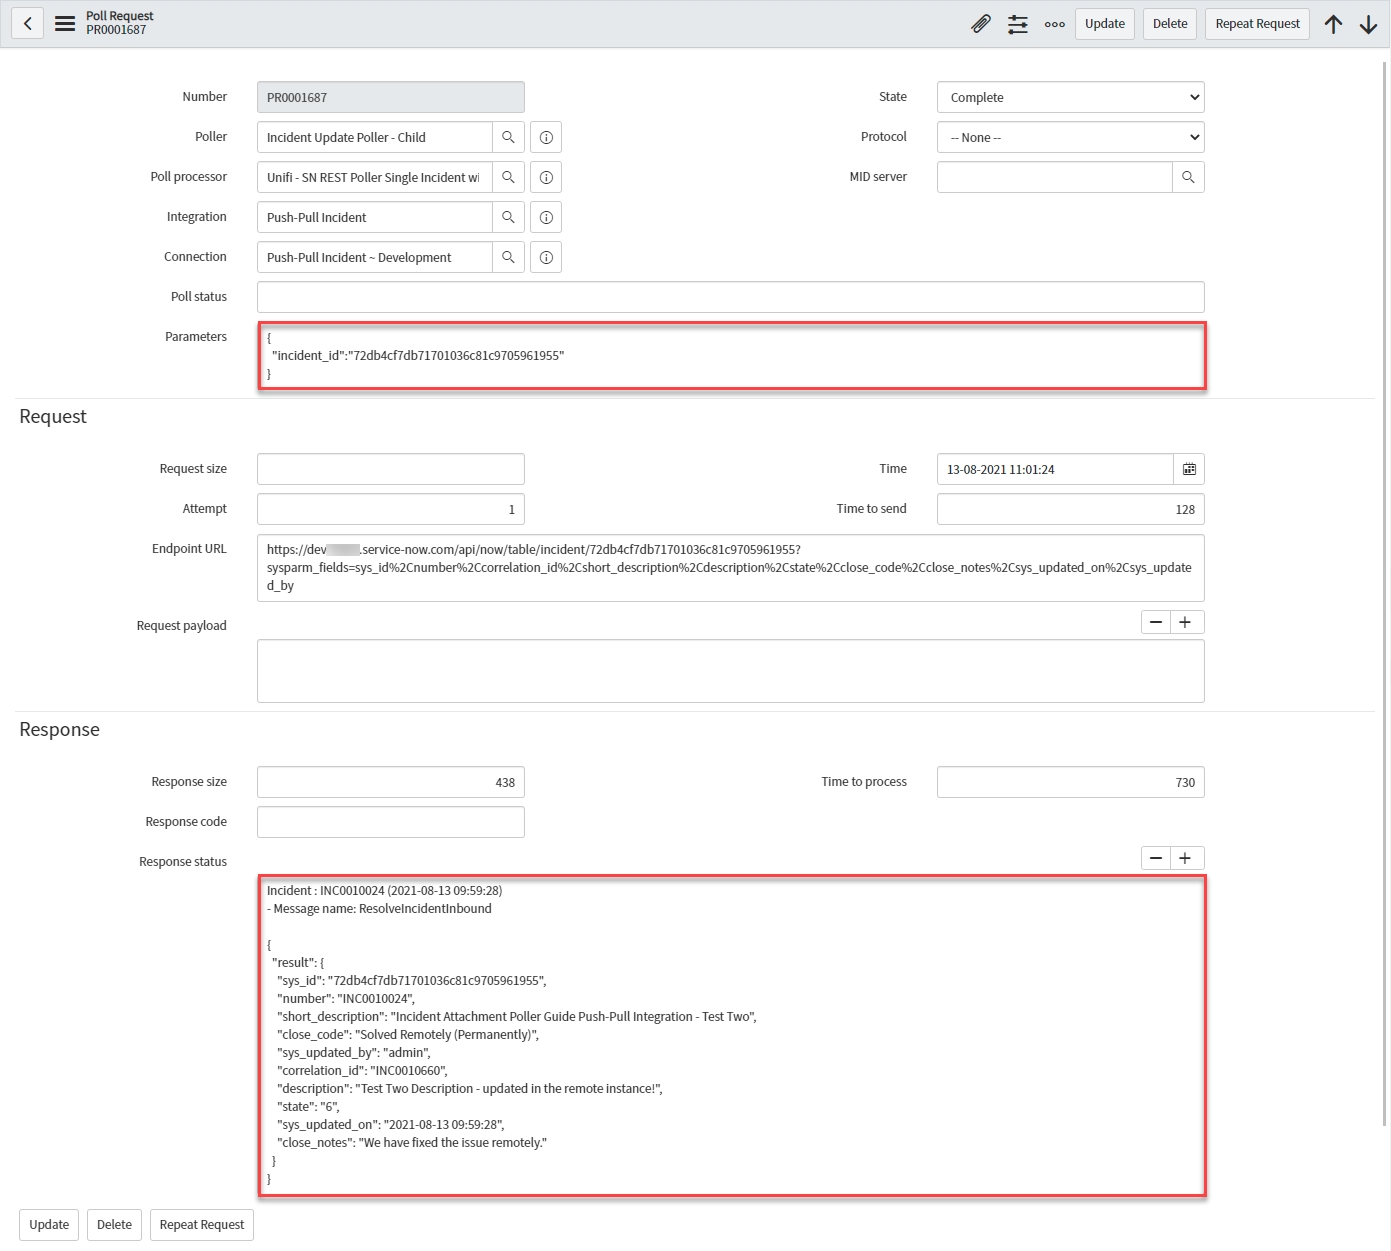
Open the corresponding Child Poll Request & confirm that the Incident was found (and the Message name was ResolveIncidentInbound) & Notice the incident_id passed in as a parameter:
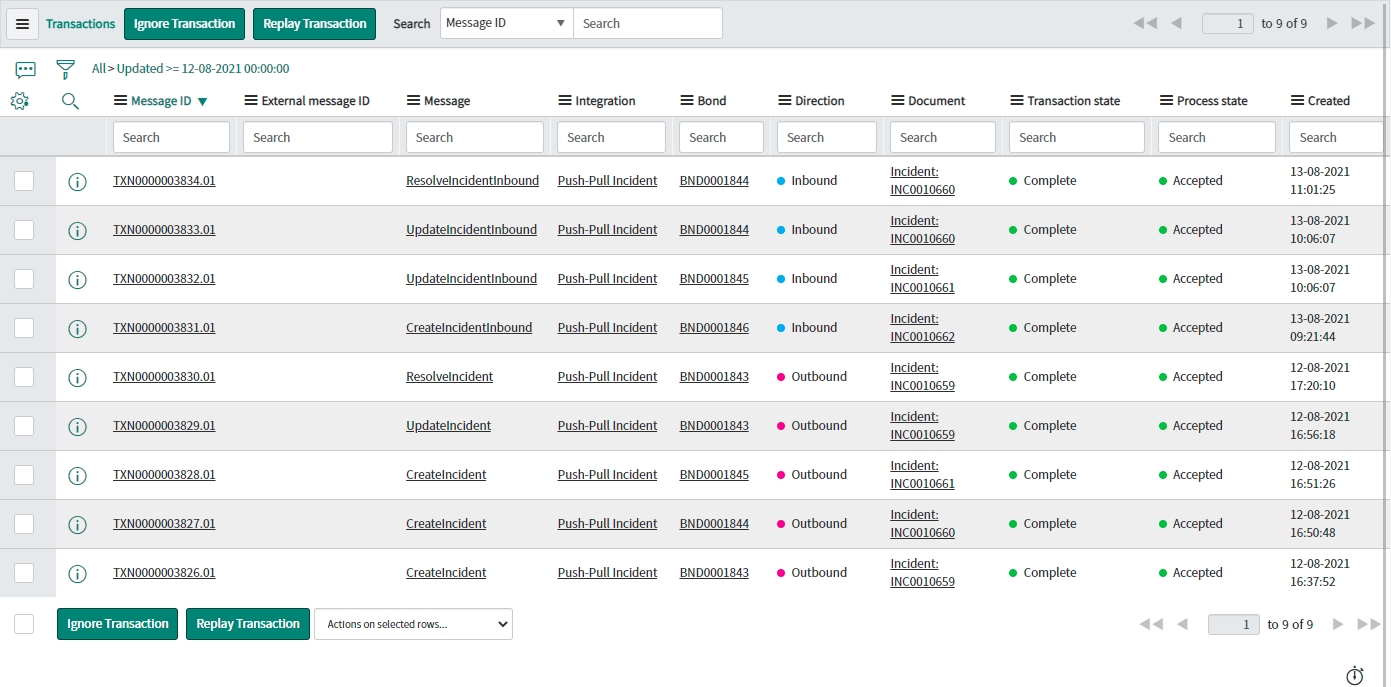
View the Transactions that have been sent. This can be done either in Native ServiceNow, or in Unifi Operations Manager.
Navigate to Unifi > Transport > Transactions.
Navigate to Unifi > Unifi Operations Manager.
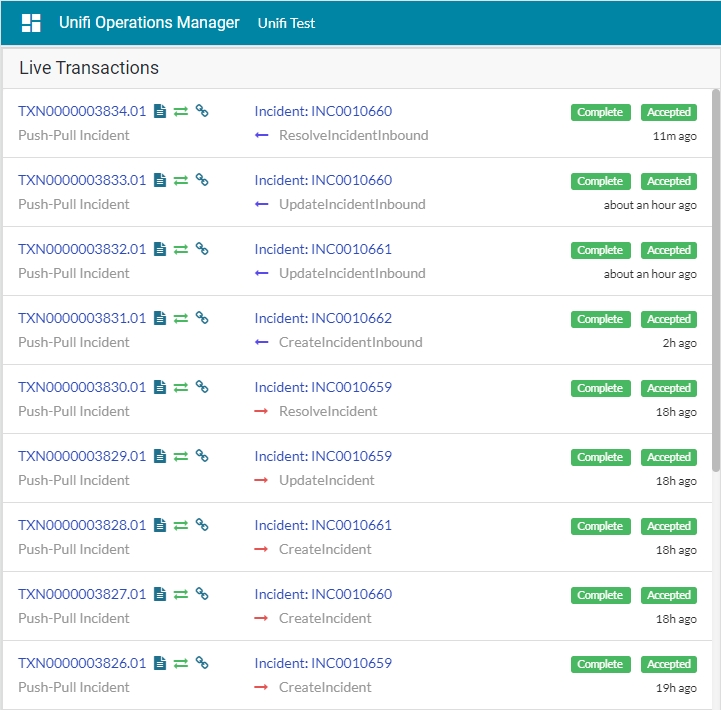
We can see that the ResolveIncidentInbound message has been received, is Complete & Accepted and displays the relevant Incident & Bond numbers.
Confirm the Transaction has updated the bonded ticket in the originating instance:
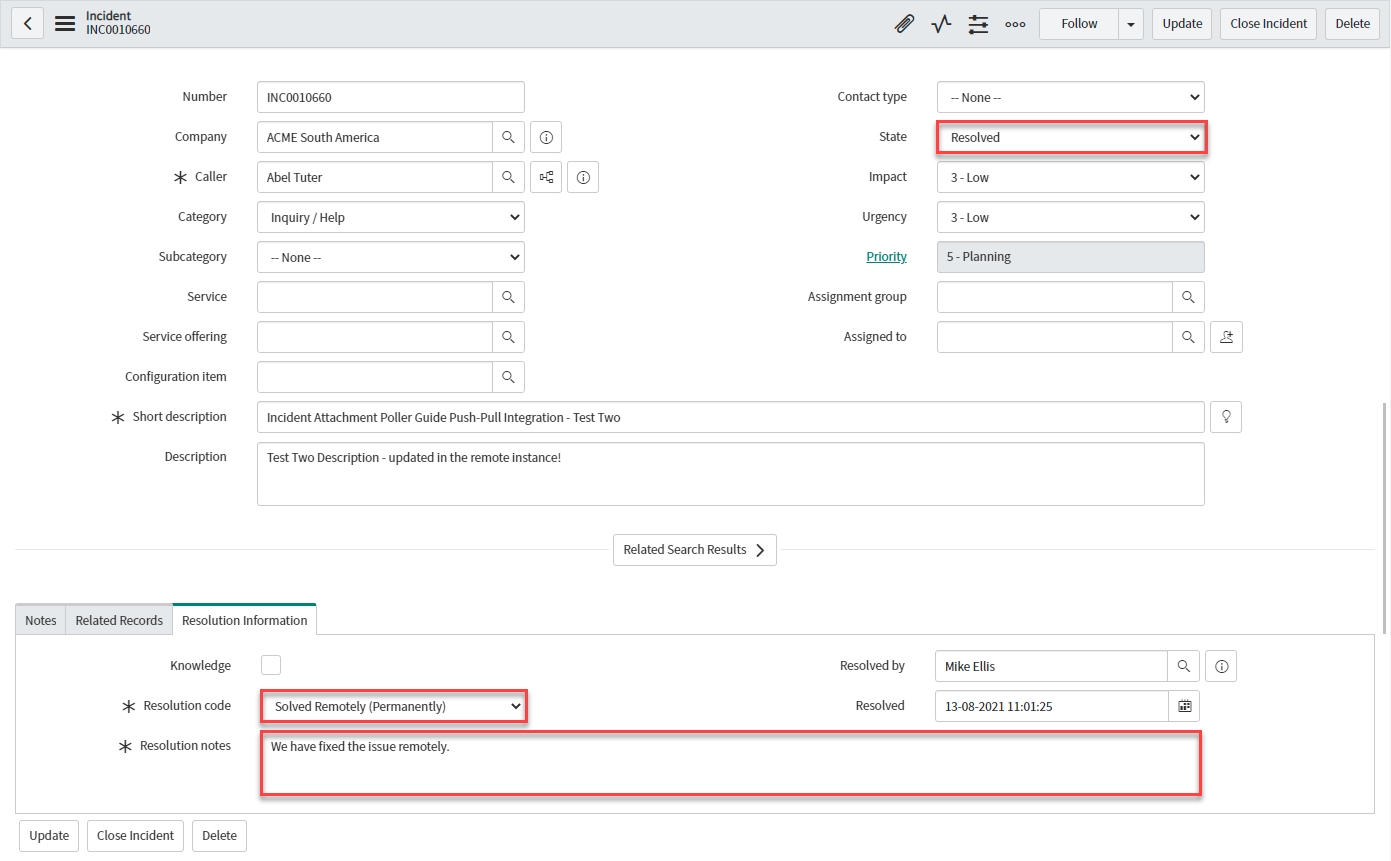
We can see that the State, Resolution code & Resolution notes have been updated on the bonded ticket.
Navigate to the Notes tab to view the Activities stream:

We can see that the update has also been logged in the Activities stream.
Test AddAttachmentInbound
Follow these instructions to test the AddAttachmentInbound Message.
Update from Remote Instance
In the remote instance, select one of the bonded tickets.
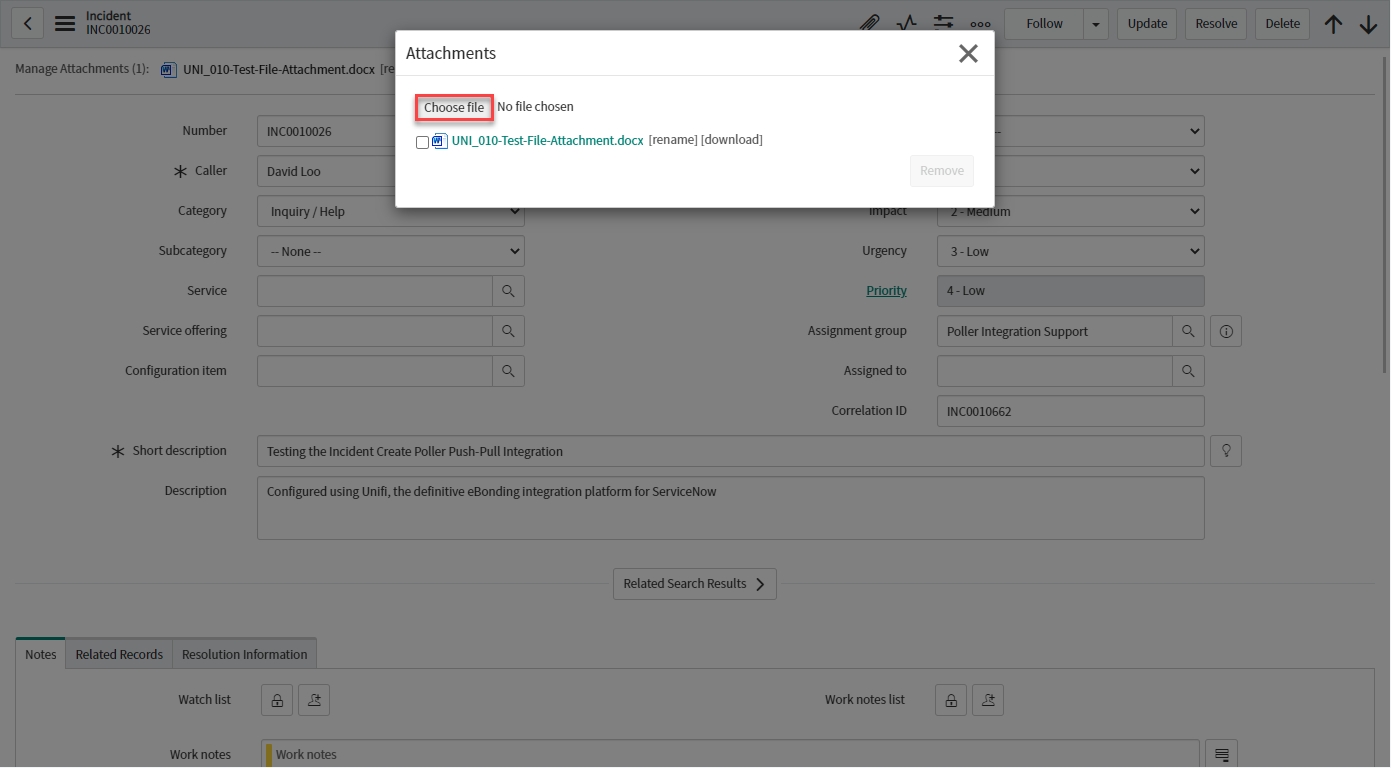
Add an attachment to the record .
Poll for Updates
Back in the originating instance, navigate to & open < Your Parent Poller >. Click Execute Now.

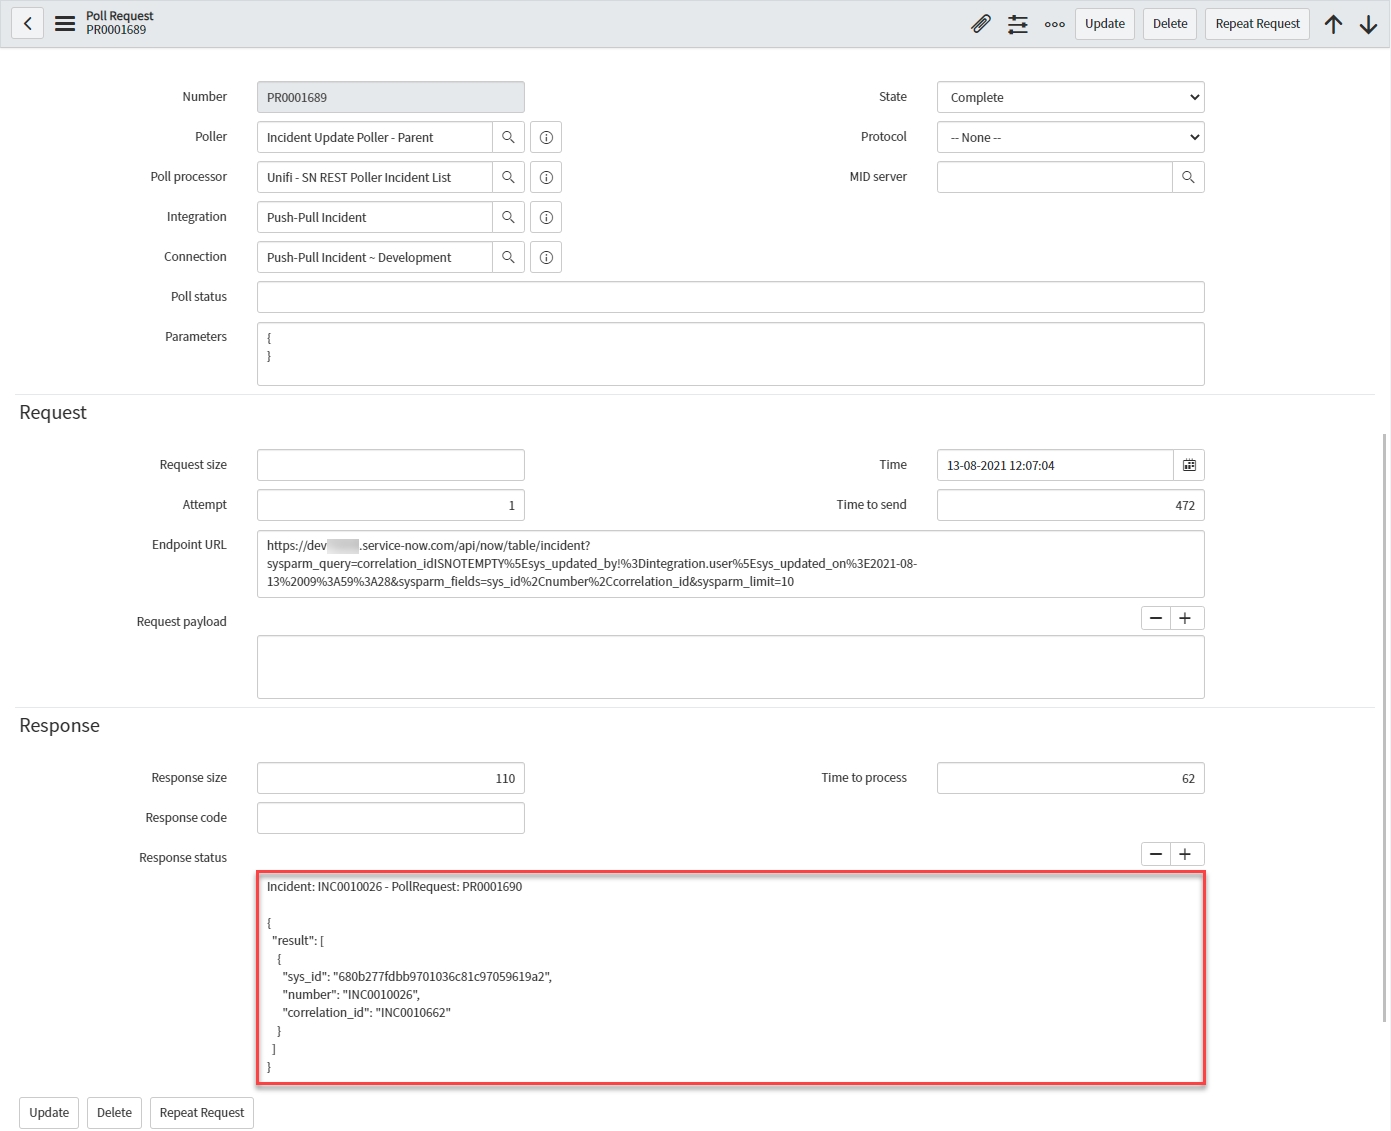
Open the corresponding Parent Poll Request & confirm that the Incident was found and that subsequent child Poll Requests were also triggered:
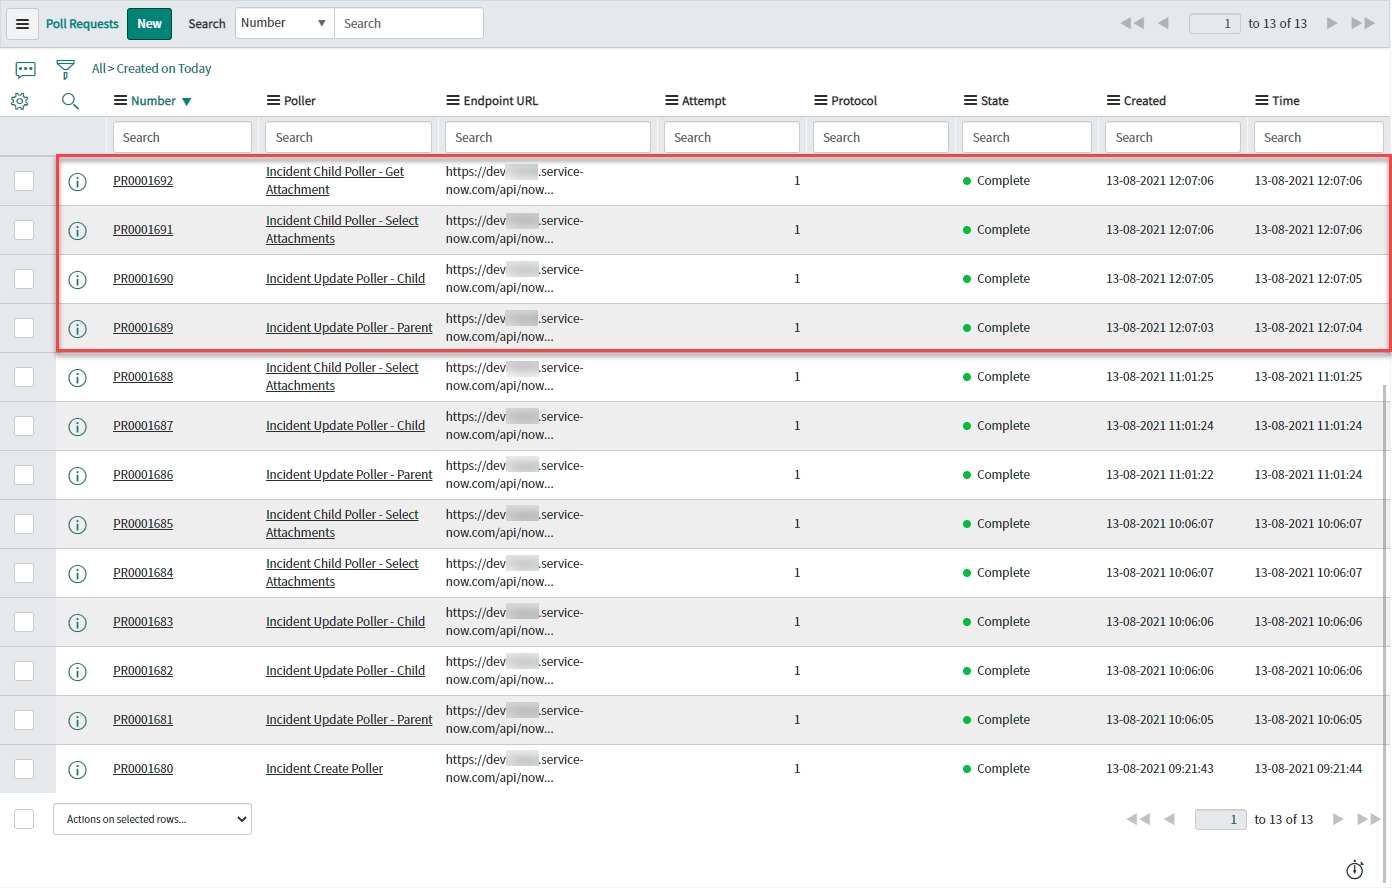
Notice the Parent & Child Update Poll Requests and the Select & Get Attachment Poll Requests:
Open the corresponding Child Poll Request & confirm that the Message name was UpdateIncidentInbound.
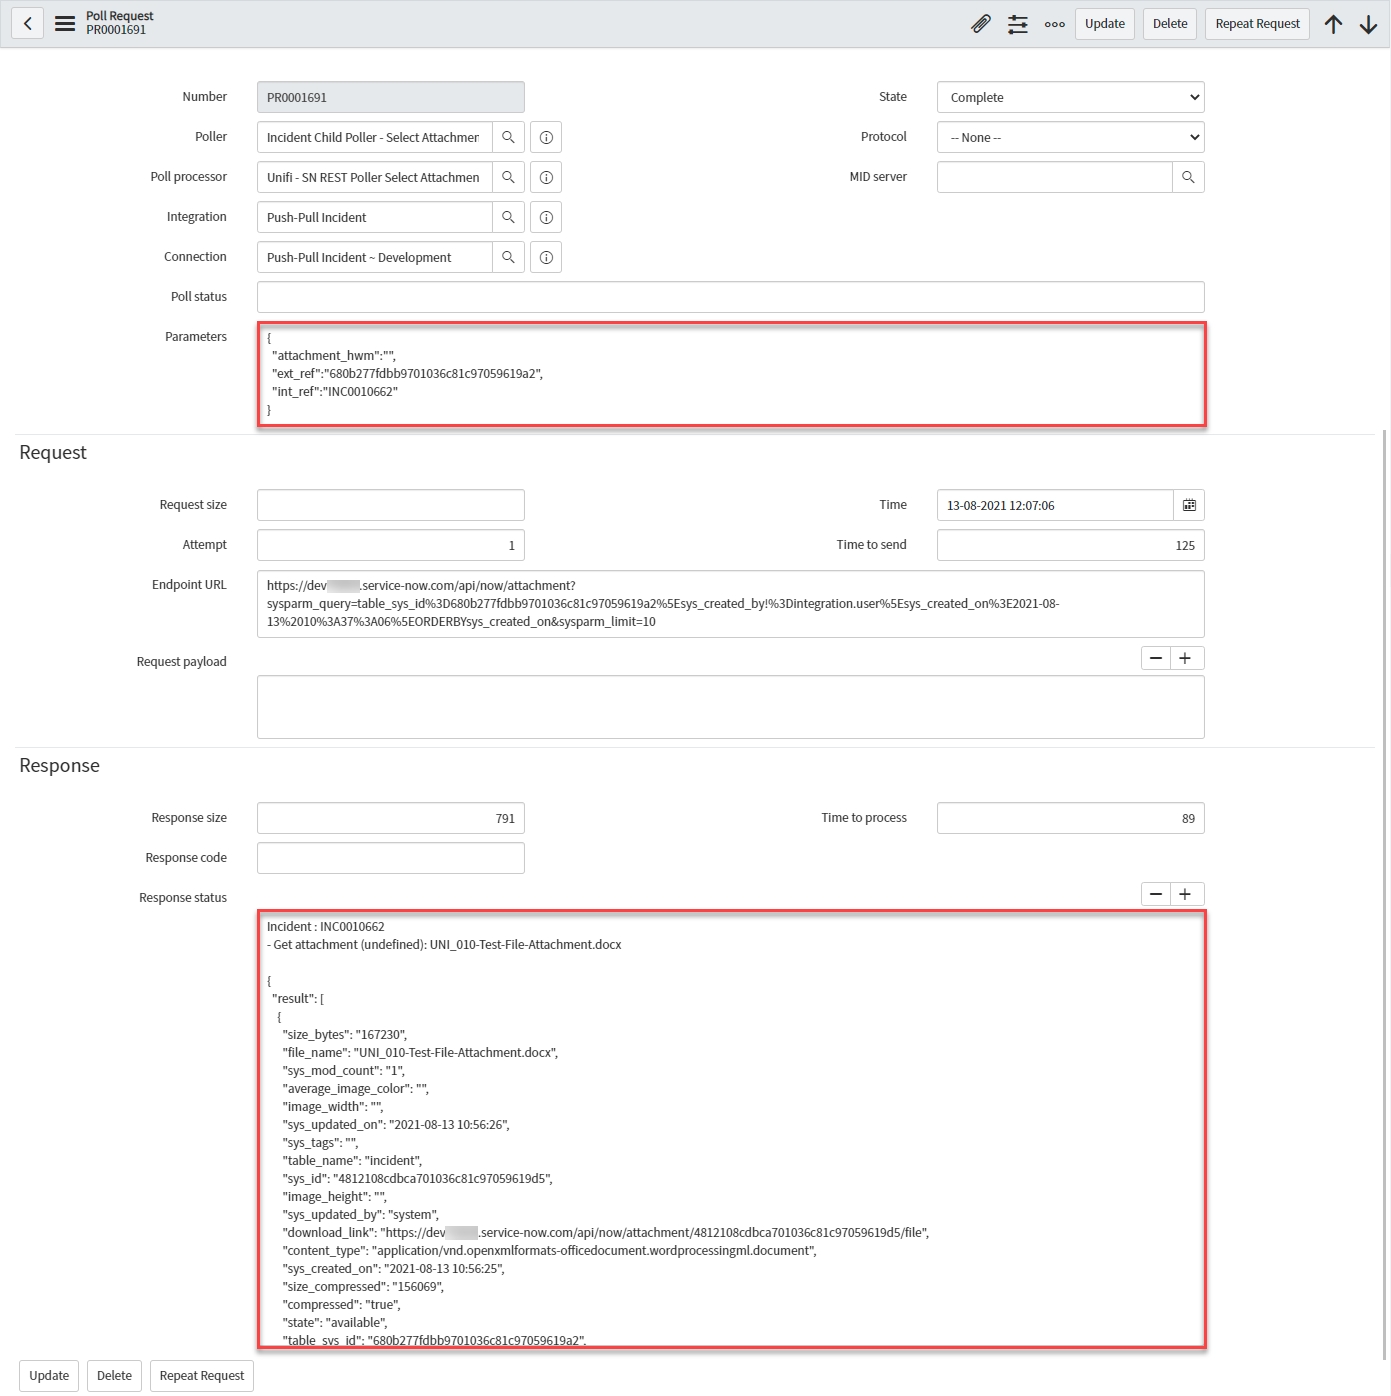
Open the corresponding Select Attachments Poll Request & confirm that the Attachment was found. Notice the attachment_hwm, ext_ref & int_ref passed in as parameters:
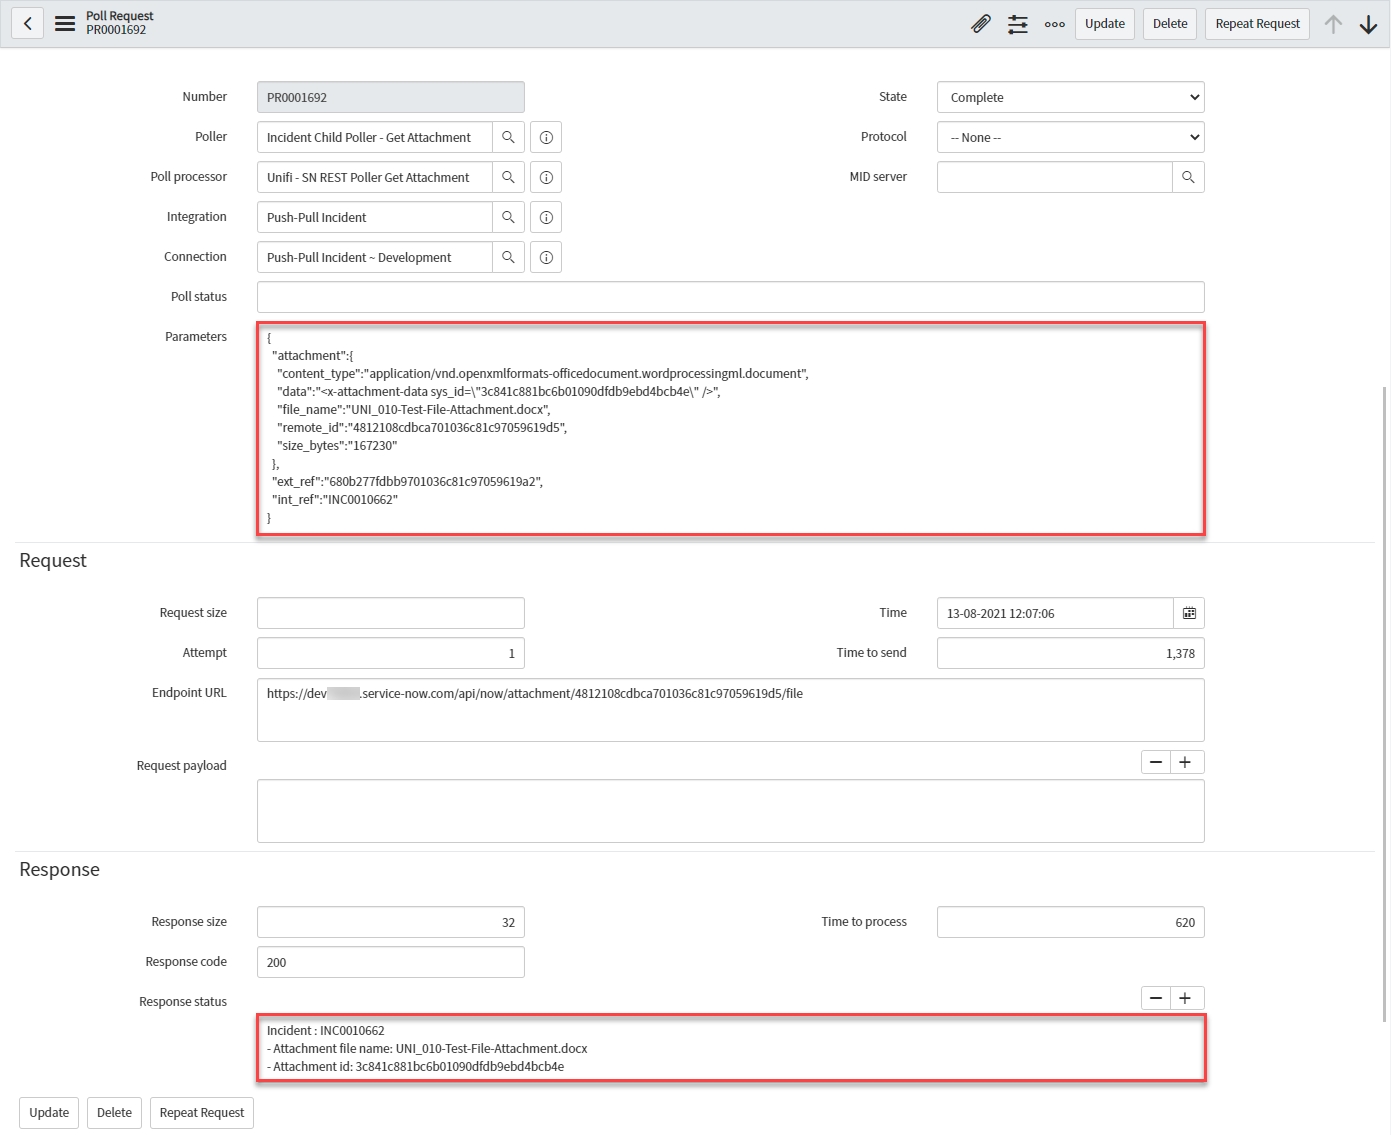
Open the corresponding Get Attachment Poll Request & confirm that the Attachment was found. Notice the attachment, ext_ref & int_ref passed in as parameters:
View the Transactions that have been sent. This can be done either in Native ServiceNow, or in Unifi Operations Manager.
Navigate to Unifi > Transport > Transactions.
Navigate to Unifi > Unifi Operations Manager.

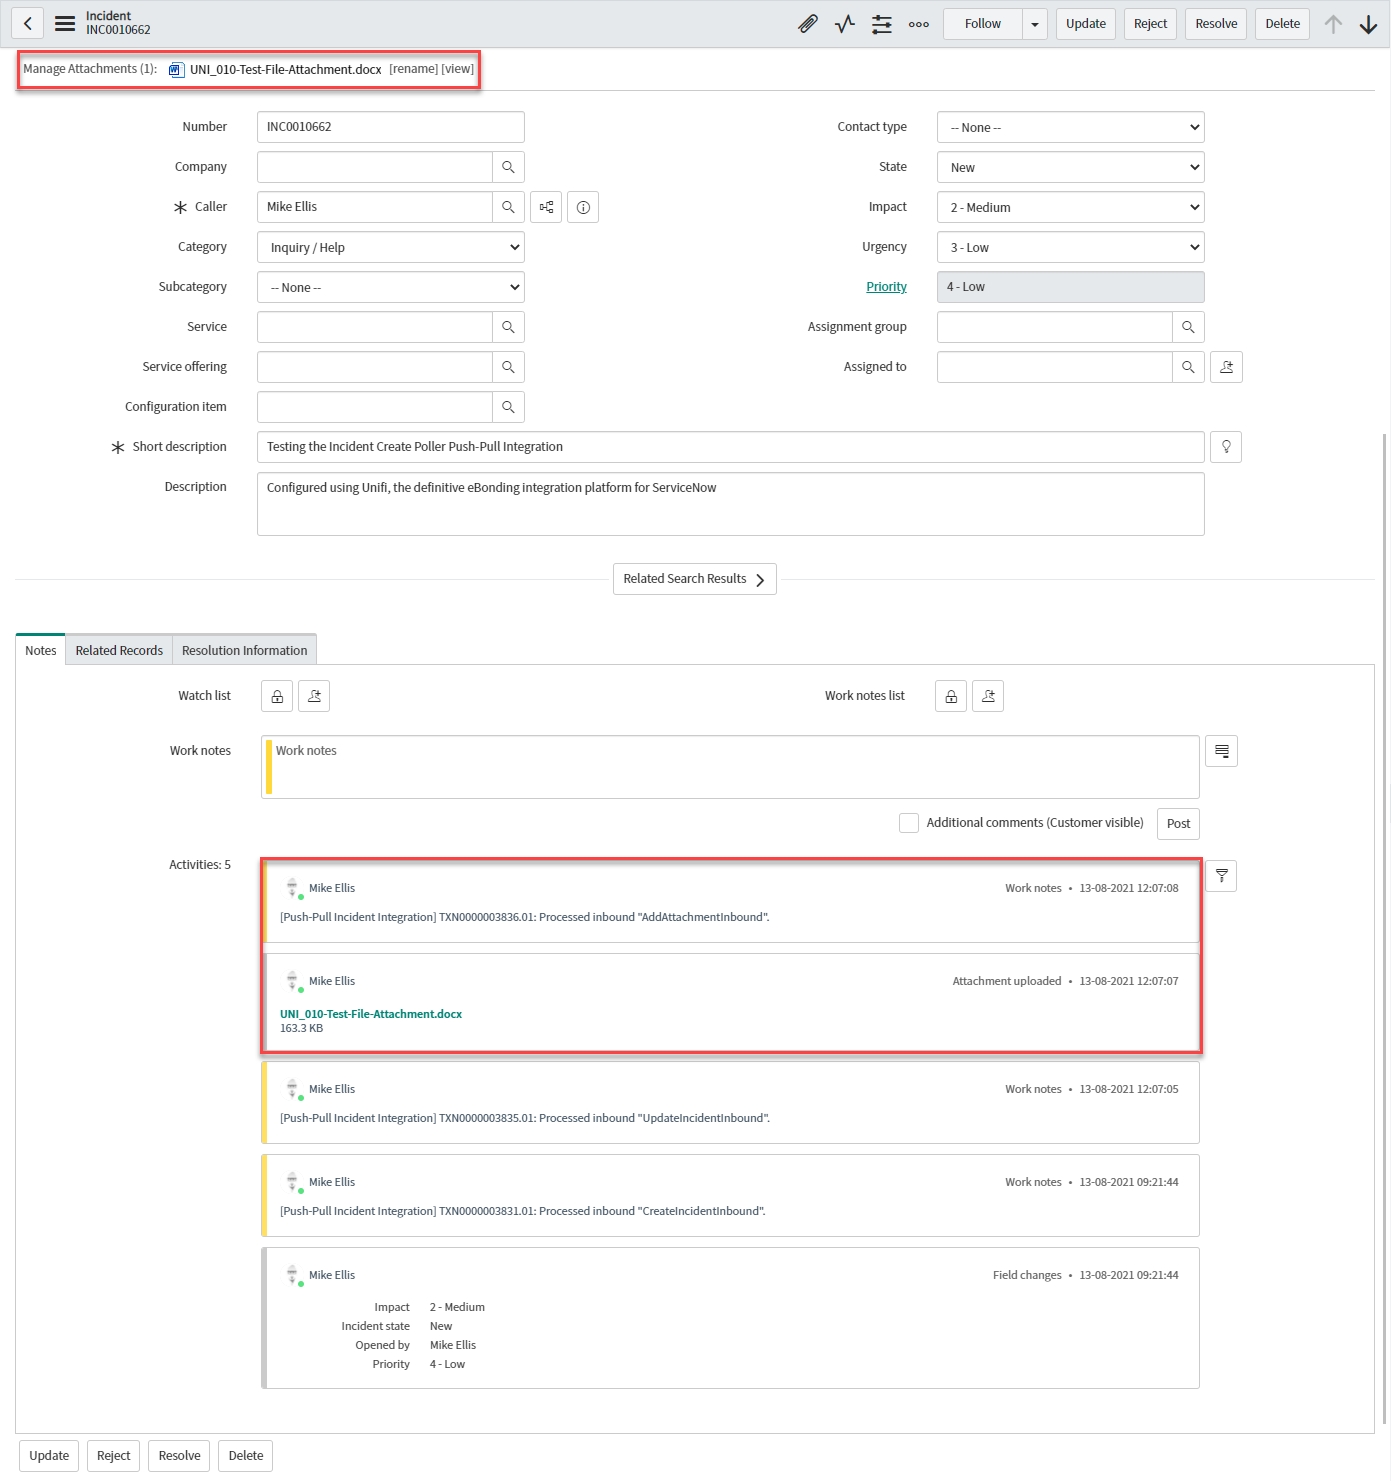
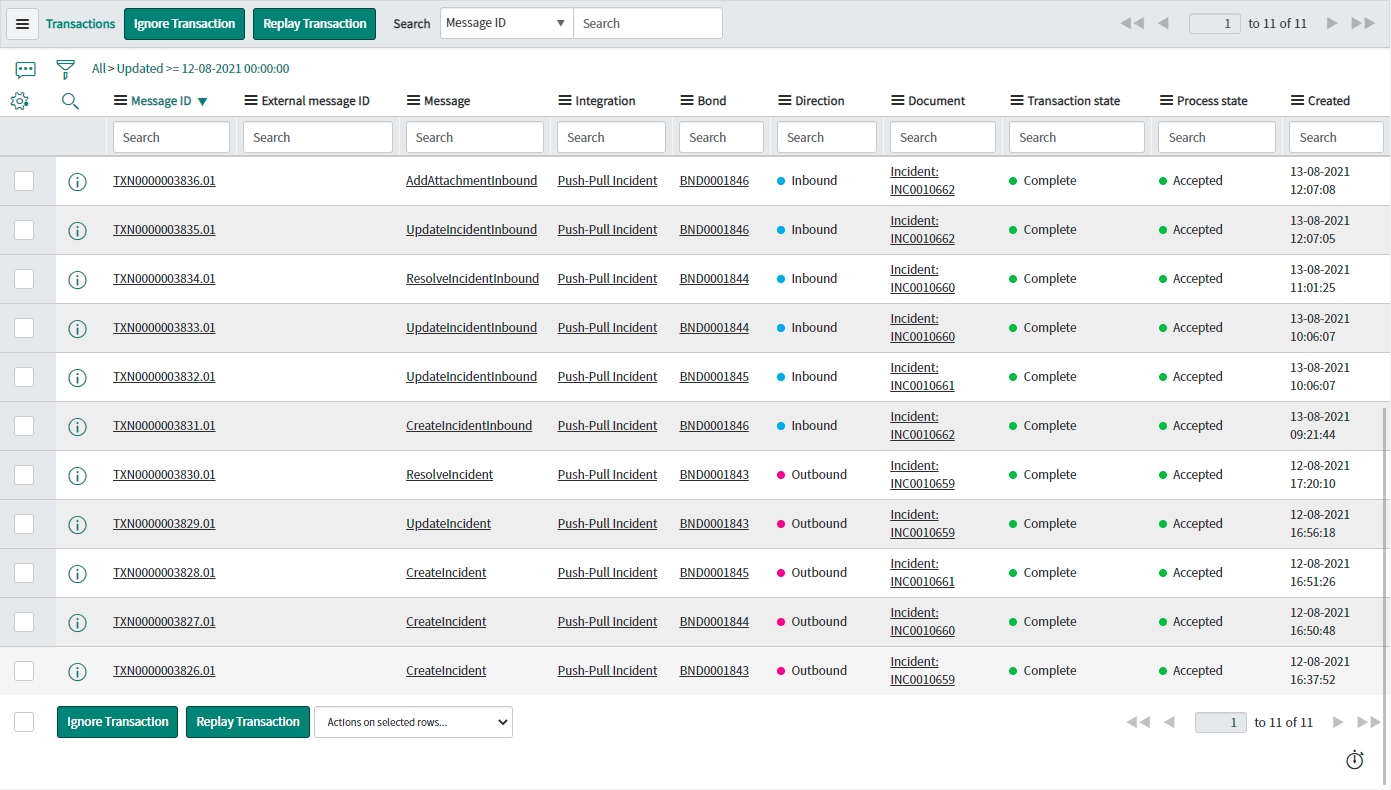
We can see that an UpdateIncidentInbound message and an AddAttachmentInbound message have been received. Both are Complete & Accepted & display the relevant Incident & Bond numbers.
Confirm the Attachment has been added to the bonded ticket in the originating instance.
