Loading...
Loading...
Loading...
Loading...
Loading...
Loading...
Loading...
Loading...
Loading...
Loading...
Loading...
Loading...
Connection Variables can be especially useful if you have multiple connection environments - e.g. Dev, Test, Prod - each containing different data.
Although having mutiple environments may not apply to this integration, we will create Connection Variables to contain certain data values which will be substituted into the Poll Processor scripts.
Instead of scripting data values directly into the code of your Poll Processor scripts, it may be better practice to use Connection Variables in their place. Not only does it make those scripts cleaner, but it also means that changes in requirements can be more easily enacted by changing the values of the data in those variables, without having to change the code in the scripts.
We will use Connection Variables to identify the child Poller and to identify which field elements to return data from when polling.
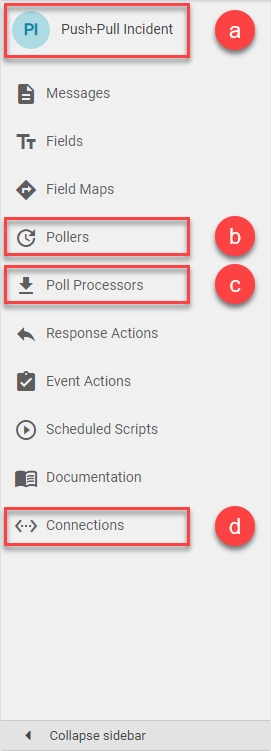
Before continuing we would like to draw your attention to some of the relevant icons that will be visible down the left hand navigation strip in the Unifi Integration Designer.
The icons are:
a) 'Integration' icon: Opens the current integration's Details page.
b) 'Pollers' icon: Opens the current integration's Pollers page.
c) 'Poll Processors' icon: Opens the current integration's Poll Processors page.
d) 'Connections' icon: Opens the current integration's Connections page.
This variable will contain the minimum set of fields required to identify and select records in the remote system.
To open Unifi Integration Designer, navigate to Unifi > Unifi Integration Designer, then navigate to < Your Integration > (created following the Outbound Incident Guide).
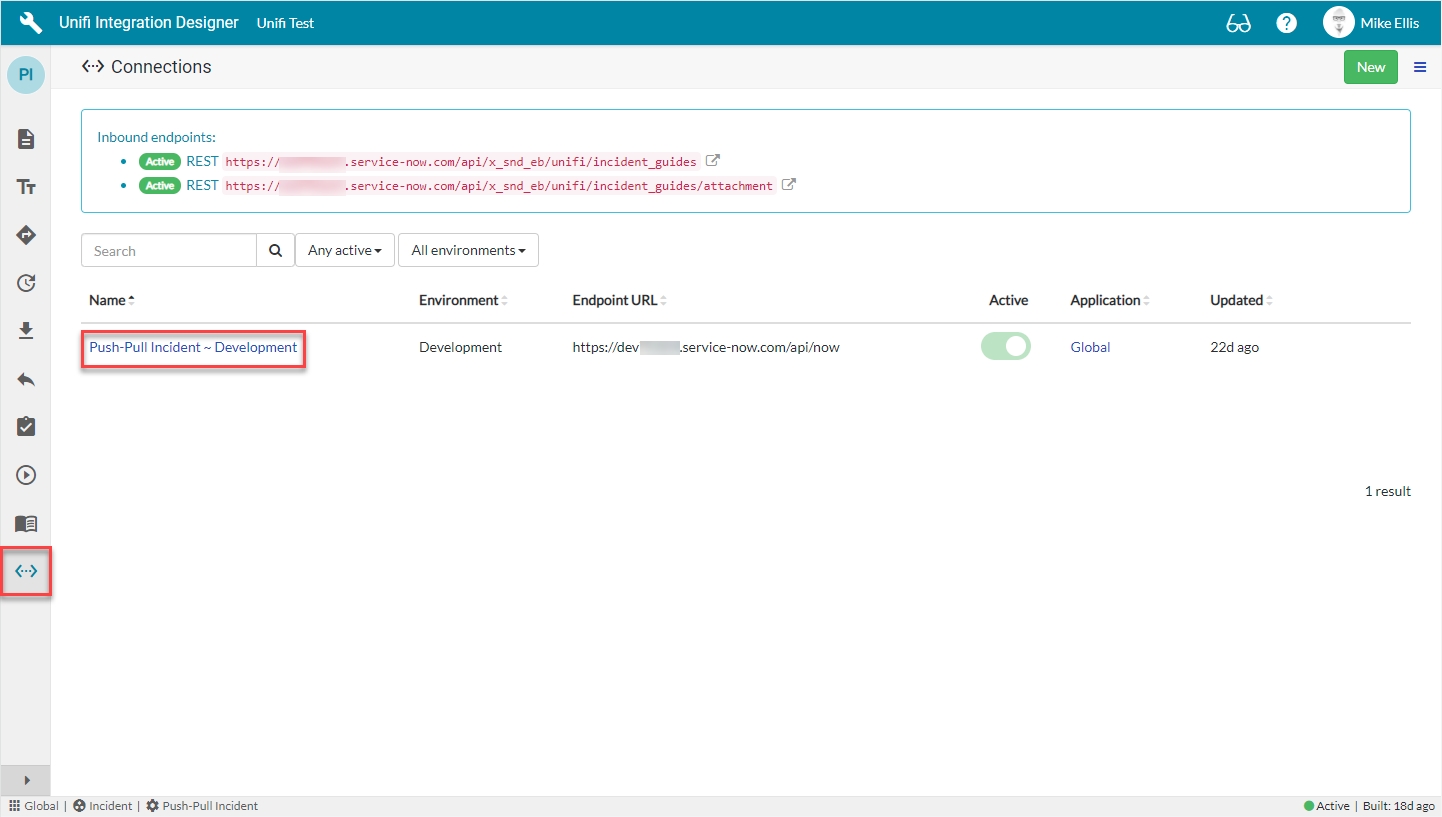
Click the 'Connections' icon, then navigate to and open < Your Connection >.
From the Connection, navigate to Connection > Variables & click New.
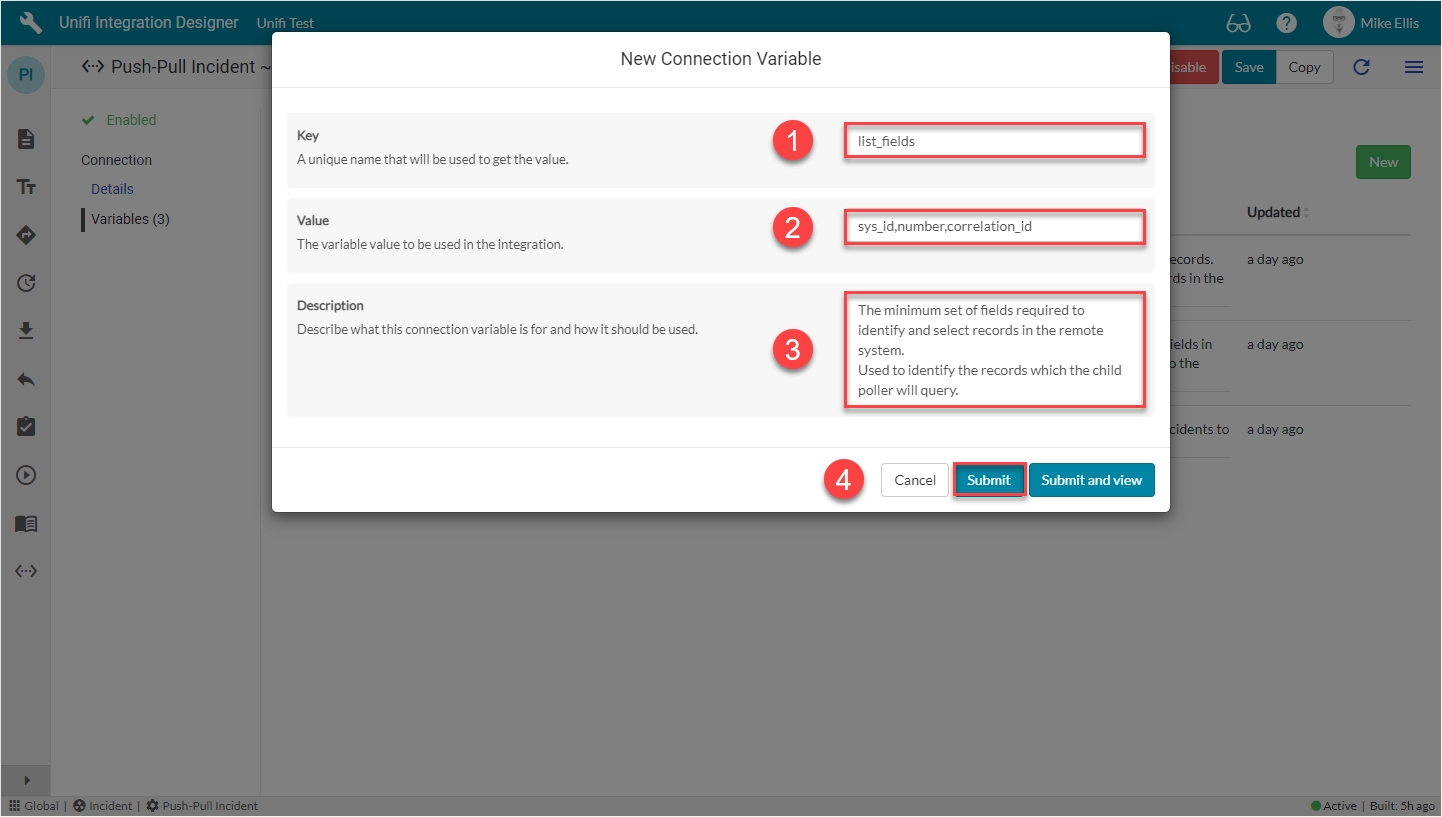
The 'list_fields' New Connection Variable fields to be configured are as follows:
Your 'list_fields' New Connection Variable modal should look like this:
Click Submit.
You will be redirected back to the Variables page of the Connection record.
This variable will contain all the fields which will be retrieved from the remote system by the child Poller.
Click New.
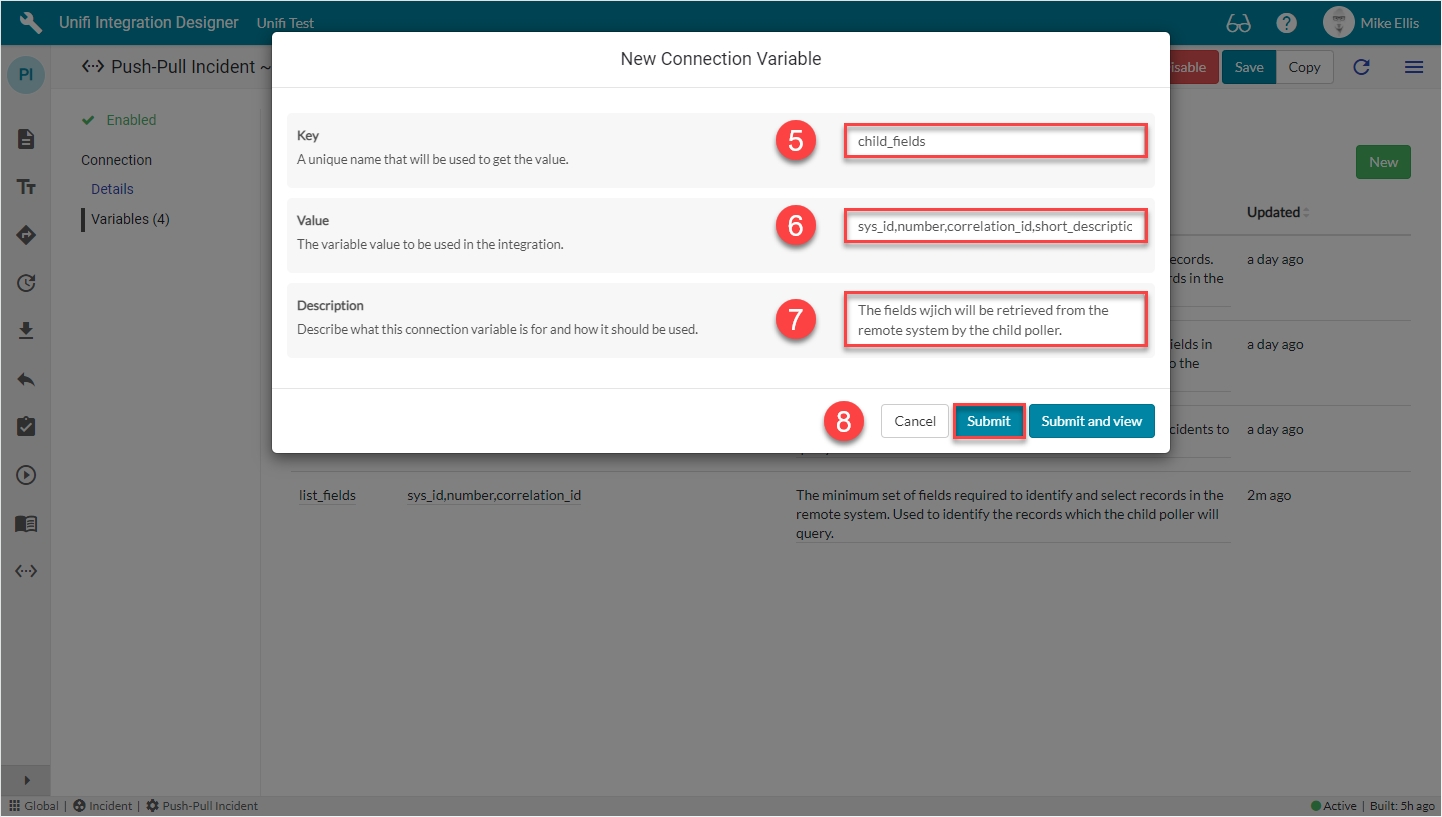
The 'child_fields' New Connection Variable fields to be configured are as follows:
*The comma-separated list of fields with no spaces.
Your 'child_fields' New Connection Variable modal should look like this:
Click Submit.
You will be redirected back to the Variables page of the Connection record.
This variable will contain the sys_id of the child Poller which we will create on the 'Child Poller' page of this Guide. Once you have created the Poller, copy the sys_id and paste it as the value in this variable.
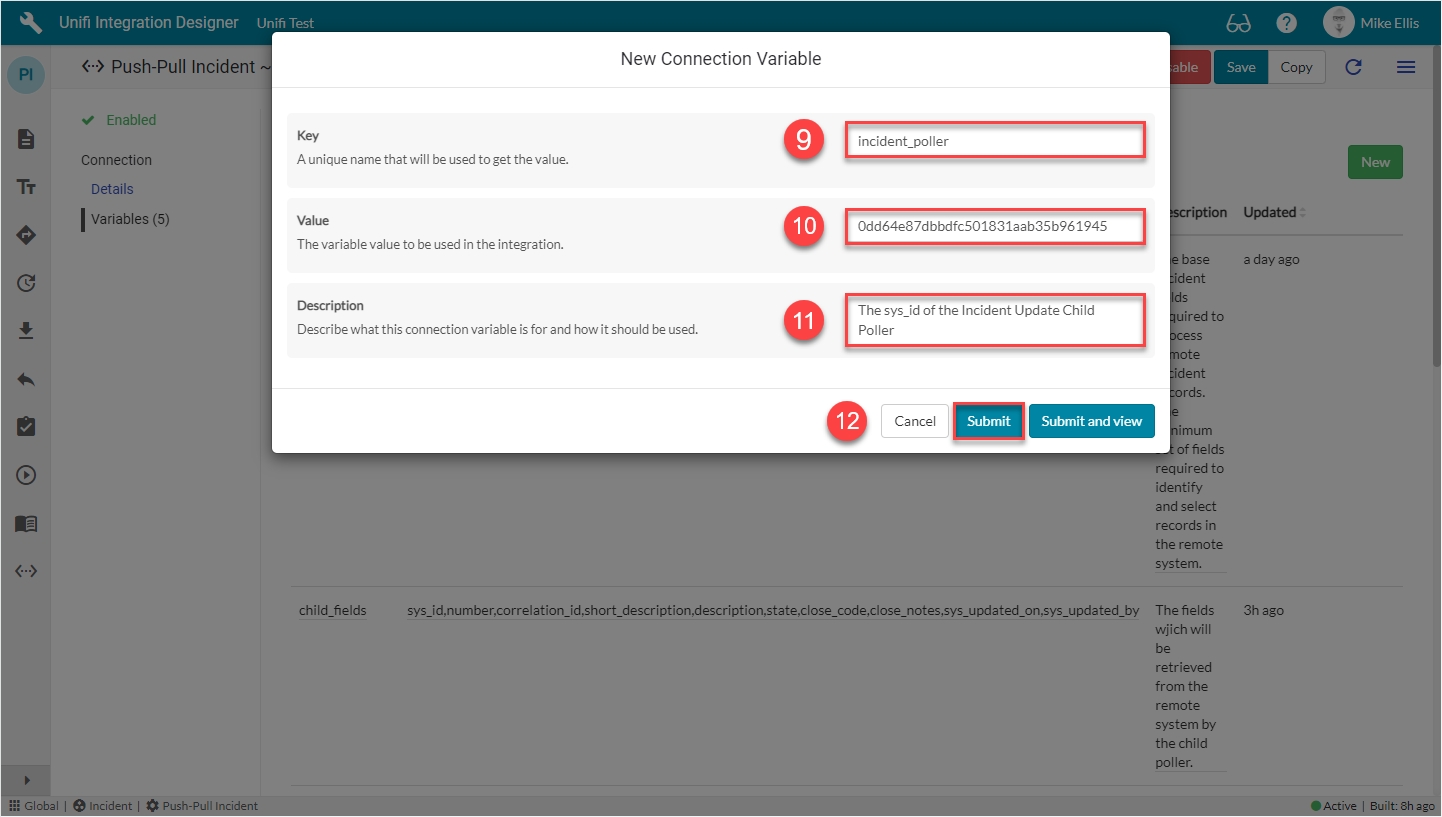
The 'incident_poller' New Connection Variable fields to be configured are as follows:
*Value may vary. Use the sys_id of the Poller you will create from the 'Child Poller' page.
Your 'incident_poller' New Connection Variable modal should look like this:
Click Submit.
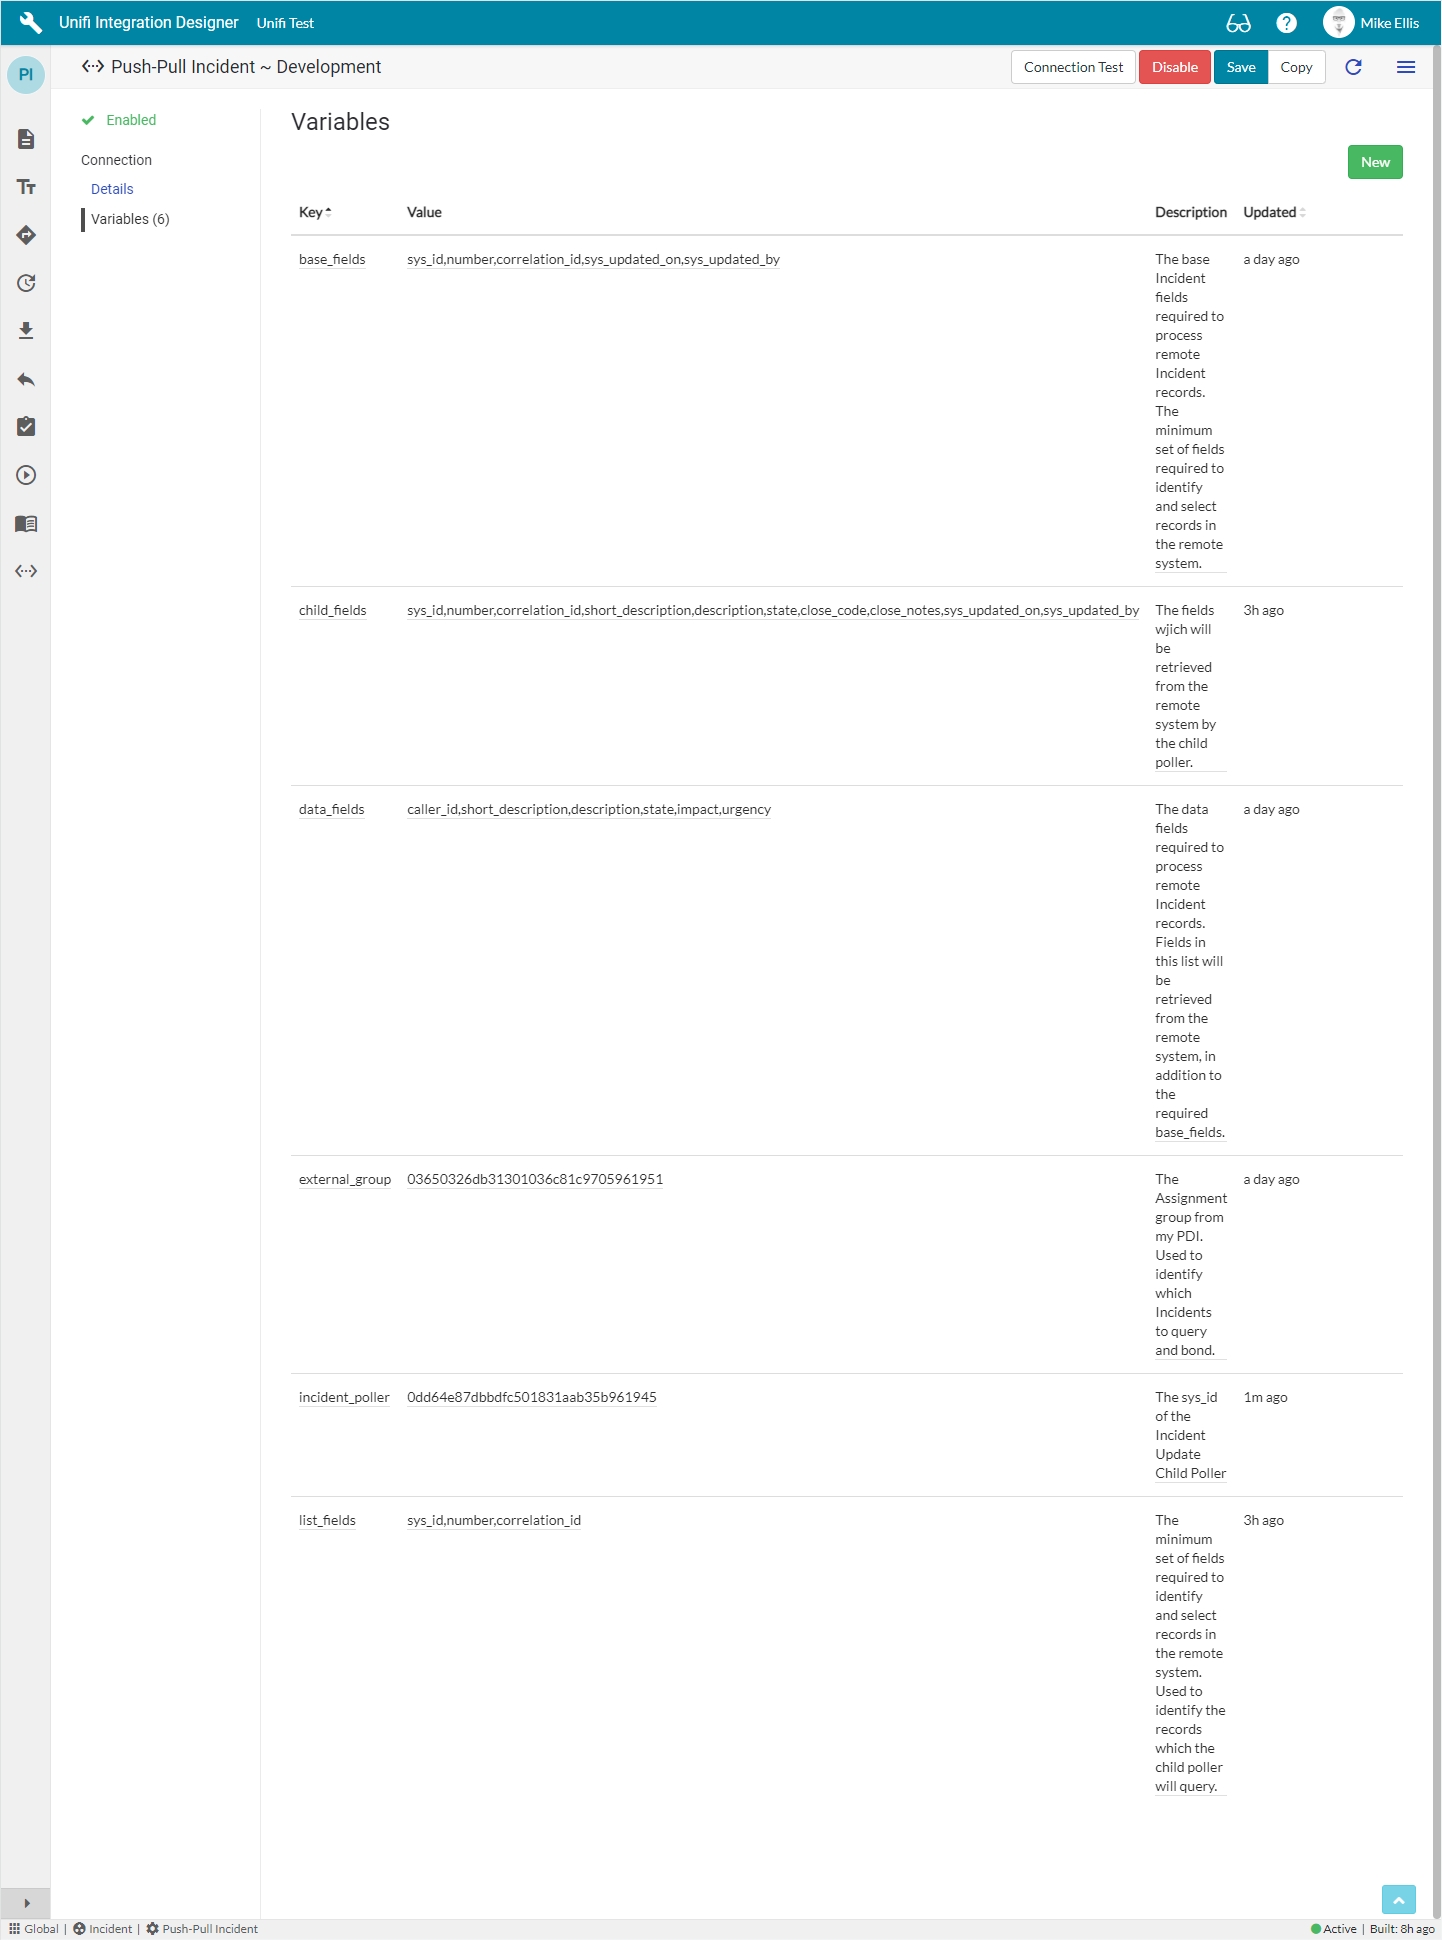
The following Connection Variables should now be in place for your Connection:
Now let's move on and configure the Child Poll Processor.
Follow this fourth of five Poller Guides to configure an integration, polling the table API of your PDI for updates in two stages - an initial light poll which passess data to a more detailed poll.
We will be configuring two Pollers and two Poll Processors in order to pull data which has been updated from an external instance, pass the relevant data between them and then pass it to Unifi. We will then use the relevant inbound Messages in order to process that data.
If you have been following along with the Outbound Incident Guide and each of the previous Poller Guides you will know that they are given as examples of how you might configure such integrations. They are not meant to be prescriptive. The same applies here.
Having said that, this Guide has been written to follow on from those previous ones and has been structured accordingly.
This document will guide you through an example of how you might configure a parent and child poller integration - polling the table API of your Personal Developer Instance (PDI).
This Guide is complementary to the Outbound Incident Guide. It assumes that both the Integration and the Connection are still in place and will be using those same elements as configured there. It also assumes that you know how to use the REST API of your PDI to query for information and read ticket data.
If you haven’t completed the Outbound Incident Guide, please review & complete the following sections of that document, as they must be in place before continuing with this Guide:
This document builds on the Incident Update Poller Guide. As such, it assumes that the changes made in that Guide are still in place and will make use of some of those same elements.
If you haven’t completed the Incident Update Poller Guide, please review & complete the following sections of that document at least, as they must be in place before continuing with this Guide:
This document also builds on the Incident Multiple Message Poller Guide. It assumes that the changes made in that Guide are still in place and will make use of some of those same elements.
If you haven’t completed the Incident Multiple Message Poller Guide, please review & complete the following sections of that document at least, as they must be in place before continuing with this Guide:
Both the Incident Update Poller Guide and the Incident Multiple Message Poller Guide demonstrated how you might poll for updates from the table API of your PDI and then configure inbound Messages to process that data. This Guide will also demonstrate how you might poll for updates from the table API of your PDI, but will poll in two stages - an initial light poll, periodically scanning for updated records and a subsequent, on-demand poll, pulling back more detail from the relevant records and deciding how to process that data with the relevant inbound Messages.
Whilst the specific use case demonstrated in this Guide may not warrant such a method, it is given as an example to follow in order to demonstrate how you might might pass data on to further Pollers.
It is not always possible for a remote system to send us the data. In such cases, we can make a scheduled request for it using Pollers. We can setup, execute and process those Requests using Poll Processors.
A poller defines the frequency of polling and which logic to use. It is effectively a scheduled job which ties together an Integration and Poll Processor. Although a Poller belongs to only one Integration, an Integration can have multiple Pollers.
A Poll Processor contains the logic that will be applied when polling a remote system for data. It contains three main scripts:
The Setup Script is used to build the environment for the poll and define what it will do (for example, create/setup the URL that will be called).
The Request Script is used to reach into the remote system and execute the request. This is usually done by making a REST call to the URL defined in the Setup Script.
The Response Script is used to process the information returned from the remote system.
Do not build integrations directly within the Unifi application scope. This can create issues with upgrades and application management.
As well as storing and checking some returned data in order to evaluate when the data was changed and which system has made the updates (we don’t want to pull back data we have changed), we will also need to store and check other data in order to decide which Message to use to process that data.
The first (parent) Poll Processor will pull back a list of the relevant records (polling enough data to identify the records). Each record it identifies will be passed on to a second (child) Poll Processor which will then make a fuller Poll Request against that record and process it deciding between multiple Messages in Unifi.
| Field | Description | Value |
|---|---|---|
| Field | Description | Value |
|---|---|---|
| Field | Description | Value |
|---|---|---|
Key
A unique name that will be used to get the value.
'list_fields'
Value
The variable value to be used in the integration.
'sys_id,number,correlation_id'
Description
Describe what this connection variable is for and how it should be used.
<Your Description>
Key
A unique name that will be used to get the value.
'child_fields'
Value
The variable value to be used in the integration.
'sys_id,number,correlation_id,short_description,description,state,close_code,close_notes,sys_updated_on,sys_updated_by'*
Description
Describe what this connection variable is for and how it should be used.
<Your Description>
Key
A unique name that will be used to get the value.
'incident_poller'
Value
The variable value to be used in the integration.
<Your Value>*
Description
Describe what this connection variable is for and how it should be used.
<Your Description>
A Poller is a configuration record which defines the frequency of polling and which logic to use.
A Poller is a configuration record which defines the frequency of polling and which logic to use (the logic itself is defined in the Poll Processor). Each time it is run, it creates a corresponding Poll Request record.
Click the 'Pollers' icon & then New.
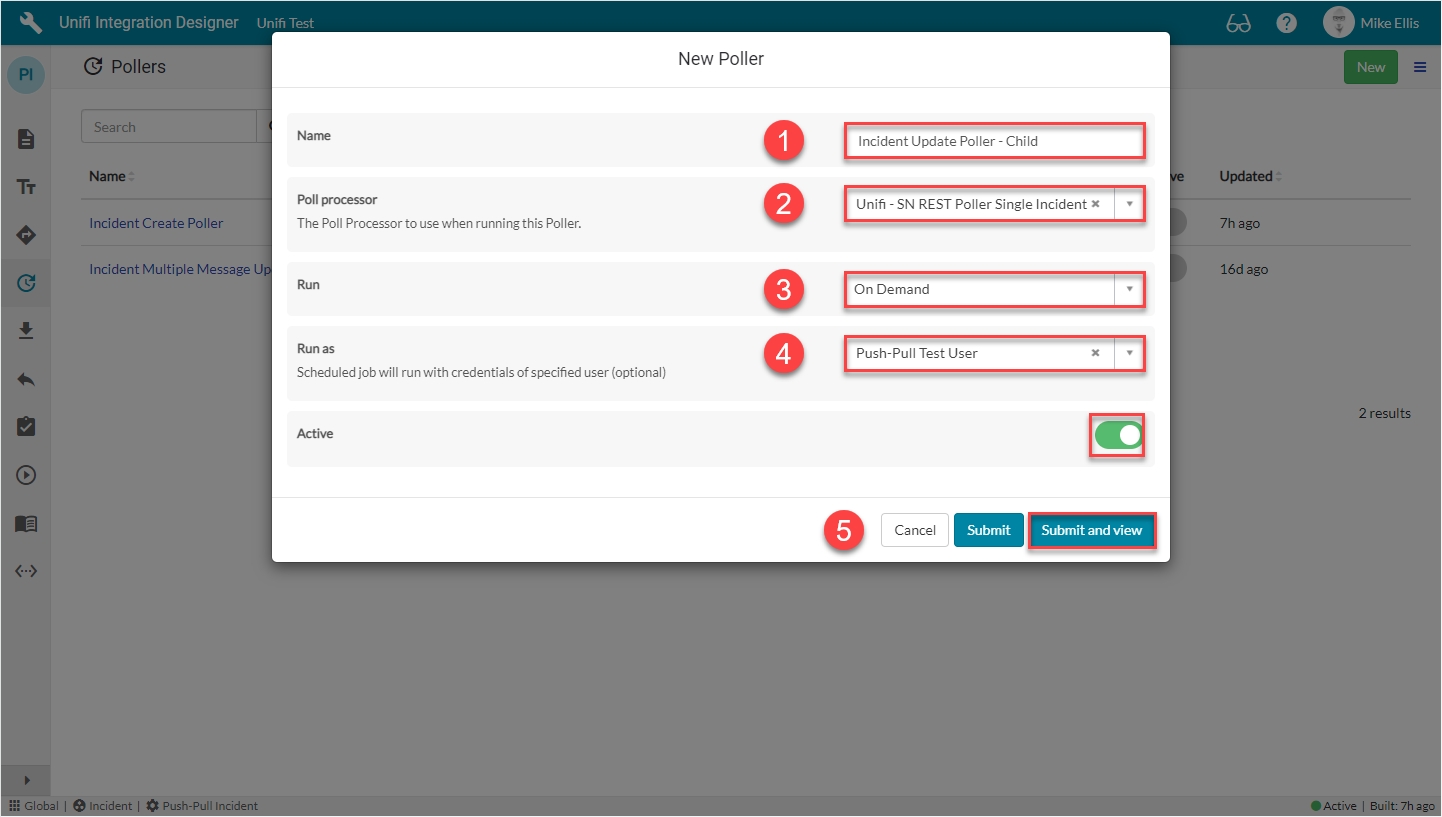
The fields to be configured for our Poller record are as follows:
| Field | Description | Value |
|---|---|---|
*These fields are mandatory, or automatically defaulted to true.
Your New Poller modal should look like this:
Submit and view to further configure the Poller.
The fields to be configured for the Details form are as follows:
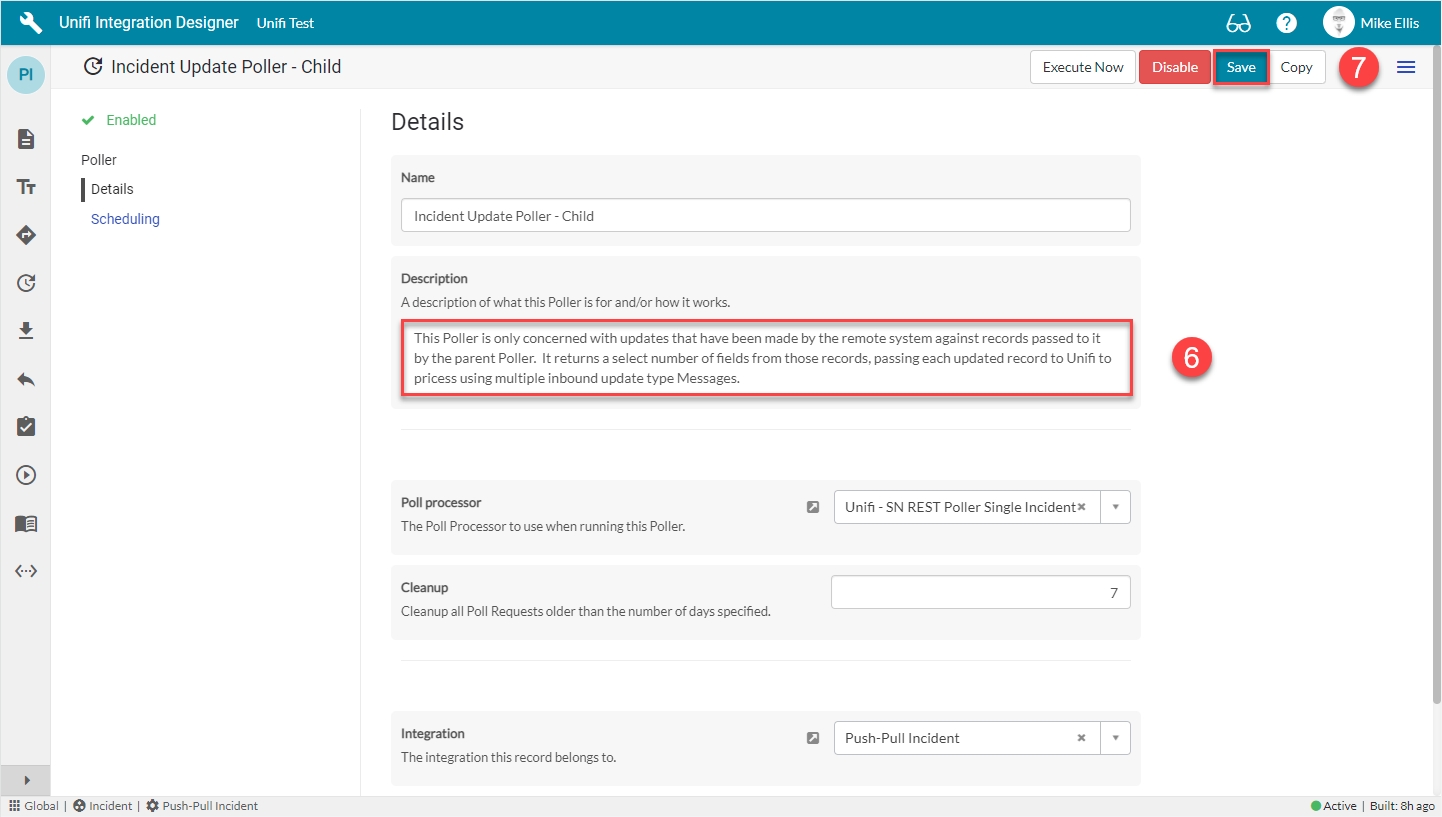
Your Details form should look like this:
Save the Poller.
Update the value of the 'incident_poller' Connection Variable with the sys_id of the child Poller.
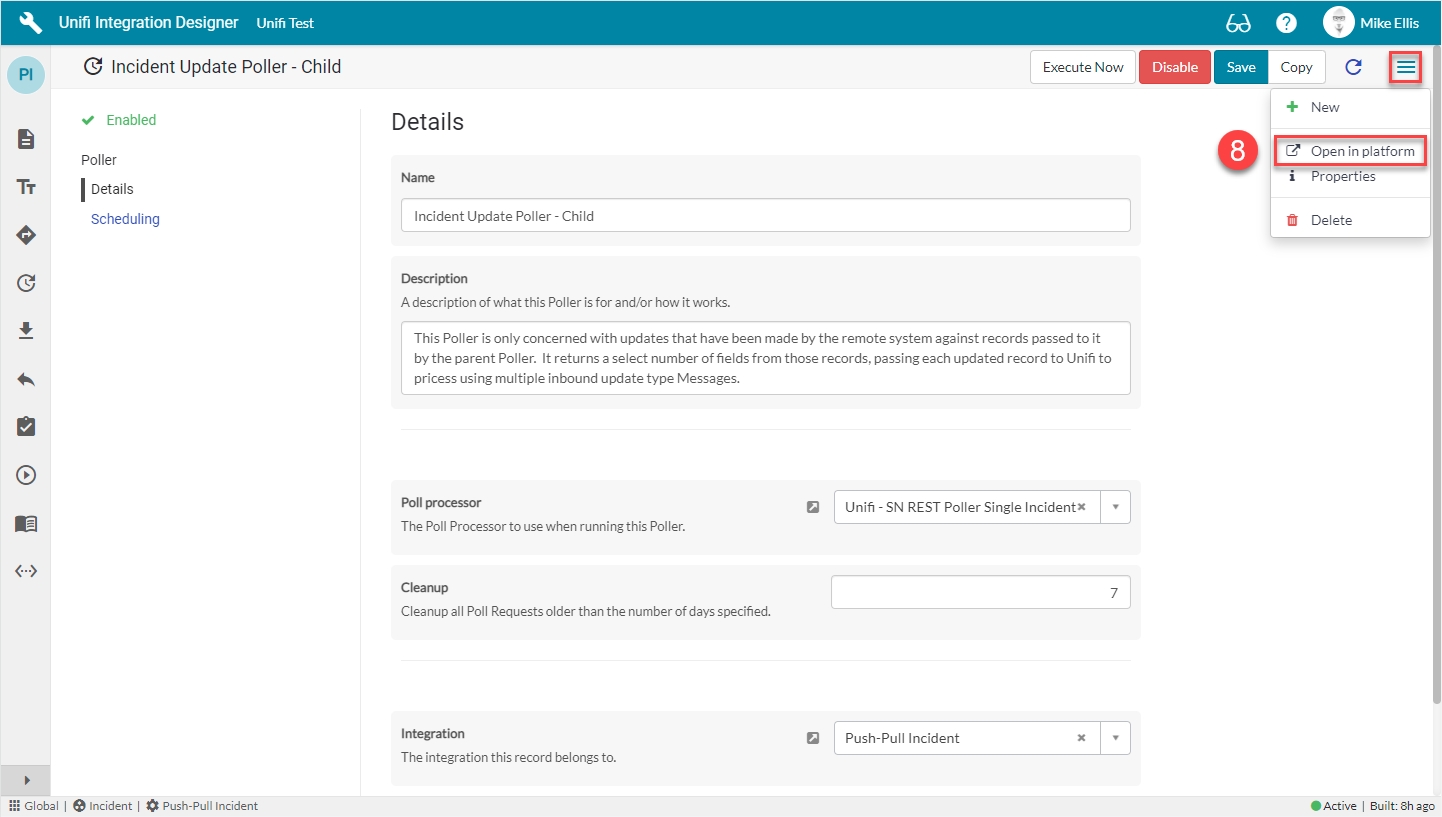
Click on the Hamburger Menu and select Open in platform.
The Poller opens in a new window.
Right-click the Header & 'Copy sys_id'.
Open the variable created on the 'Connection Variables' page of this Guide and update the value with the copied sys_id.
Next, we will configure the Parent Poll Processor.
We will utilise already configured inbound Messages to process the data returned from the poll.
In order to process the data that is returned from the remote system, we will utilise the Messages we created in earlier Guides. The following Messages will be used:
UpdateIncidentInbound
ResolveIncidentInbound
Because we have already configured those Messages in the previous Incident Update Poller Guide & Incident Multiple Message Guide, we will not be configuring any of those messages here.
If you haven't already, please review & complete the following sections of the Incident Update Poller Guide:
Please also review & complete the following sections of the Incident Multiple Message Poller Guide:
We can now move on to Testing.
You should have successfully configured two Poll Processors and two Pollers - to enable polling data from your PDI & passing the relevant data between them and then passing it to Unifi. Now to test.
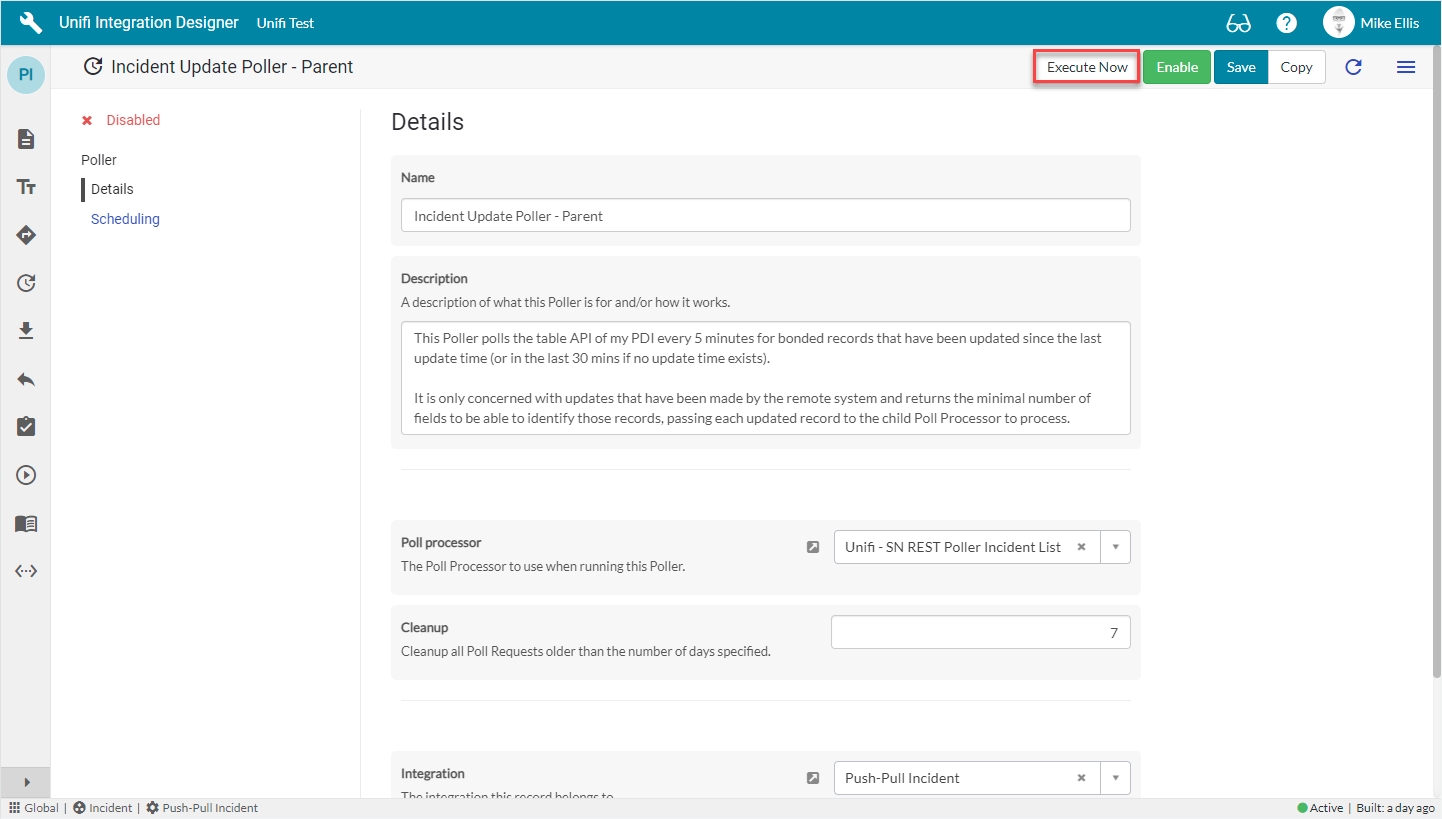
It may help to turn off the Parent Update Poller we created (set Active to 'false') whilst conducting these tests and to manually execute it as required (this can still be done even if the Poller is inactive). This is so that we don't have to wait for the Poller to run, but rather manually activate it when needed by clicking 'Execute Now'.
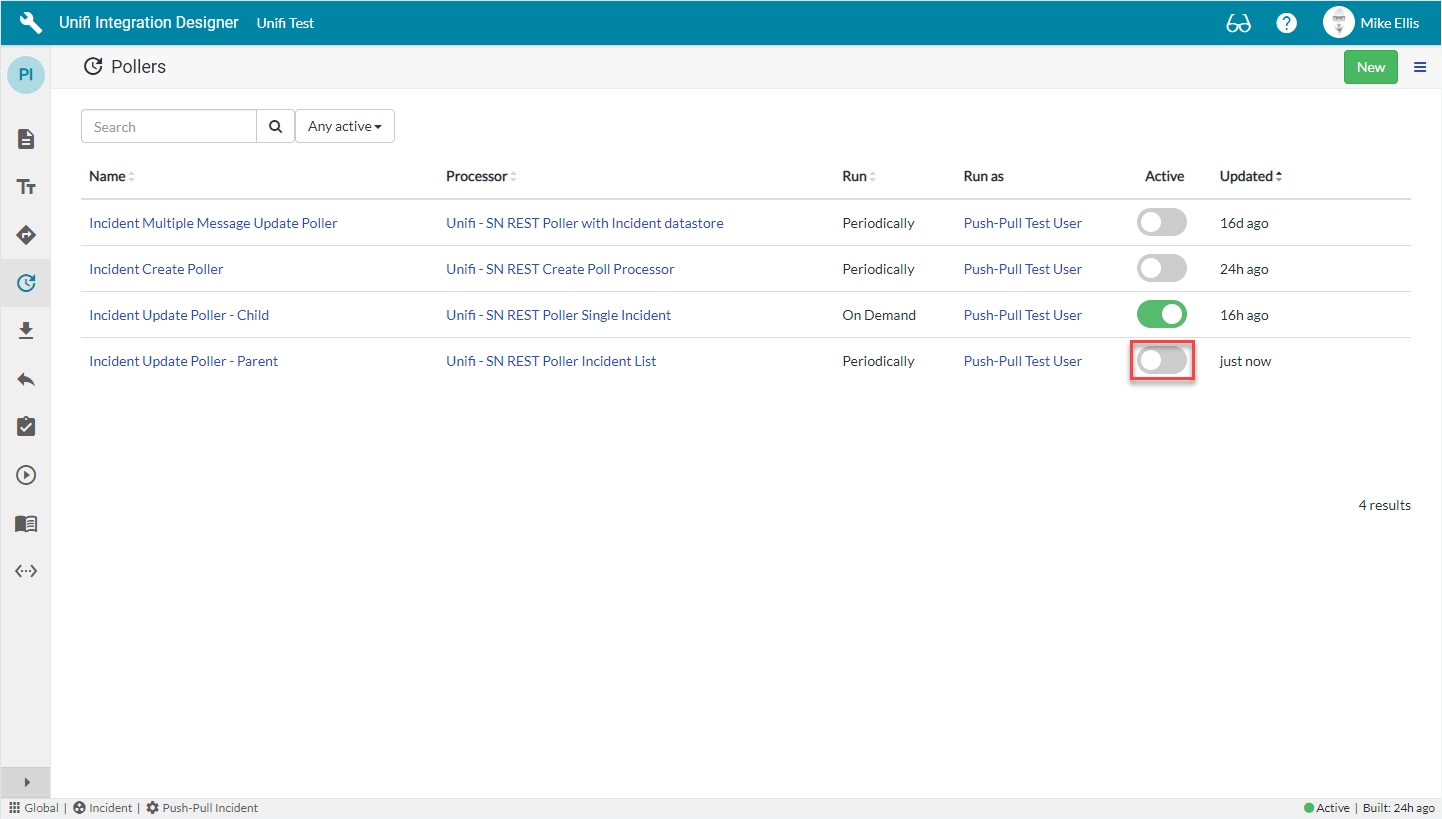
To turn off the Poller, in the Unifi Integration Designer window, navigate to the 'Pollers' icon & set Active to false.
Our Poll Processors have been configured to poll for updates from our PDI and make a decision, telling Unifi which Message to use to process that data. We will therefore test our Poller by means of testing both of the Update type inbound Messages on our Integration:
UpdateIncidentInbound
ResolveIncidentInbound
We will look in more detail at the steps for each over the next couple of pages.
First, we shall test the UpdateIncidentInbound Message.
We will configure a scheduled poll to query the remote system and pull back a list of records that have changed. Data from which will be passed to an on-demand poll to pull back more detailed data.
To set up a scheduled poll that will query the remote system at regular intervals, pass data to a subsequent poll which will check whether any data has changed and then pass that data to Unifi, we will need to configure two each of the following records:
Poll Processor
Poller
We will look at the polling records in turn over subsequent pages. Before configuring those records, let’s first look at Connection Variables.
The Poll Processor contains the logic that will be applied when polling a remote system for data.
The Poll Processor is a configuration record which contains the logic that will be applied when polling a remote system for data. There are three main scripts which are used to setup, execute and process the Poll Requests. The scripts given here are examples of how you might configure your Poll. The details of yours may differ depending on your requirements.
This child Poll Processor will take take each record passed to it from the parent Poll Processor and then make a fuller Poll Request against that record, processing it and deciding between multiple Messages in Unifi.
In Unifi Integration Designer, navigate to & open < Your Integration > (created following the Outbound Incident Guide).
Click the 'Poll Processors' icon & then New.
The fields to be configured for the New Poll Processor modal are as follows:
| Field | Description | Value |
|---|---|---|
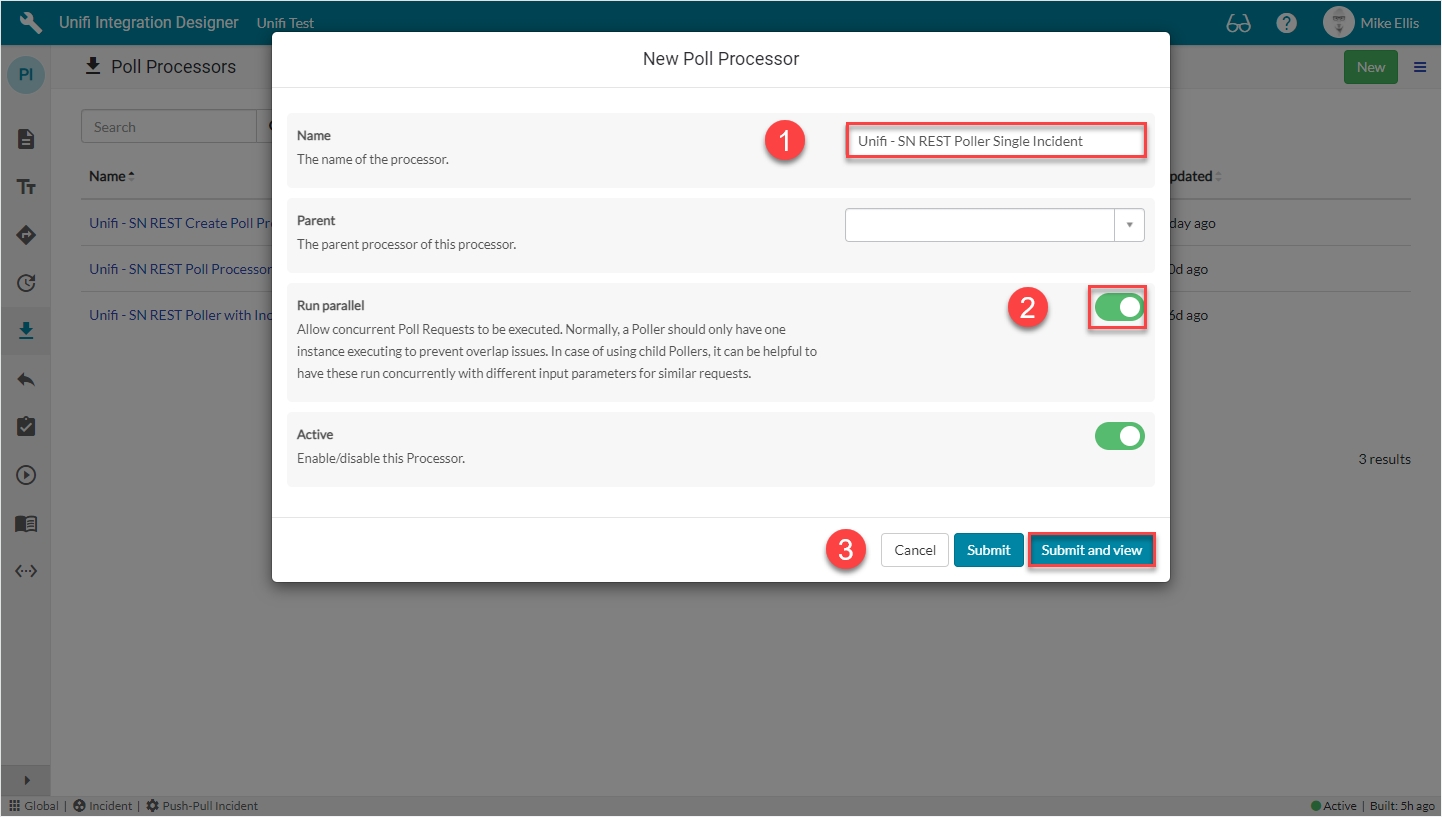
*Run parallel: Each Poll Request will have different input parameters (i.e. the sys_id of one of the updated Incidents passed from the Parent). We can therefore run concurrent Poll Requests on the different records without concern for overlap issues.
Your New Poll Processor modal should look like this:
'Parent' - Once we have created the Parent Poll Processor, we can then select it here. We have not scripted any business logic to run from the value in this field. It is given for documentary purposes only.
Submit and view to further configure the Poll Processor.
The Setup Script is the first script to run (it runs at the point in time the Poll Request is created). It is used to build the environment for the poll and define what it will do. We will use it to setup the URL that will be called.
Navigate to Scripts > Setup Script.
The initial Poll Processor fields to be configured are as follows:
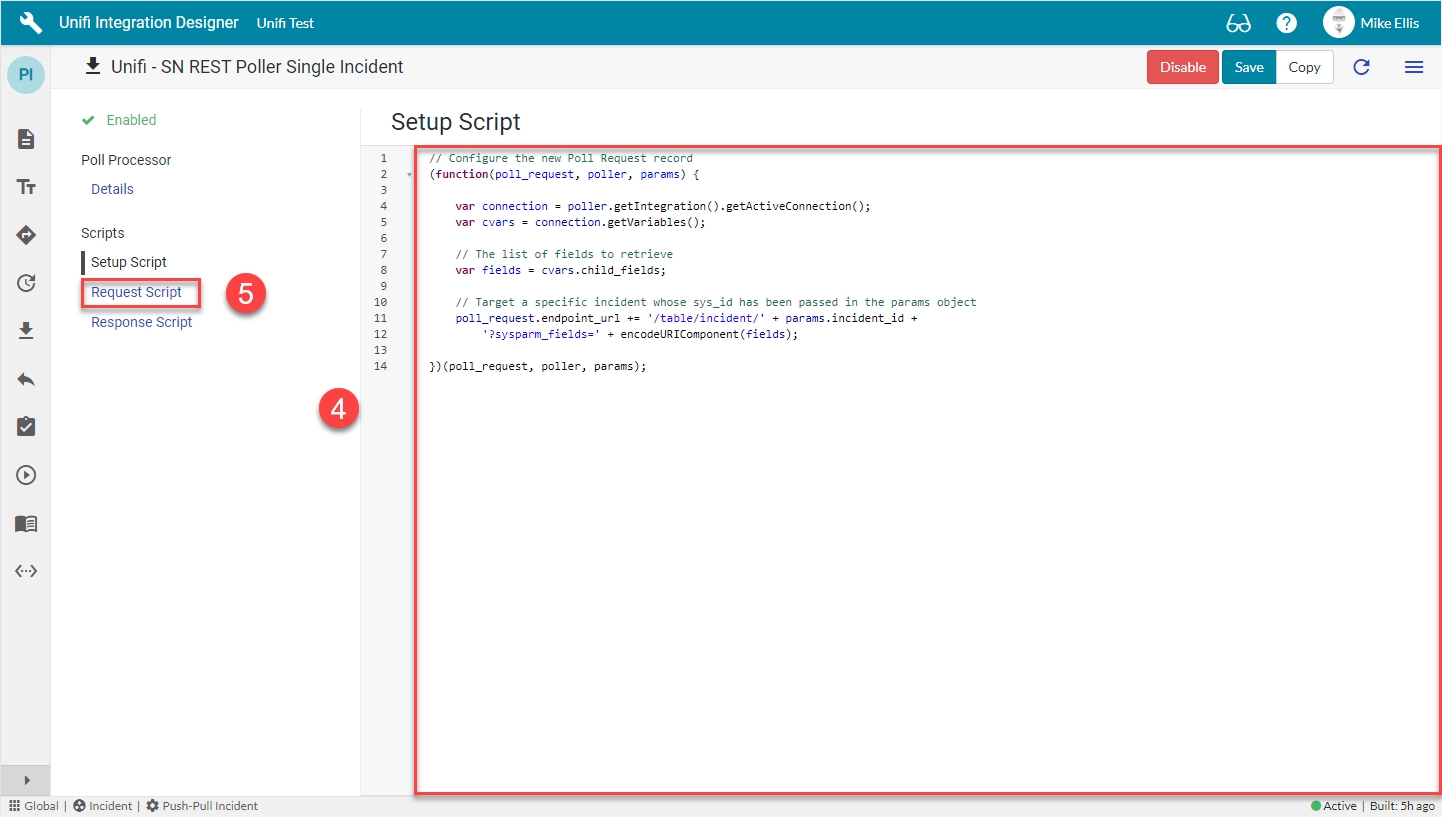
The code in the Setup script field should look like this:
Setup script: The parameters for which data to return are contained in the endpoint url.
fields: The table API will return all the data by default, so we choose to deliberately limit what is returned to the fields listed in this variable.
Endpoint URL: The value used in the poll_request.endpoint_url was initially generated using the ServiceNow REST API Explorer, substituting a connection variable in for the fields along with the sys_id of a specific incident to query. This value is appended to the existing endpoint url in the active connection before being added to the Poll Request.
Note: We have included the /table/incident element of the endpoint url because we used the truncated url in the Connection when following the Outbound Incident Guide. If you have used the full url there, then this element can be excluded here.
params: The params object is passed through to the subsequent scripts (and on to further Pollers, if required). This script has been passed the sys_id of a specific incident from the parent Poller.
Your Setup Script form should look like this:
Navigate to Request Script.
The Request Script is used to reach into the remote system and execute the request. We will use the ServiceNow RESTMessageV2() web service to make a REST call to the URL defined in the Setup Script.
The next Poll Processor field to be configured is as follows:
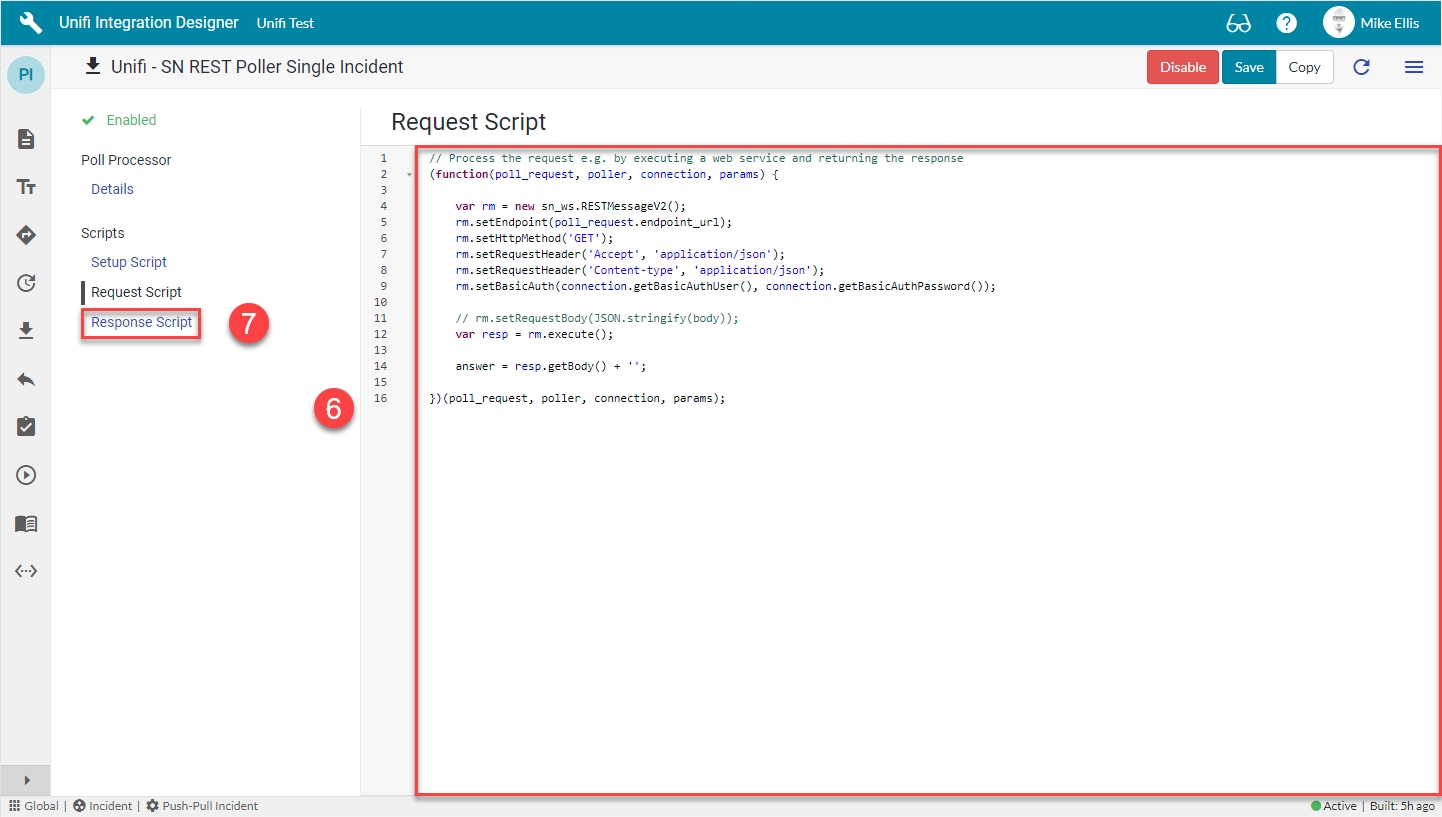
The code in the Request script field should look like this:
Request script: This script uses the ServiceNow RESTMessageV2() web service to make a REST call to the endpoint url created in the Setup script. It returns the body of the request as the answer which it passes to the Response script
Your Request Script form should look like this:
Navigate to Response Script.
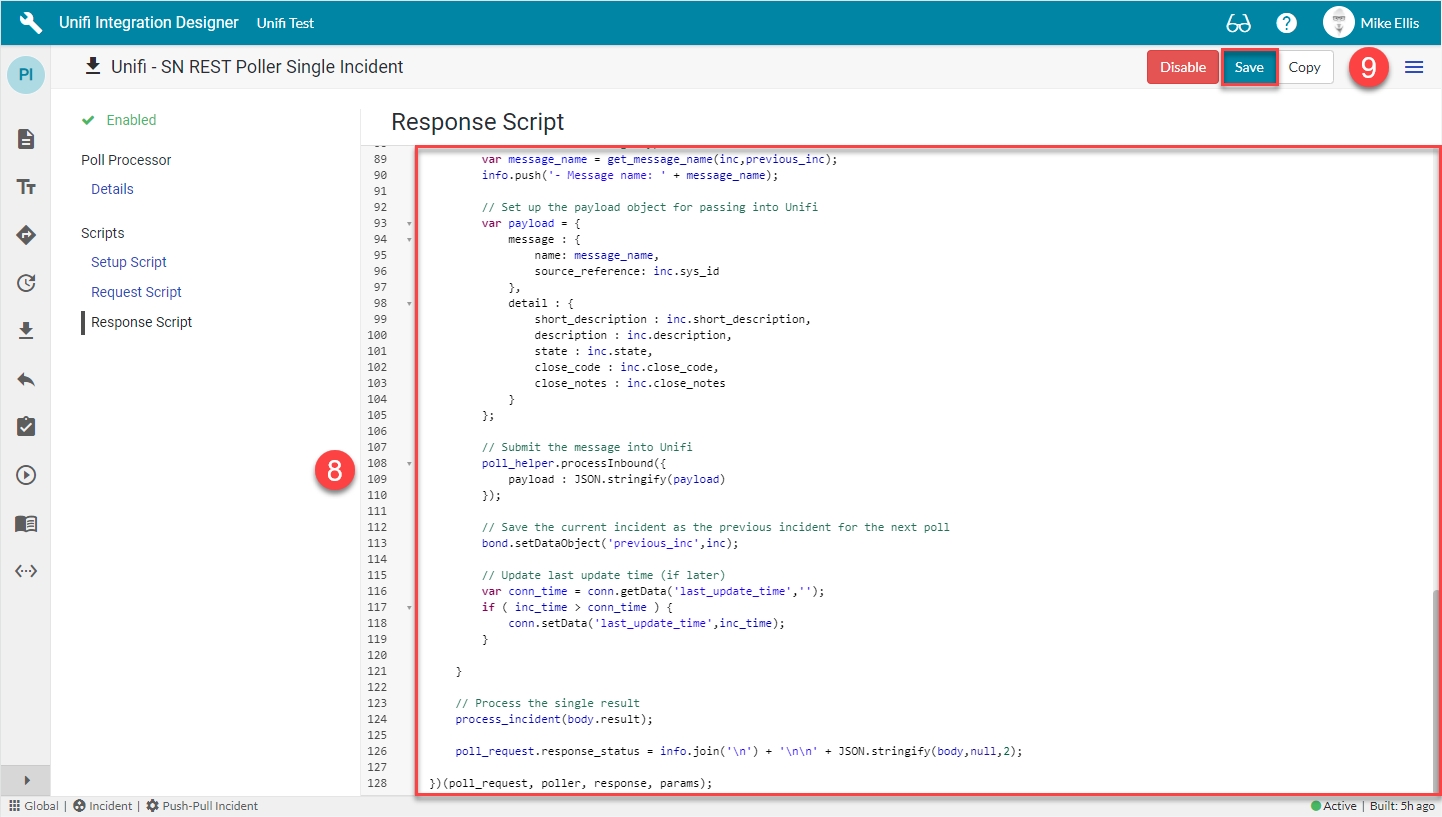
The Response Script is used to process the information returned from the remote system. We will pass this data to Unifi, telling it which Message to use to process the data.
The last Poll Processor field to be configured is as follows:
The code in the Response script field should look like this:
Response script: This script parses the response into a body object to contain the result, (returning if it doesn't contain anything).
It then sets up some objects to help us; these include the essential PollHelper() function (which we initialise from the poll_request) along with two other functions: get_bond() to find the Bond for an Incident & get_message_name() to work out the message type to send to Unifi based upon the change of state.
After that it processes the passed in ticket - logging the incident number & time, finding the bond & returning any previous data stored on the bond, deciding which Message to use, setting up a payload object and submitting it to Unifi by calling the processInbound() method. It then saves the current incident as the previous incident for the next poll & checks whether the ticket was updated later than the last update time; if so, it sets and stores the last update time as that 'sys_updated_on' value (this 'last_update_time' is what the Setup script checks against when defining what the Poll will do).
After processing the single result, it is logged to the Response status field of the Poll Request.
Essential code: the following lines of code must be included in the response script to enable Unifi
Payload object: We have chosen to structure the payload object (var payload) as we have. There is no obligation to keep the same structure. Yours can be defined to suit your requirements.
Message name: Unifi needs to know the message name in order to know how to process the inbound request. We can either set it in the payload (as we have), or declare a variable that sets it which is passed into the processInbound() function along with the payload. (Unifi will always check processInbound() first. If no Message name is set here it will use the 'Identify message script' on the Integration).
Your Response Script form should look like this:
Save the Poll Processor.
Now let's move on and configure the Child Poller.
Congratulations on using this Parent and Child Poller Guide to successfully poll your PDI for updates - passing relevant data between Pollers, deciding which Messages to use to process that data.
This Guide has shown us how we might configure a parent and child poller integration - polling data from the table API of a Personal Developer Instance (PDI) in two stages - an initial light poll, periodically scanning for updated records and a subsequent, on-demand poll, pulling back more detail from the relevant records and deciding how to process that data with the relevant inbound Messages. As such, we created the following records:
Child Poll Processor
Child Poller
Parent Poll Processor
Parent Poller
In testing our integration, we created some incidents in the remote instance which were bonded. We then updated the bonded records from both instances (polling for updates each time). We successfully proved that we were only querying bonded records, pulling back updates made in the remote instance since the last update time, only retrieving a select number of fields. For each returned record, more detailed child Poll Requests were triggered, generating transactions for each updated ticket.
We also proved that we were able to store previously returned records in order to facilitate comparison & enable the decision as to which Message to use to process the data - successfully telling Unifi which Message to use.
By Using the Unifi integration platform, we have discovered that building and testing our integration is simpler and more efficient, saving both time and money. Our hope is that this Guide has been a valuable aid to you in that process.
For further information please see our .
If you have any feedback or questions, please contact us via our website .
Follow these steps to test the ResolveIncidentInbound Message.
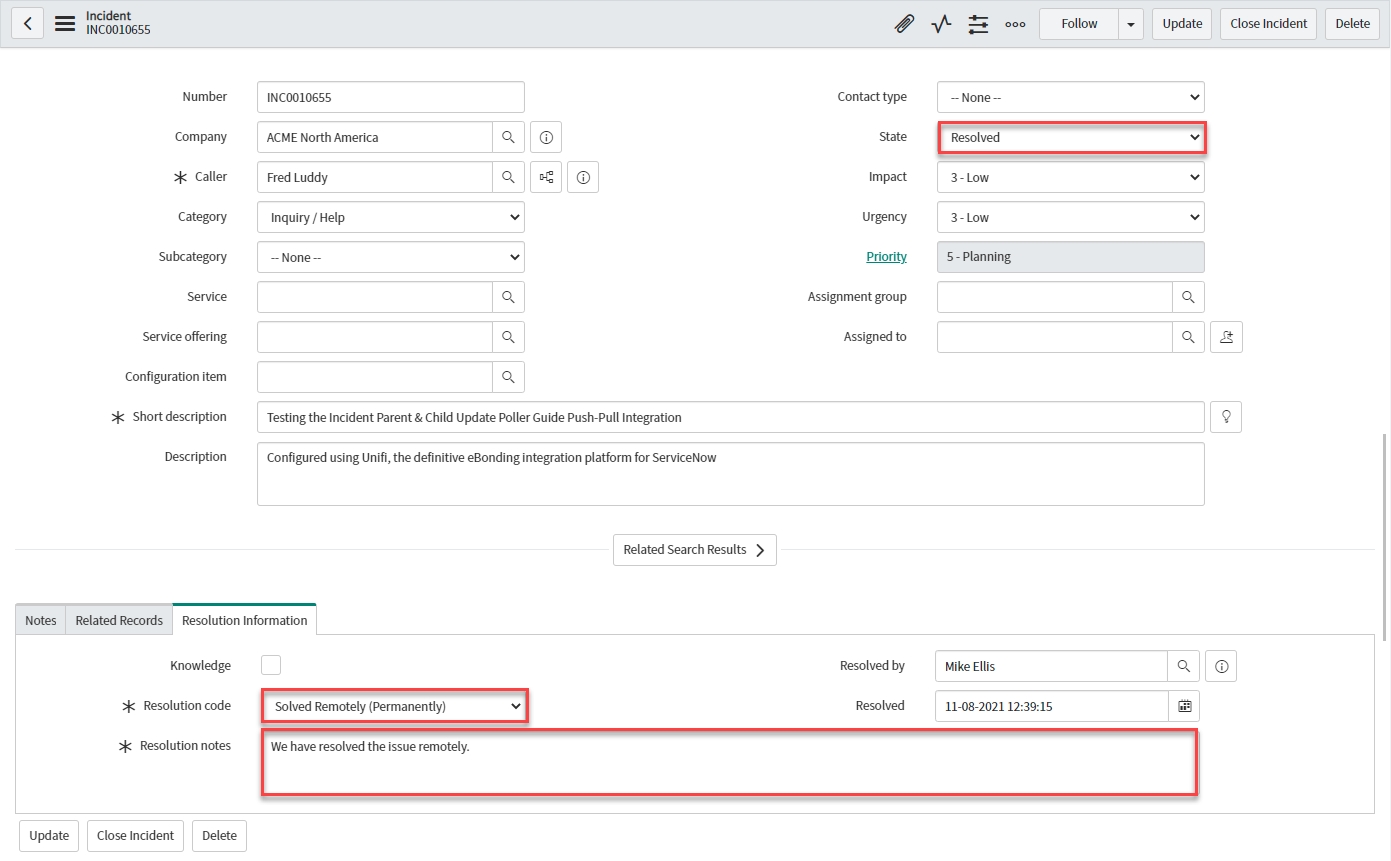
In the remote instance (your PDI), navigate to < Your Incident > created in the earlier test.
Update the Incident record as follows:
| Field | Description | Value |
|---|
Your Incident record should look like this:
Right-click & Save.
Back in the originating instance, navigate to & open < Your Poller >. Click Execute Now.
Open the corresponding Child Poll Request & confirm that the Incident was found (and the Message name was ResolveIncidentInbound) & Notice the incident_id passed in as a parameter:
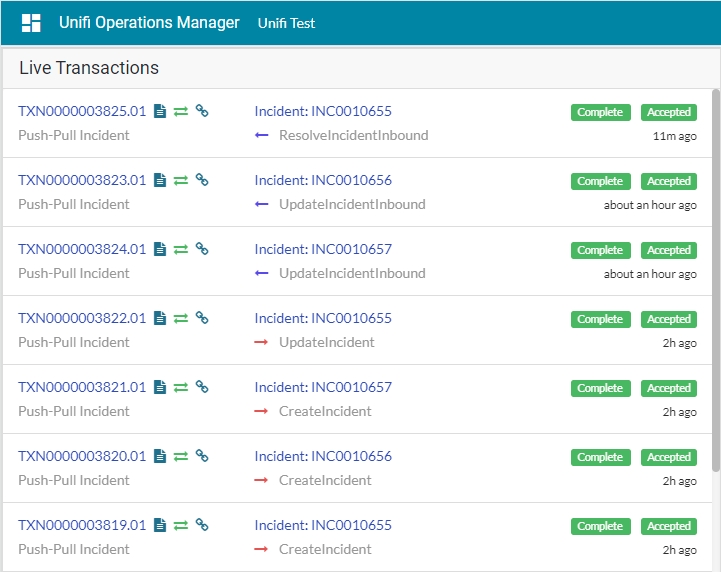
View the Transactions that have been sent. This can be done either in Native ServiceNow, or in Unifi Operations Manager.
Navigate to Unifi > Transport > Transactions.
Navigate to Unifi > Unifi Operations Manager.
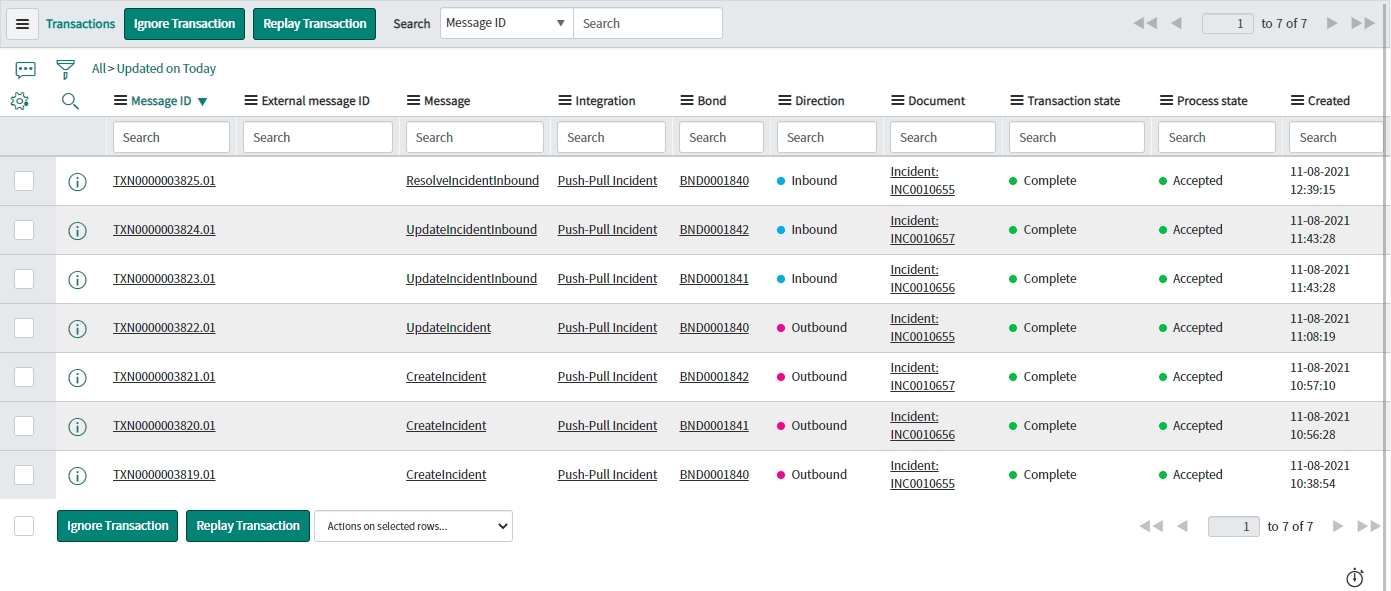
We can see that the ResolveIncidentInbound message has been received, is Complete & Accepted and displays the relevant Incident & Bond numbers.
Confirm the Transaction has updated the bonded ticket in the originating instance:
We can see that the State, Resolution code & Resolution notes have been updated on the bonded ticket.
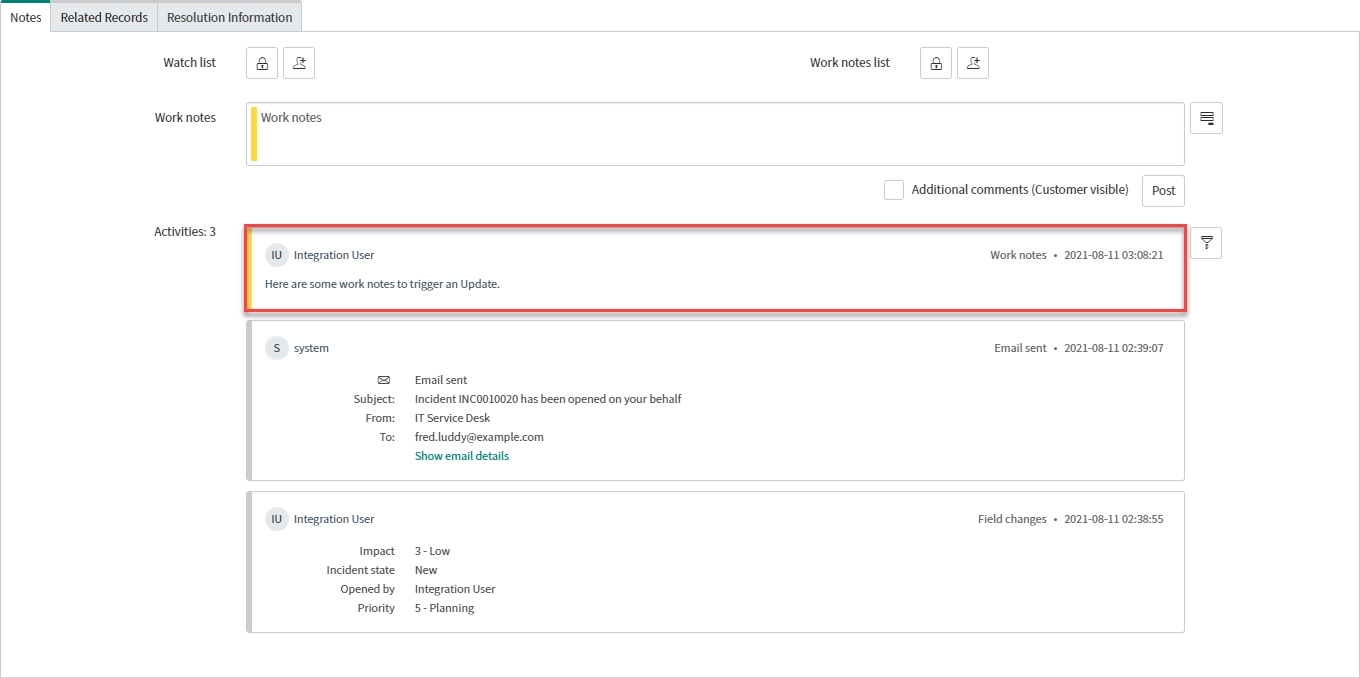
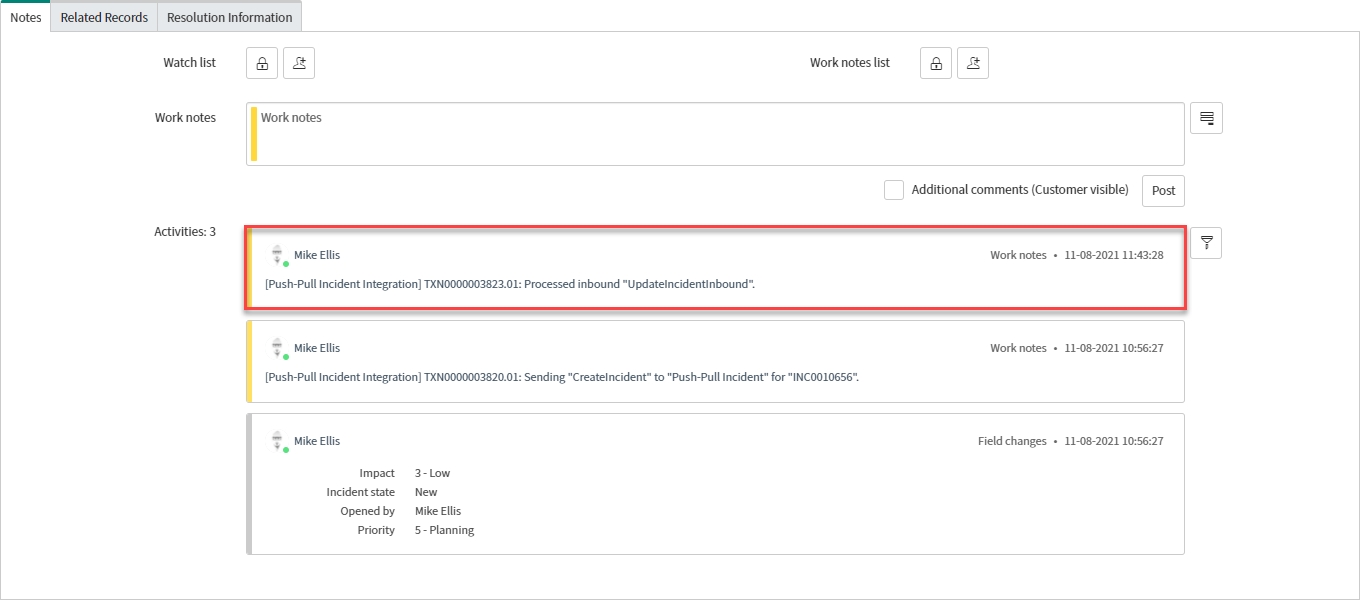
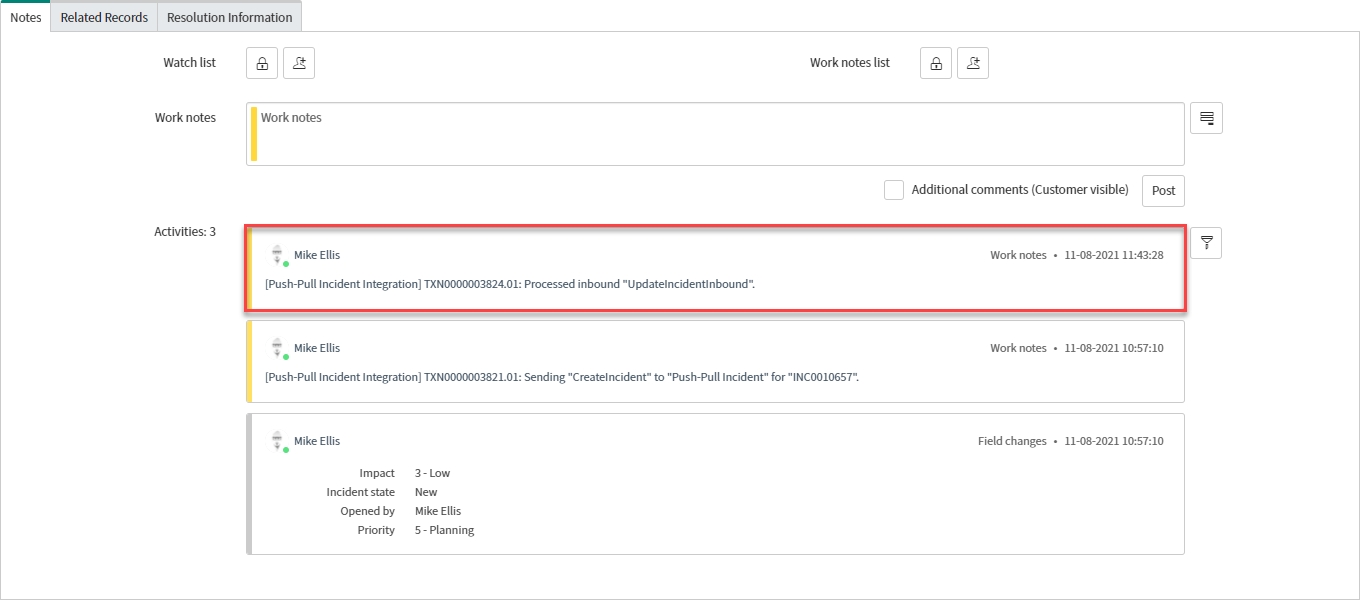
Navigate to the Notes tab to view the Activities stream:
We can see that the update has also been logged in the Activities stream.
A Poller is a configuration record which defines the frequency of polling and which logic to use.
A Poller is a configuration record which defines the frequency of polling and which logic to use (the logic itself is defined in the Poll Processor). Each time it is run, it creates a corresponding Poll Request record.
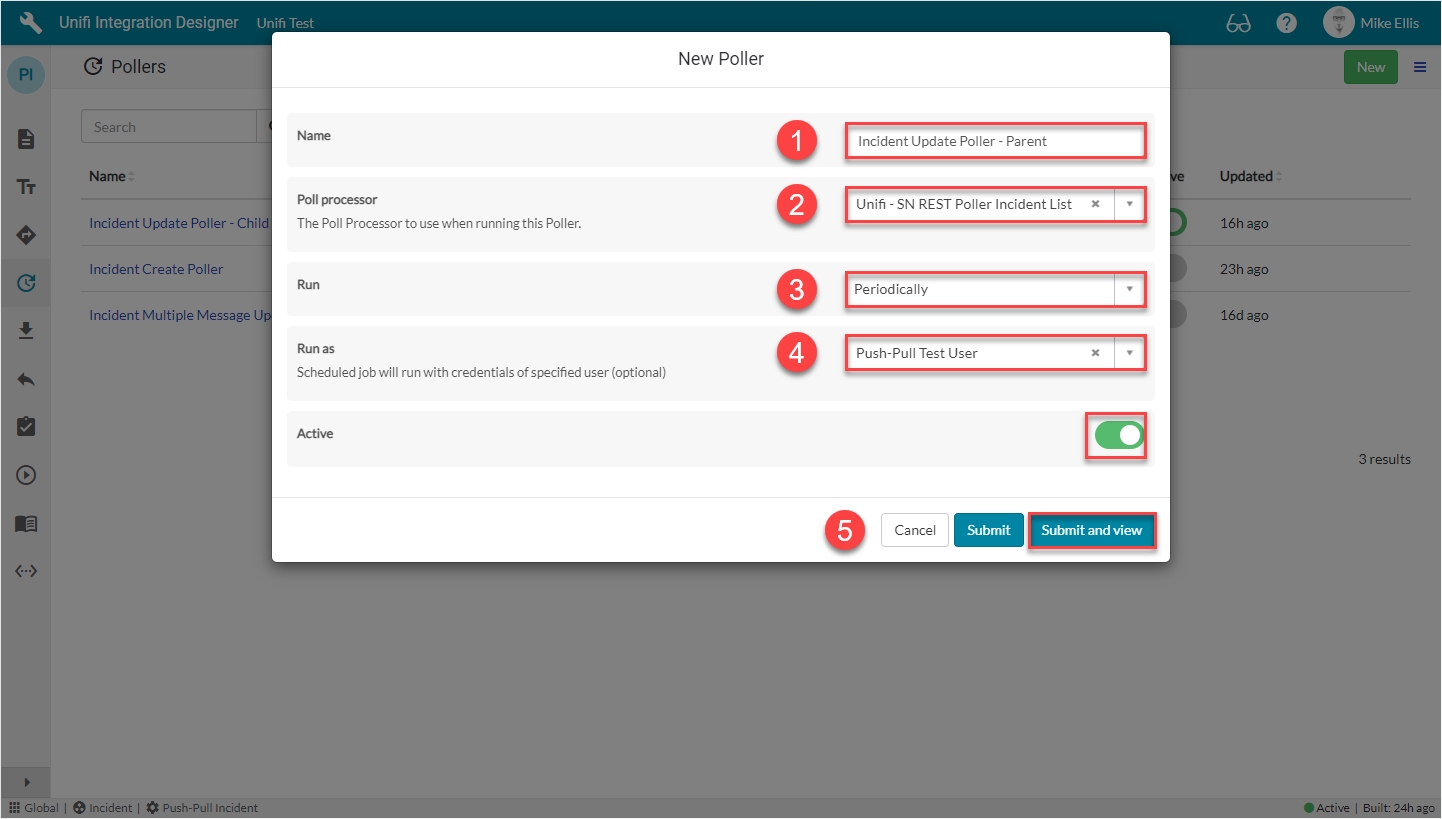
Click the 'Pollers' icon & then New.
The fields to be configured for our Poller record are as follows:
| Field | Description | Value |
|---|
*These fields are mandatory, or automatically defaulted to true.
Your New Poller modal should look like this:
Submit and view to further configure the Poller.
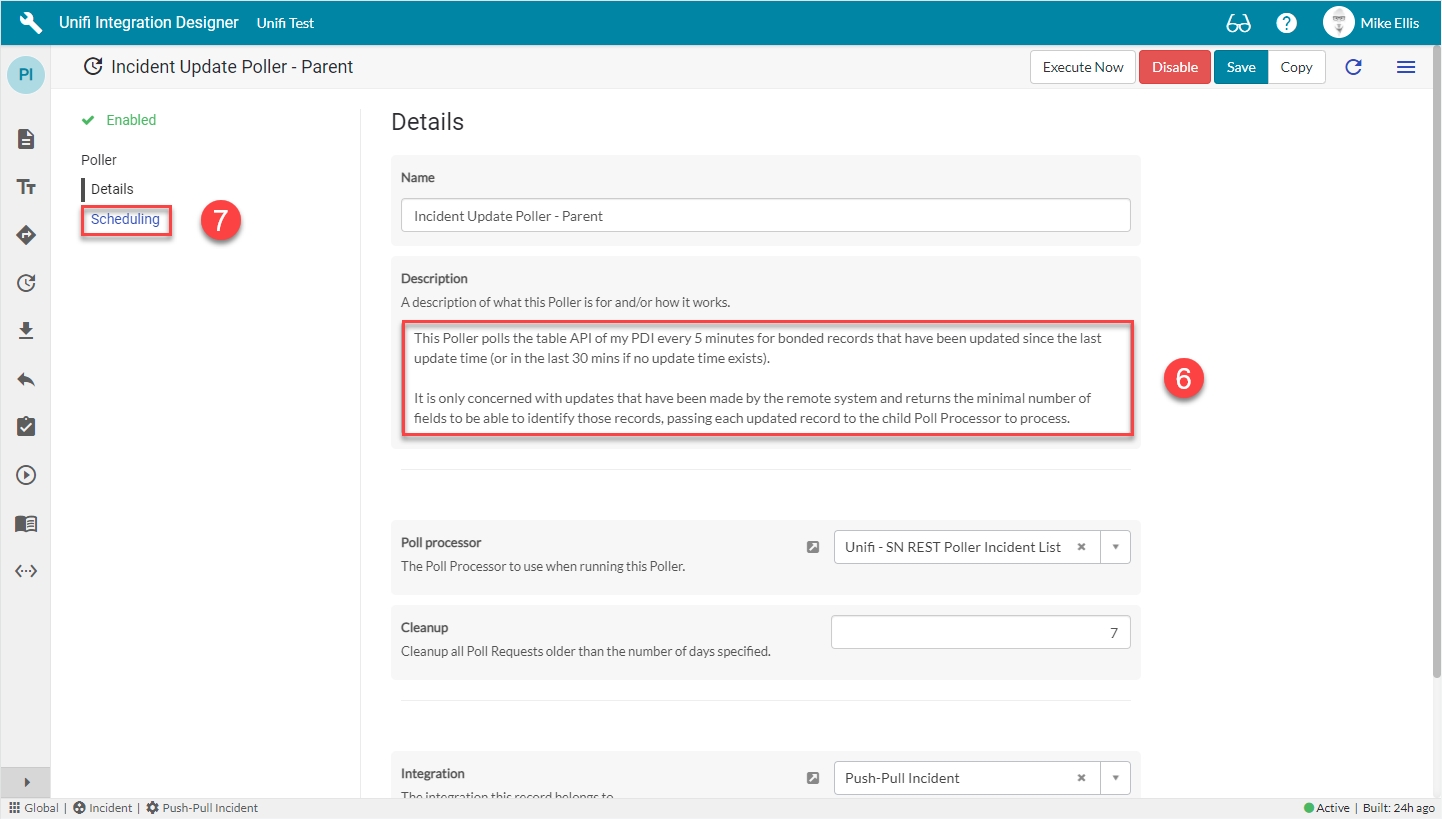
The fields to be configured for the Details form are as follows:
Your Details form should look like this:
Navigate to Scheduling.
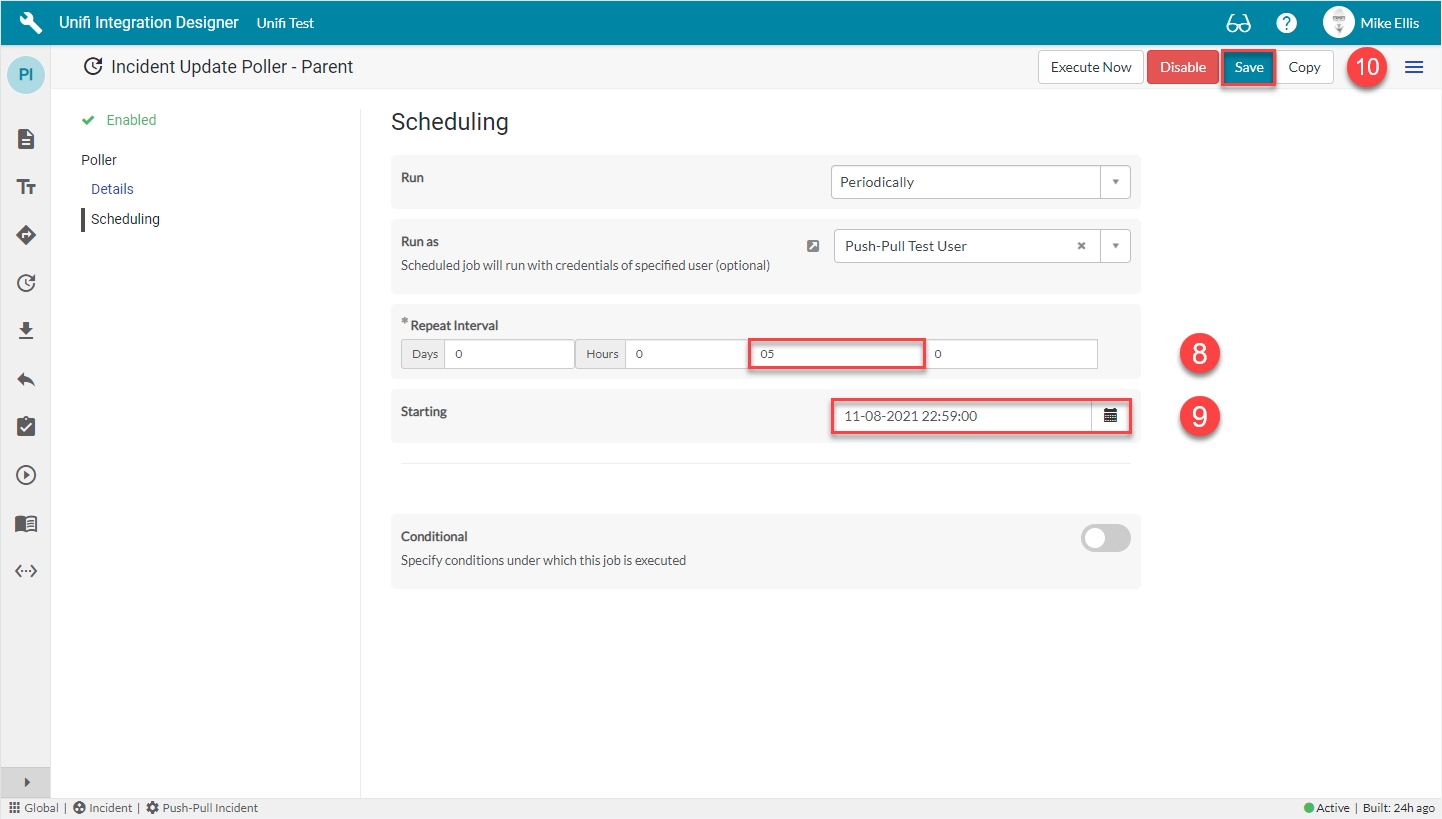
The fields to be configured for the Scheduling form are as follows:
*This field is mandatory.
Your Scheduling form should look like this:
Save the Poller.
In order to process the inbound Requests, we will utilise already configured Inbound Messages.
Follow these steps to test the UpdateIncidentInbound Message.
To test our integration we will need some bonded tickets in the remote instance. If there aren't any already in place, then they'll need to be created.
In native ServiceNow, navigate to Incident > Create New.
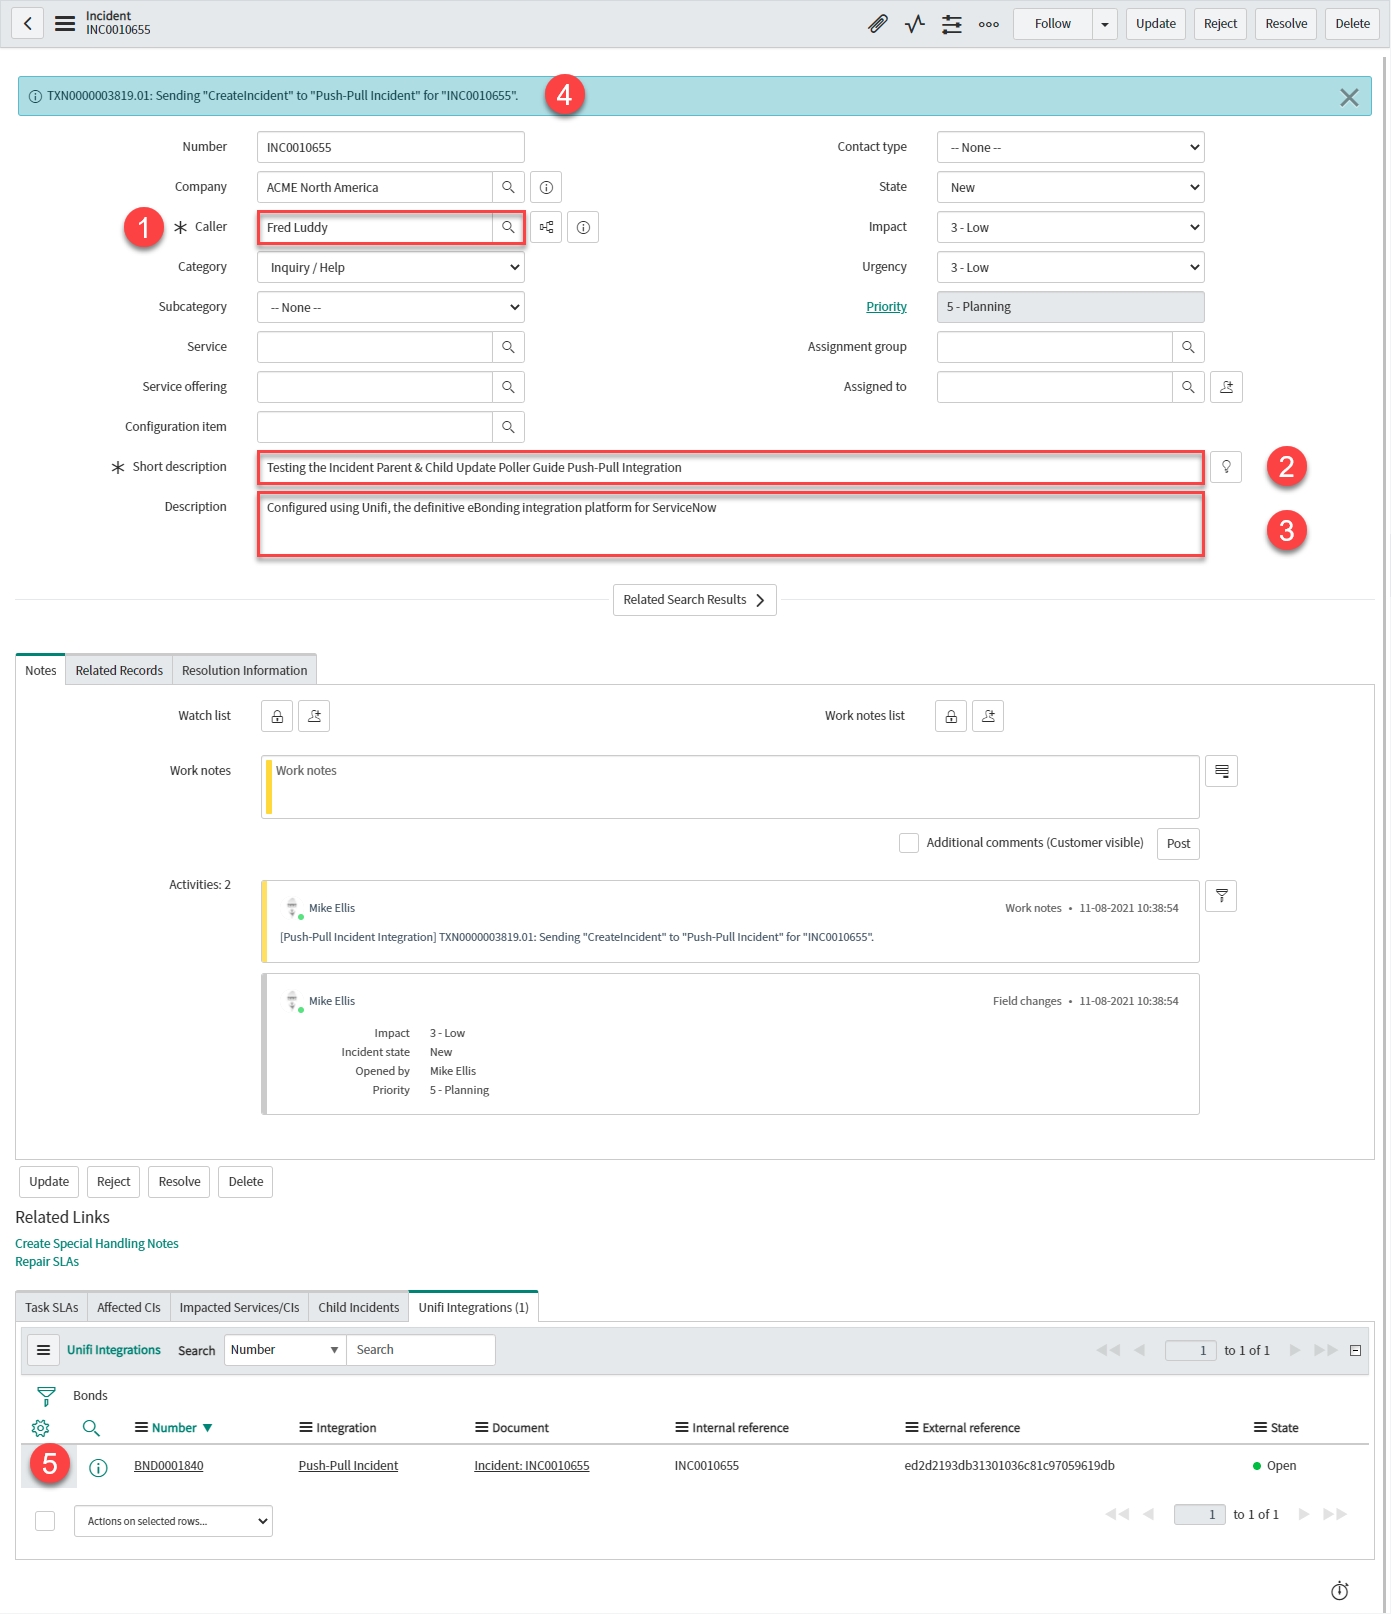
The Incident fields to configure are as follows:
| Field | Description | Value |
|---|
Though the CreateIncident Message has been configured to map more than just the Short Description & Description fields, we have only filled these fields because that is all whe have included in the payload of our Poller.
Your Incident form should look like this:
Note the Info Message confirming the CreateIncident Message is being sent to your Integration.
Note the Bond is 'Open' and both the Internal & External reference are in place.
Repeat as necessary so that there are two or three bonded tickets in the remote instance:
Update one of the bonded tickets in the originating instance to cause the UpdateIncident Message to fire:
View the Transactions that have been sent. This can be done either in Native ServiceNow, or in Unifi Operations Manager.
Navigate to Unifi > Transport > Transactions.
Navigate to Unifi > Unifi Operations Manager.
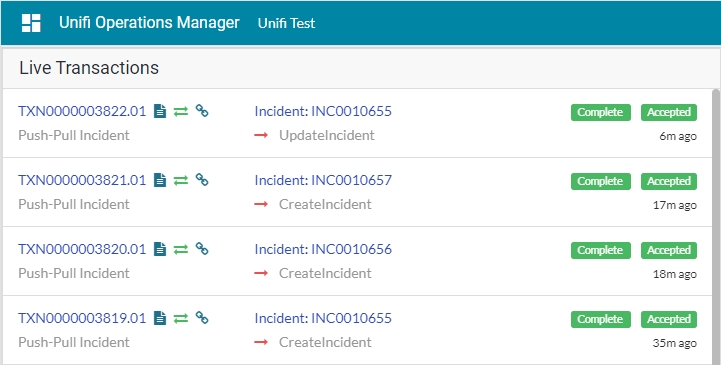
We can see that the three CreateIncident messages & one UpdateIncident message have been sent. All are Complete & Accepted & display the relevant Incident & Bond numbers.
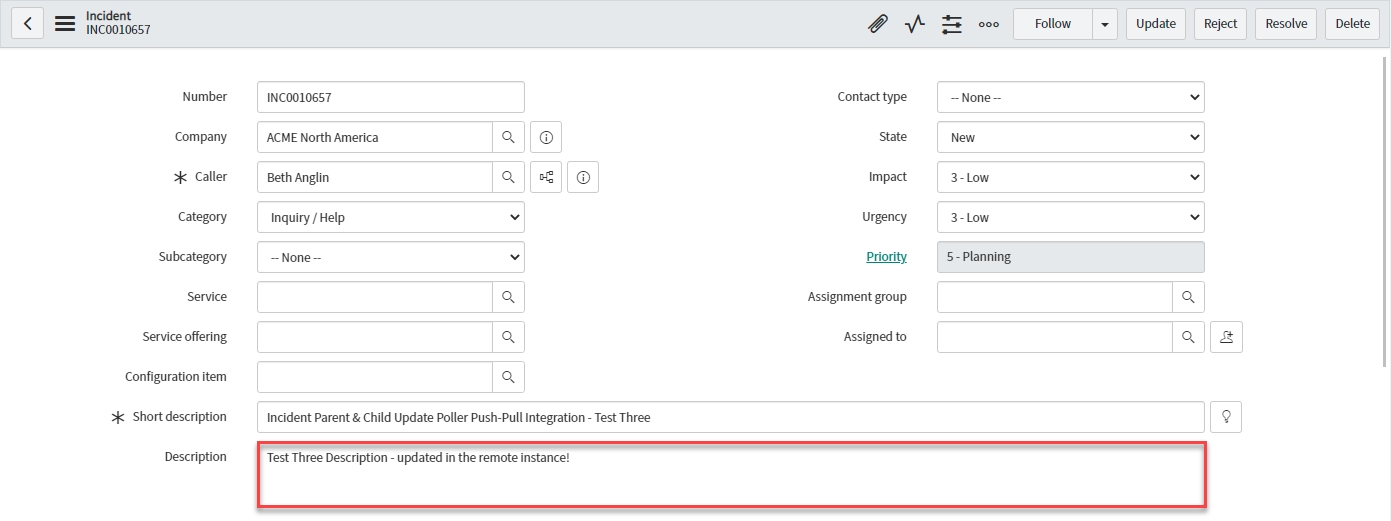
Confirm the Transaction has updated the bonded ticket in the remote instance:
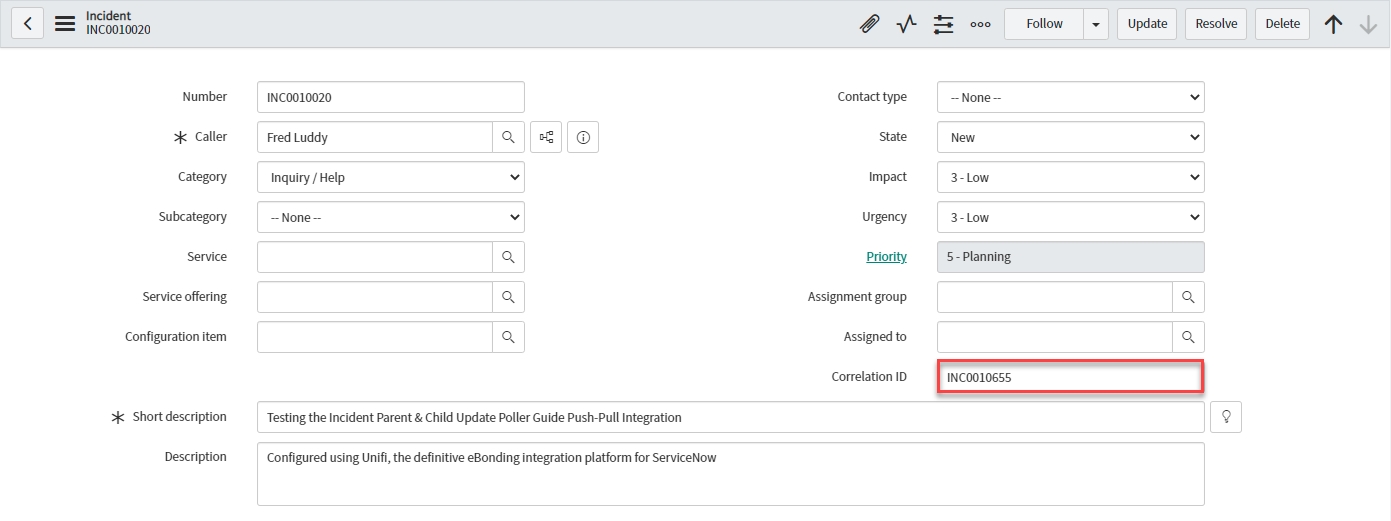
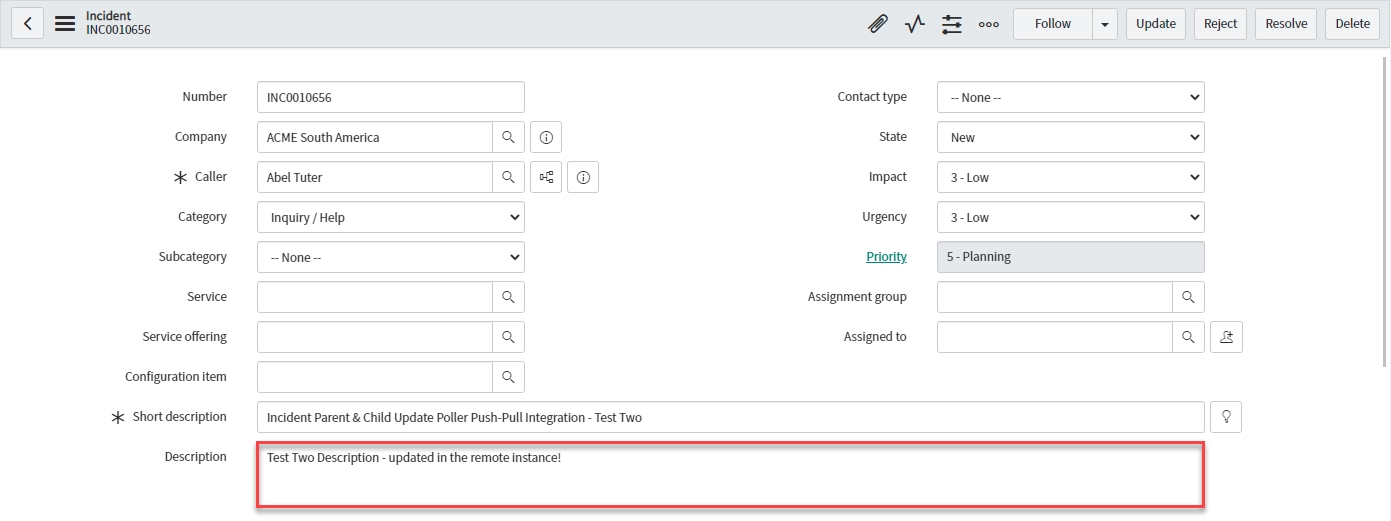
We can see that the update has reached the bonded ticket (& that the correlation id matches the outbound Incident number)
In Unifi Integration Designer, click on the 'Pollers' icon. Navigate to & open < Your Parent Poller > (created earlier).
Click Execute Now:
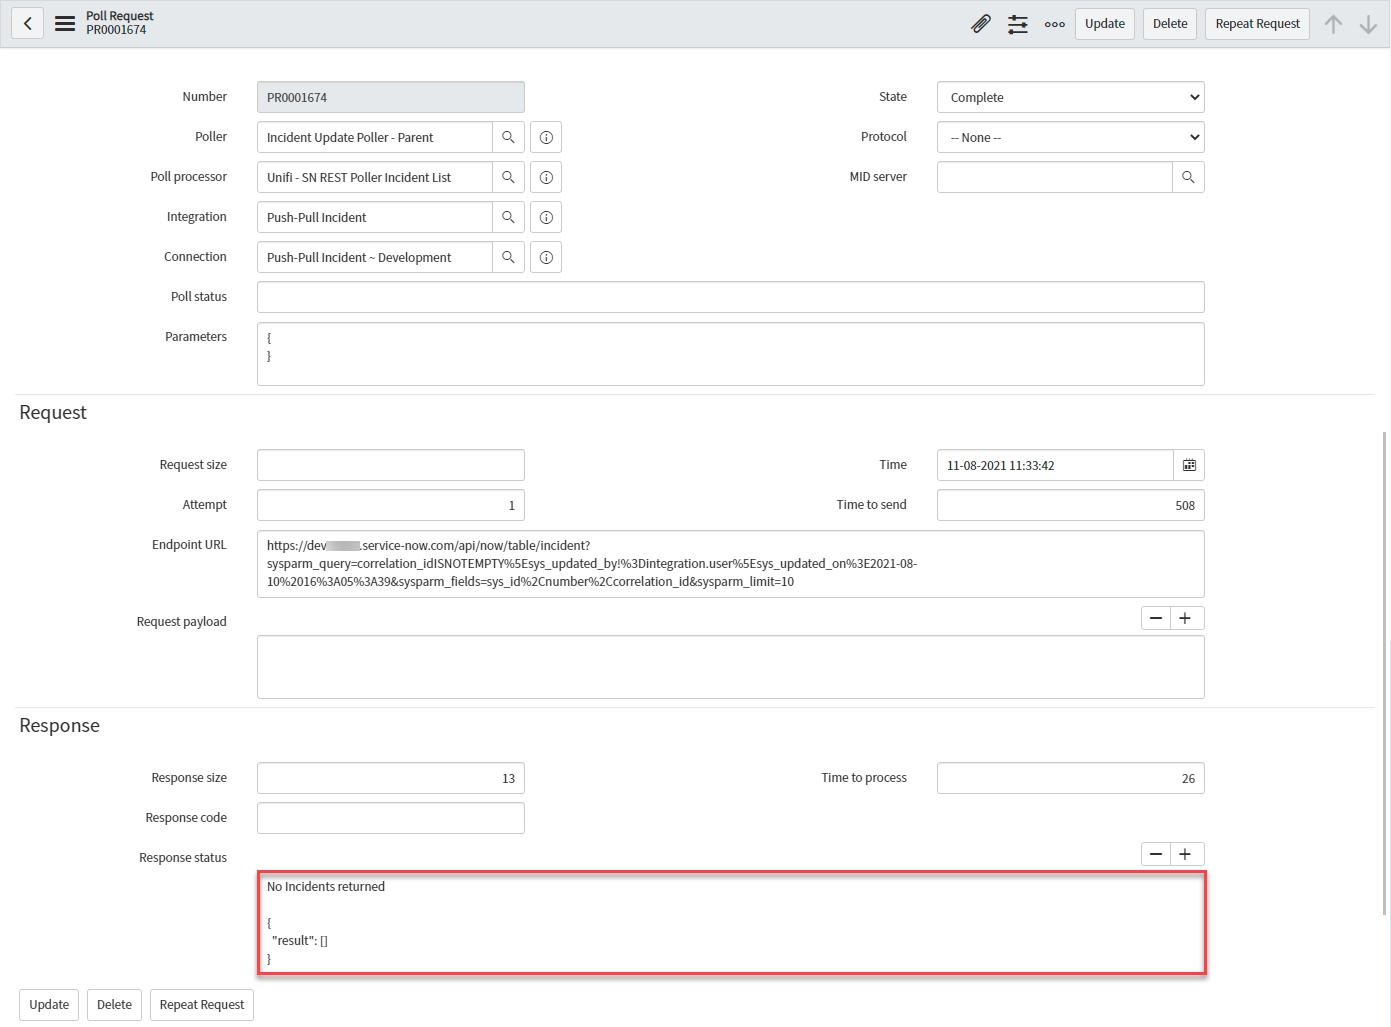
In native ServiceNow, navigate to Unifi > Polling > Poll Requests. Click to Open & view the generated Poll Request. Confirm that no Incident was found (this is exactly as we expect because we are only polling for updates made by the remote instance):
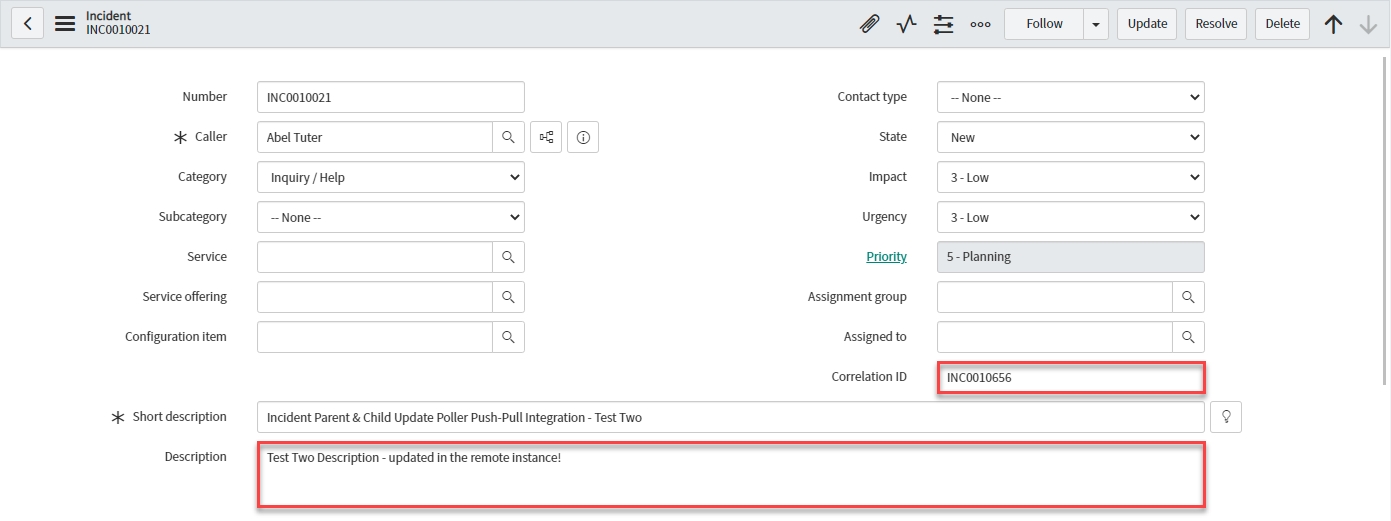
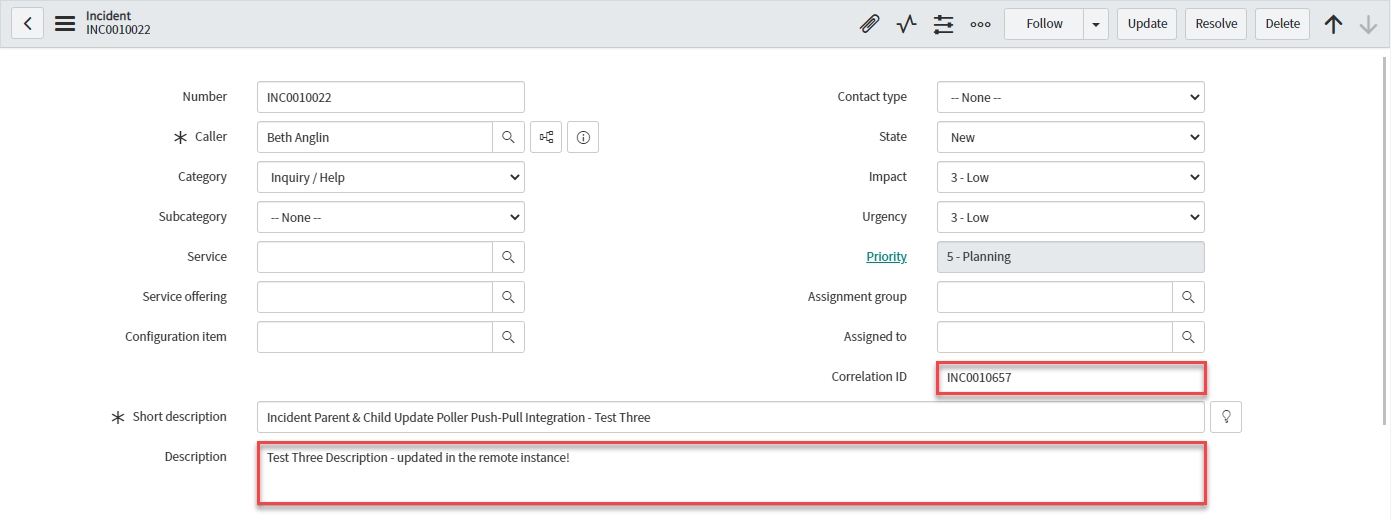
in the remote instance, update two of the bonded tickets in turn.
Updates have been made to the Description field only. Correlation ID is highlighted for us to identify the correct bonded ticket).
Back in the originating instance, navigate to & open < Your Poller >. Click Execute Now.
Open the corresponding Parent Poll Request & confirm that both Incidents were found (and only those) and that subsequent child Poll Requests were also triggered:
Notice the Parent & Child Poll Requests:
Open each of the corresponding Child Poll Requests & confirm that the Message name was UpdateIncidentInbound.
View the Transactions that have been sent. This can be done either in Native ServiceNow, or in Unifi Operations Manager.
Navigate to Unifi > Transport > Transactions.
Navigate to Unifi > Unifi Operations Manager.
We can see that two UpdateIncidentInbound messages have been received. Both are Complete & Accepted & display the relevant Incident & Bond numbers.
Confirm the Transactions have updated the bonded tickets in the originating instance.
For completeness, to prove we are only querying and pulling back data from bonded records, update an incident in the remote system which isn't bonded (Correlation ID is empty) & run the Poller again.
What do you expect to happen?
Next, we shall test the ResolveIncidentInbound Message.
The Poll Processor contains the logic that will be applied when polling a remote system for data.
The Poll Processor is a configuration record which contains the logic that will be applied when polling a remote system for data. There are three main scripts which are used to setup, execute and process the Poll Requests. The scripts given here are examples of how you might configure your Poll. The details of yours may differ depending on your requirements.
This parent Poll Processor will pull back a list of the relevant records (polling enough data to identify the records). Each record it identifies will be passed on to the child Poll Processor.
In Unifi Integration Designer, navigate to & open < Your Integration > (created following the Outbound Incident Guide).
Click the 'Poll Processors' icon & then New.
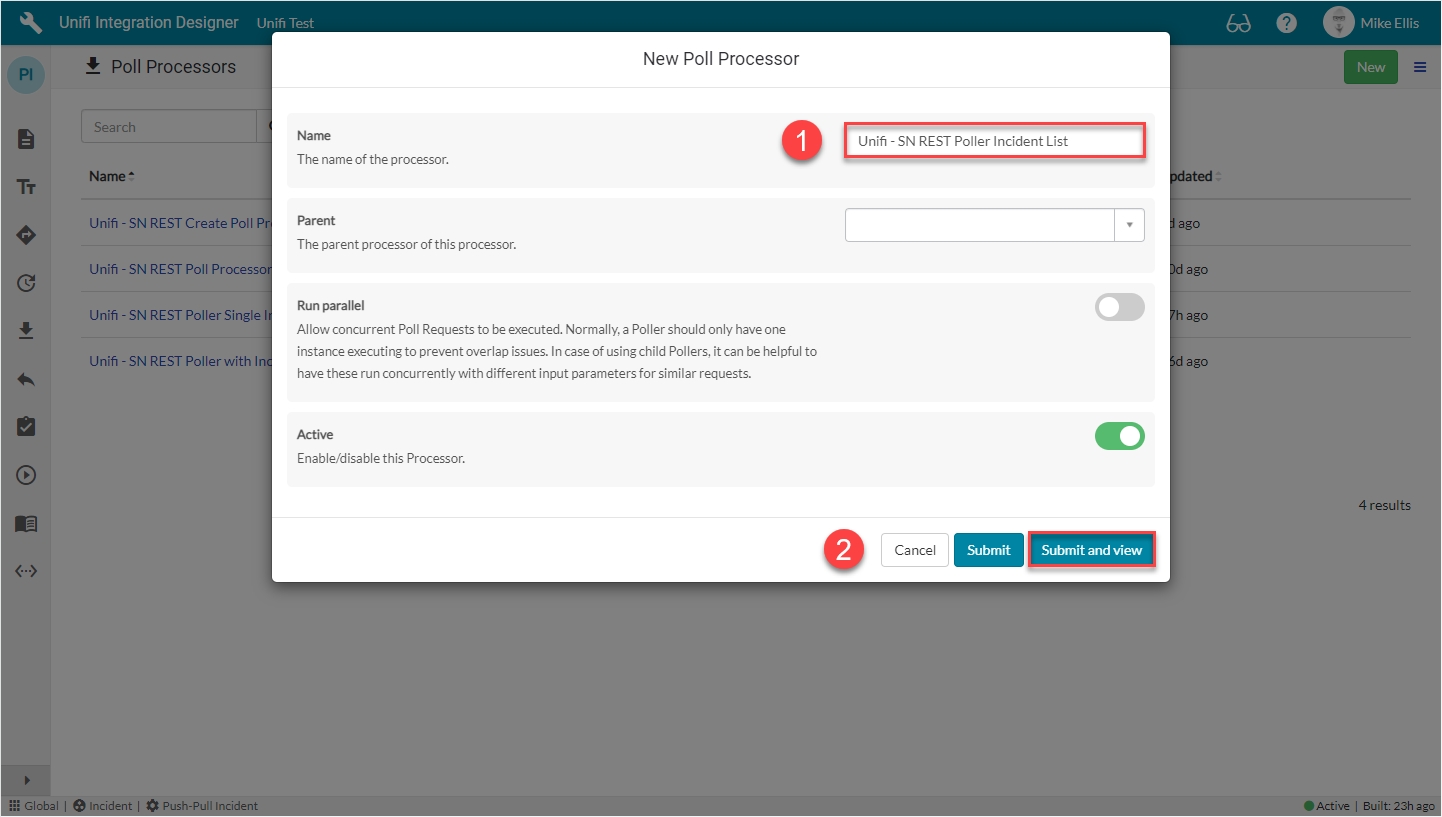
The fields to be configured for the New Poll Processor modal are as follows:
| Field | Description | Value |
|---|
Your New Poll Processor modal should look like this:
Submit and view to further configure the Poll Processor.
The Setup Script is the first script to run (it runs at the point in time the Poll Request is created). It is used to build the environment for the poll and define what it will do. We will use it to setup the URL that will be called.
Navigate to Scripts > Setup Script.
The initial Poll Processor fields to be configured are as follows:
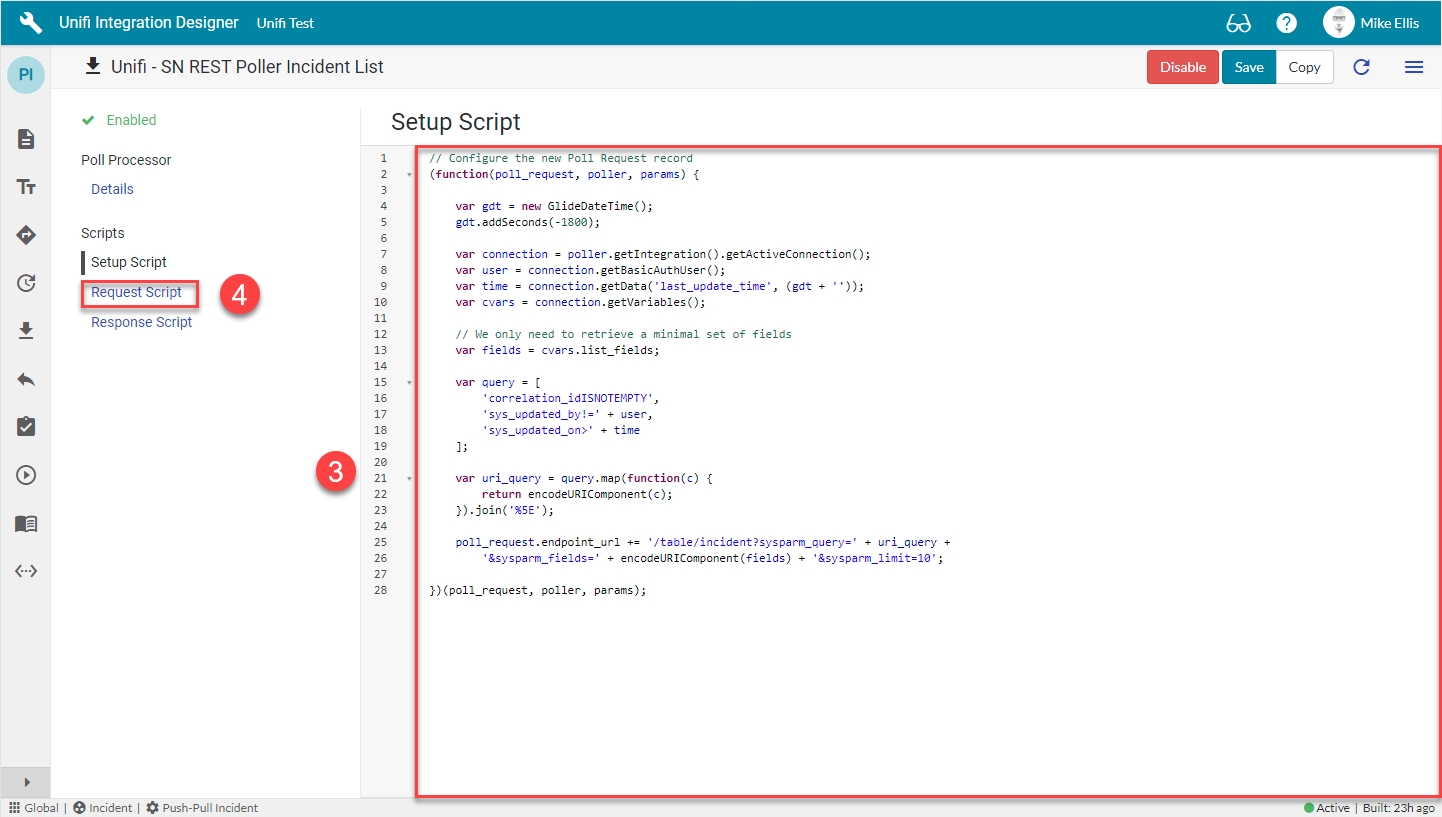
The code in the Setup script field should look like this:
Setup script: The parameters for which data to return are contained in the endpoint url.
fields: The table API will return all the data by default, so we choose to deliberately limit what is returned to the fields listed in this variable.
query: Instead of querying all the records on the remote instance, we deliberately limit the records to those where the correlation id is not empty (i.e. it's bonded), that haven't been updated by the Authentication user (our system) and that were updated since either since the last update time (if one exists), or in the last 30 minutes.
Endpoint URL: The value used in the poll_request.endpoint_url was initially generated using the ServiceNow REST API Explorer, substituting variables in for the uri query and fields. This value is appended to the existing endpoint url in the active connection before being added to the Poll Request.
(We have also chosen to limit the number of records returned to 10.)
Your Setup Script form should look like this:
Navigate to Request Script.
The Request Script is used to reach into the remote system and execute the request. We will use the ServiceNow RESTMessageV2() web service to make a REST call to the URL defined in the Setup Script.
The next Poll Processor field to be configured is as follows:
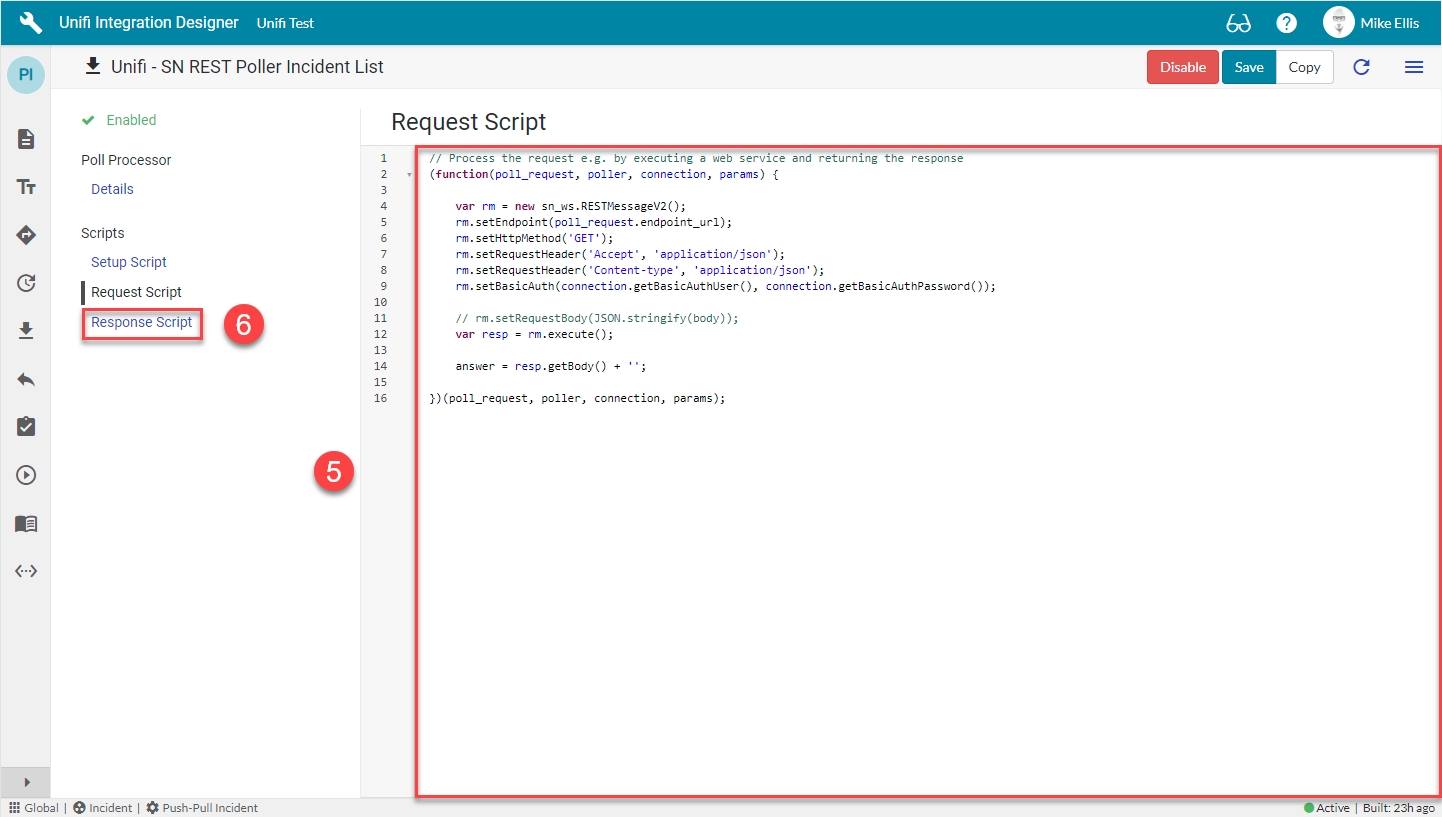
The code in the Request script field should look like this:
Request script: This script uses the ServiceNow RESTMessageV2() web service to make a REST call to the endpoint url created in the Setup script. It returns the body of the request as the answer which it passes to the Response script_._
Your Request Script form should look like this:
Navigate to Response Script.
The Response Script is used to process the information returned from the remote system. We will pass this data to Unifi, telling it which Message to use to process the data.
The last Poll Processor field to be configured is as follows:
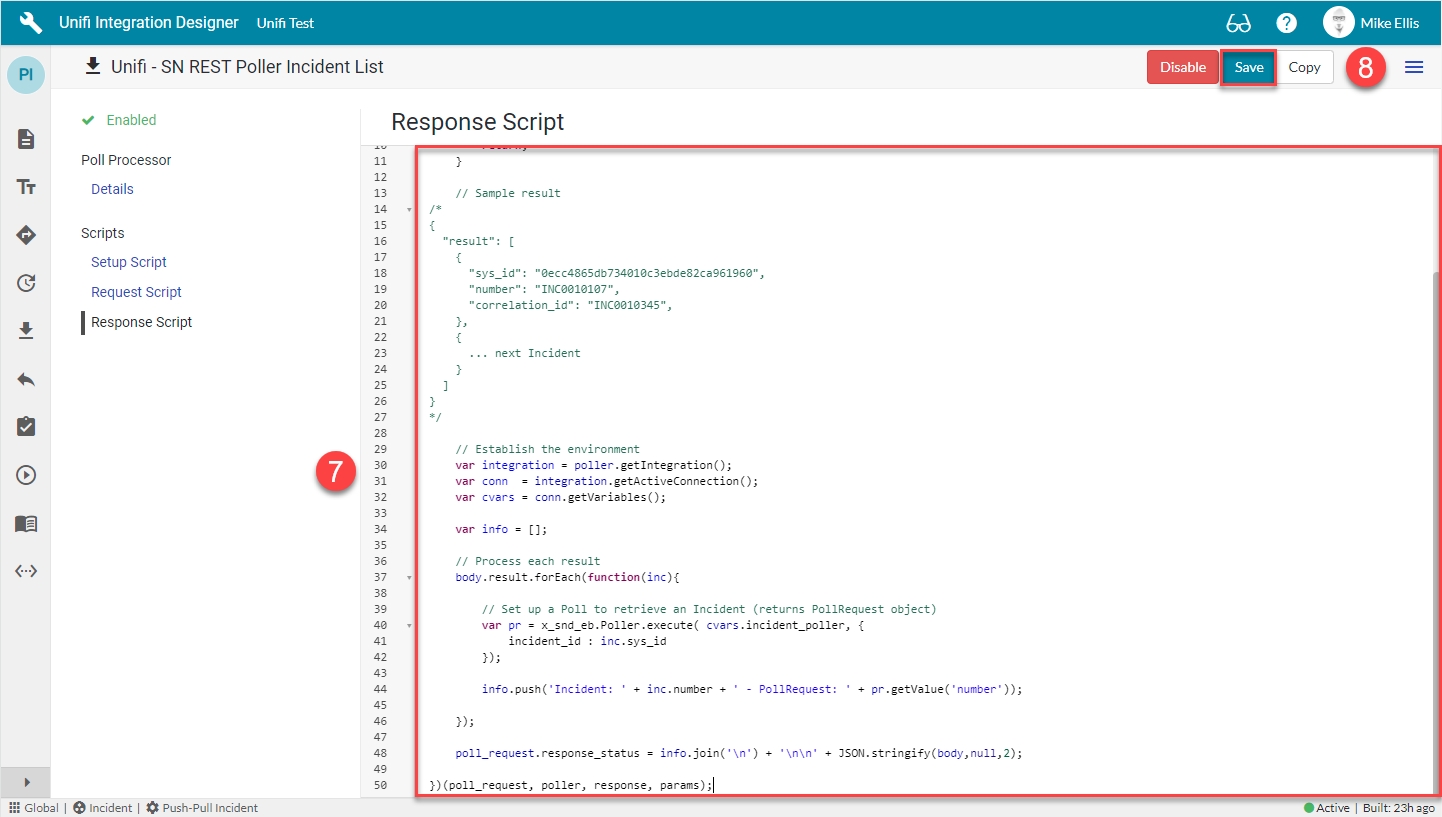
The code in the Response script field should look like this:
Response script: This script parses the response into a body object to contain the result, (returning if it doesn't contain anything).
It then establishes the environment, getting the Integration, Connection & Connection Variables.
After that it processes each of the results (returned tickets). For each ticket, it sets up a Poll Request to retrieve an Incident (returning a PollRequest object).
After processing each result, the results are logged to the Response status field of the Poll Request.
params: The params object is passed through to the subsequent scripts (and on to further Pollers, if required). This is used to pass the incident_id to the child Poller.
Your Response Script form should look like this:
Save the Poll Processor.
Remember, We have not scripted any business logic to run from the value in the Parent field. It is given for documentary purposes only (for you to easily identify which parent Poll Processor kicked off the child).
Now let's move on and configure the Parent Poller.
| Field | Description | Value |
|---|---|---|
| Field | Description | Value |
|---|---|---|
| Field | Description | Value |
|---|---|---|
| Field | Description | Value |
|---|---|---|
| Field | Description | Value |
|---|
| Field | Description | Value |
|---|
| Field | Description | Value |
|---|
Note: We have included the /table/incident element of the endpoint url because we used the truncated url in the Connection when following the . If you have used the full url there, then this element can be excluded here.
| Field | Description | Value |
|---|
| Field | Description | Value |
|---|
x_snd_eb.Poller.execute(): This method has two parameters. In the first we pass the sys_id of the child Poller (as created on the '' page). In the second we pass an object containing the sys_id of the returned Incident as the incident_id element (telling the Poller which record to poll).
Navigate to and open < Your Child Poll Processor > (created on the '' page) and update the value of the Parent field by selecting the parent Poll Processor created above.
Description
A description of what this Poller is for and/or how it works.
<Your description>
Setup script
The script to setup the Poll Request record.
Update the code in the Setup script field so that it looks like the code below
Request script
The script that executes the request.
Update the code in the Request script field so that it looks like the code below
Response script
The script that processes the response to the request.
Update the code in the Response script field so that it looks like the code below
Description | A description of what this Poller is for and/or how it works. | <Your description> |
Repeat interval* | The interval at which the Poller should repeat. | '05' (Minutes) |
Starting | The date/time the Poller should start. | <Your Start date/time> |
Setup script | The script to setup the Poll Request record. | Update the code in the Setup script field so that it looks like the code below |
Request script | The script that executes the request. | Update the code in the Request script field so that it looks like the code below |
Response script | The script that processes the response to the request. | Update the code in the Response script field so that it looks like the code below |
Name*
The name of your Poller.
<Your Name>
Poll processor*
The Poll Processor to use when running this Poller.
<Your Poll Processor>
Run
The frequency at which the Poller should run.
'On Demand'
Run as
Poller will run with credentials of specified user.
<Your Inbound user> (from Connection)
Active*
Set to true to use this Poller record for processing.
<true>
Name
The name of the Processor.
<Your Name>
Run parallel
Allow concurrent Poll Requests to be executed.
<true>*
State | The Incident lifecycle state. | ‘Resolved’ |
Resolution code | The Incident resolution code. | <Your Resolution code> |
Resolution notes | The Incident resolution notes. | <Your Resolution notes> |
Name* | The name of your Poller. | <Your Name> |
Poll processor* | The Poll Processor to use when running this Poller. | <Your Poll Processor> |
Run | The frequency at which the Poller should run. | 'Periodically' |
Run as | Poller will run with credentials of specified user. | <Your Inbound user> (from Connetion) |
Active* | Set to true to use this Poller record for processing. | <true> |
Caller | Person who reported or is affected by this incident. | <Your Caller> |
Short description | A brief description of the incident. | <Your Short description> |
Description | Detailed explanation on the incident. | <Your Description> |
Name | The name of the Processor. | <Your Name> |

